No, I don’t need another fly tying vise, especially one that possesses a nose bleed price.
I had been an extra good fellow this year, and therefore opted to treat myself to the last vise I’ll ever buy. A thousand dollars is my limit for any fly fishing item, and the speed with which prices are climbing suggests I’ll soon be unable to buy them entirely, as I avoid paying nose bleed prices for anything that isn’t rare or antique.
Once the price point on any any fly fishing item approaches a thousand dollars, technical detail and feedback is necessary to determine function, value, and its ranks among peers, and the fly fishing industry does a miserable job of giving us good information other than, “it’s awesome.”
Fly shops and the mainstream media are incapable of giving us real reviews of products for fear of offending manufacturers simply because they didn’t use enough superlatives … ending their supply of gifted freebies to review, and leaving us independent louts to do all the heavy lifting.
What I cannot do, is tell you whether this is the best fly tying vise ever … That type of rigor requires owning all of the vises of similar repute and quality, and then doing an exhaustive analysis of the features and foibles of each.
What I can do, is run 10 or 12 dozen trout flies through the Excalibur, which will be enough for me to find many of its attributes and flaws, and formulate some solid information and impressions of its performance to help you decide whether the high price of the vise is warranted – for you. I will follow up with another review in six months, once I’ve had the opportunity to add bass and striper flies (big flies and larger sizes) to the mix.
What possessed me to purchase this vise?
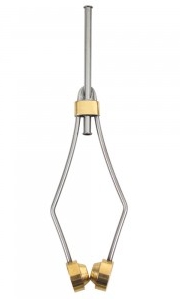
I have two other high quality vises and and wanted one of the newer “offset” style vises. “Offset” being my term for a vise whose jaws are removed from the stem or upright, and are several inches from the centerline of the vise. Offset vises use less force to tighten the vise jaw, and have a smaller handle commensurate with this reduction in effort. The mechanics of the jaw closure and adjustment are the same as traditional vises, offset vises simply do it with less effort.
I hoped that this design might offer some new advantages than the centuries old standard we’ve used for so long.
Why buy a rotary vise if you’re not going to use it?
After watching dozens of tiers and professionals at shows and exhibitions, I have yet to see a rotary vise used as such. I’ve seen the jaws rotated slightly to access the side of the fly or to inspect the ribbing, but full rotation and applying dubbing, wire, and other body materials using the rotational capability is something most tiers appear to find marginal.
I have watched a professional Glo-Bug tyer use the rotational feature exclusively to tie Glo-Bugs, and the rotation feature was extremely useful for his flies, but small trout flies and their ilk, leave little opportunity for rotary applications.
My assumption is that I’m no different than these other fellows, and the full rotation of the vise will merely be a “gadget” rather than a must-have.
Like a small child at Christmas
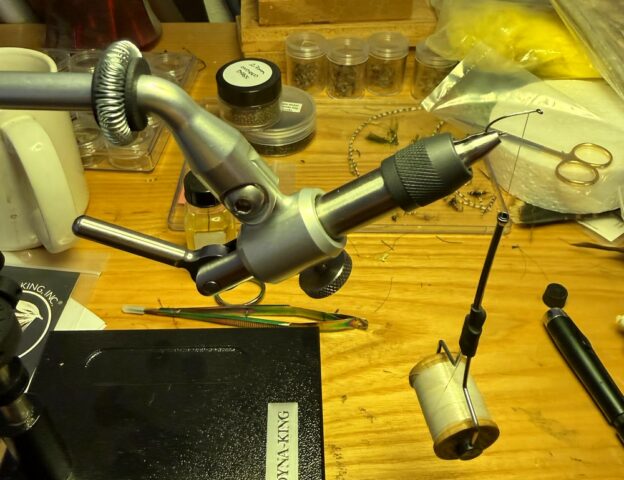
Upon receipt assume you’re not the only fellow that’s handled the vise. Every fellow that works at the fly shop you bought it from – has jiggled its handle, fiddled with the knobs, and tested it a few times before you even showed up. There’s the possiblity of damage in shipping, someone dropped it at the shop, or someone crossthreaded a fitting, or simply because they were unfamiliar with the vise’s function.
Lubrication: The first thing I did was remove all adjustment screws from the vise chassis and apply a dollop of lithium grease to each threaded screw post. This ensures lubrication of threaded elements and ensures each type of adjustment operates smoothly and with little effort.
Dyna-King uses some hideously thick silver goop for lubrication (think JB Weld), and I’ll assume it’s their means of ensuring the lubrication will survive a decade of use. I removed several globs of their lubricant off of the forcing cone and jaws and replaced it with a lighter grade of lubricant. I typically will regrease all components on a yearly basis, especially those in continuous use like the forcing cone.
Test the Fit: Once lubricated, tighten down all adjustment screws and test the vise for looseness in fittings or wobble in any of the machined parts. If you find any persistent wobble or looseness it’s possible the fit or milling is incorrect or the vise may have been damaged via someone dropping it while fiddling at a shop.
- For a rotating vise, check for rotation when the vise should be locked in stationary mode.
- For a rotating vise, check for tension while rotating to ensure all feels smooth. Dyna-King has a teflon tipped screw that applies the desired tension to the rotating element to ensure it rotates with the resistance you prefer, versus simply being “sloppy loose”.
- Test the vise jaw height adjustment to ensure the barrel of the jaws slides smoothly up and down. This is the screw under the jaws controlling the jaw (and hook) placement when the user rotates the assembly, allowing the hook to be in the same “plane” as the rotating body.
- Test the Forcing Cone and its collar to ensure smoothness of operation. It should turn smoothly to adjust the width of the jaws.
My Dyna-King Professional developed a wobble early due to a soft steel cog on the top of the stem that spread slightly with use. The Dyna-King folks were unable to repair it, so I added a matchbook cover spacer to the cog “valley” to take up the play and reduce the wobble of the vise head. Knowing the vise arrived in perfect condition allowed me to understand that I had likely dropped the vise while transporting it to a fly tying class or show, rather than a manufacturers defect.
Purchase all the accessories : I purchased a set of midge jaws for the Excalibur, a second forcing cone, and extra tension screws for the rotation adjustment (teflon tipped) and the rotation lock screw (rotation on, rotation off). More on this later.
This vise is likely to last several decades or more and the vendor may no longer be around or making parts for older models. If you drop nine hundred dollars for a vise, you need to buy all of the accessories that you will need, lose, or break, now. Buy them now while they are plentiful. Screws were $15 each, forcing cone was $35, and the midge jaws were $124.
NOTE: The Midge jaws for the Dyna-King Professional are not identical to the Midge jaws for the Excalibur, they are of different lengths. If you buy the Midge jaws ensure you are getting the correct versions for this vise, as the person filling your order at the shop may not realize this is the case. Place the order via phone if buying from a third party fly shop to avoid disappointment.
Forcing cones are the element most likely to break over time. Each time the vise handle is depressed the jaws are pushed through the cone to force them closed. Should metal fatigue eventually surface these cones will be the item that cracks under pressure, so having an extra is a really worthwhile investment.
Environmental Issues
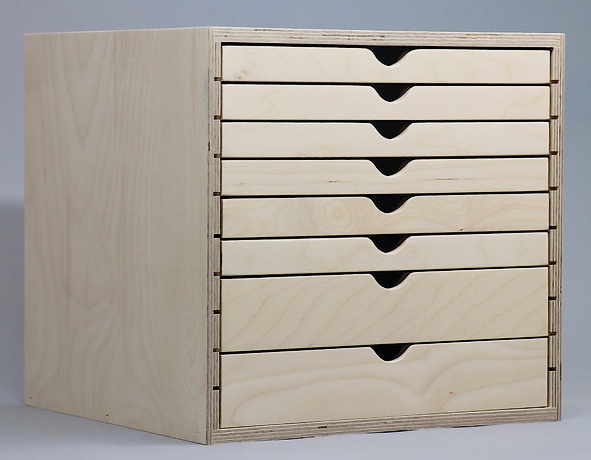
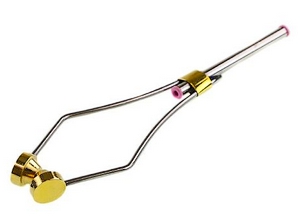
“Offset” vises like the Excalibur have a different footprint on your tying desk. Firstly, the vise assembly now sits five to six inches away, due to the distance the jaws protrude from the vise stem, and the pedestal base is now square instead of rectangular.
Due to the shape, the tying activity is removed from the center stem area, and the vise base needs to be bigger to ensure pressures exerted on the jaw from any direction doesn’t tip the vise over. Rotation use may mean you’re pulling up, down, or from either side, and winding materials under tension puts increased force to work in potentially any direction.
In a normal configuration, the jaw of the Excalibur is six inches from the pedestal stem. The pedestal base of the Excalibur is square, six inches wide and six inches long, considerably larger than a traditional pedestal vise base, which has always been rectangular.
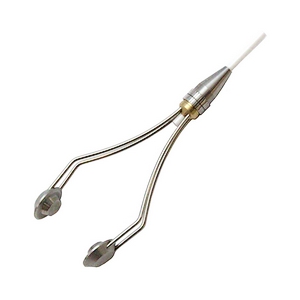
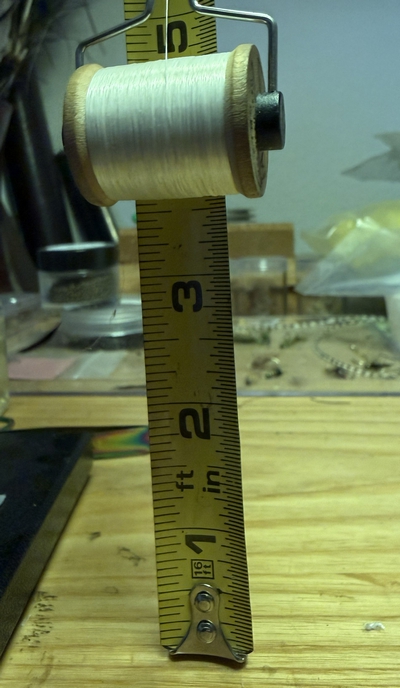
As the Excalibur is actually the shortest vise I own, using a long tube bobbin coupled with the shortness of the vise means you only have 3.5 inches of clearance under the bobbin when it’s at rest (see illustration above). This is plenty to tie flies, but if you do a lot of tying with dubbed loops, which are often longer than three inches, it means your dubbed loop and tool may need to rest on the table edge versus hanging vertically from the jaws.
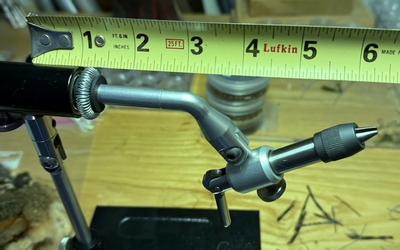
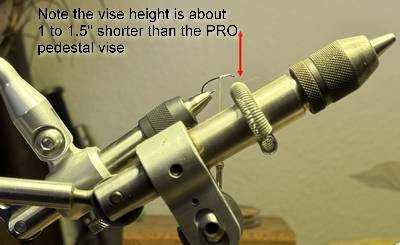
In a default configuration the vise jaws are 7.5″ above the table surface. Compare this with the vise you’re currently using to see how that will change your visual plane. The Jaw adjustment knob used to center the hook shank with the rotation allows you to increase the jaw height about half an inch, and I have incorporated that extra height in my vise’s configuration.
Many tools have long handles, like the dubbed loop spinners, the Cal Bird tools, and a few others, and that extra half inch may allow a favorite tool to hang vertically from the hook shank, versus hanging off the edge of the desk.
It appears possible to loosen the allen screw on the jaw arm to tilt the jaws slightly higher still, or loosen the jaw arm to tilt the entire jaw assembly upwards, but it doesn’t appear to offer a great deal of additional height.
Note that the height of the vise is not that much of an issue, nor do I feel cramped, it is merely an environmental issue any tyer should be aware of as part of a pending purchase. Do you have the extra room on your desk for the pedestal, do you have the extra room for the six inch jaw offset (moving the vise to the left or right six inches), and does your tying include lots of long tools and materials hanging off the hook?
I find that due to the height of the vise my perception of the fly includes the ability to see both top and sides without rotation. The lower hook gives me a little higher sight plane, which translates into seeing a bit more of the top and sides.
Remove all unused or uneccessary gadgets
I won’t be using the rotation feature very much, so I removed the long bobbin arm off of the vise stem. This big clunky arm is for resting your bobbin on when performing full rotation, and it’s not likely to see much action. The size of the arm makes it necessary to move out of the way when tying, and it’s 10 inch length is exactly the thing that will knock over head cement bottles when swung out of the way. When attached to the vise stem it protrudes about 9″ from the stem, requiring you to have at least a foot of unused space around the stem to swing it out of the way. I jettisoned this with great glee.
I removed the arm clamp off the vise stem as well. This is the collar that clamps the arm to the stem. The arm and collar I returned to the box should I need them later.
I moved the material clip back to the rotating body to get it out of the way of fingers, knuckles, and other tools. “Offset” vices have more things in the way when operating behind the jaw, so clearing additional space will let a fellow with large hands not bump the material clip repeatedly. Traditional vises feature the jaw and hook the highest point with the remainder of the vise and handle below the fly. Offset vises have the arm holding the jaw at the same height, with a “valley” behind the jaw which rises to connect to the arm holding the jaws. That means big hammy handed tiers may have find things in their way, and the material clip is one of them. Big flies have a lot more big or long materials, and for the moment, most of my tying will be smaller.
The Purpose of a fly tying vise is to hold a Hook
Once I had the vise lubricated, and explored all the working knobs and dials, removed all the unecessary parts, I was ready to actually test the function of the vise. A fly tying vise has but one core purpose, holding a hook immobile while you whack at it with bobbin and mats.
The trick on any of the Dyna-King vises is understanding how to manipulate the forcing cone for the hook you’re about to mount. The cone is tightened for smaller sizes and loosened for bigger hooks. For trout sizes, it appears about a quarter turn adjustment on the forcing cone is warranted for the size 14, to 12 transition, or from size 12 to 10, and on the smaller sizes, often a forcing cone setting will work for two hook sizes. 16’s and 18’s were similar, and I expect this might hold for even smaller hooks – as the wire doesn’t deviate as much as the hook size gets smaller.
Once we hit size 10 and larger, we had the same issue with the Excalibur as we’ve had on the Professional. The hook is large enough to have to move it back from the tip of the jaw, which brings the bend in contact with the two grooves scalloped out of the jaw for big hooks. This can lead to hook movement when tying, as the groove doesn’t grip the hook – and the hook isn’t inside it, so you have a partial grip on the hook that might pivot under stress.
This is not an insurmountable issue, just something you have to be cognizant of … mid range sizes should be placed with a bit more thought to avoiding the bend partially in the groove for larger hooks.
Learning the nuances of the forcing cone takes a bit of time, but the results once mastered are fantastic. The “offset” design, with its small handle and reduced force, coupled with the feel of the “clunk” when the hook is locked into place, is really superb. This was consistent with what others had mentioned of their offset vises – and why I wanted the new design, as the feedback it gives makes the process less forceful and hammy handed.
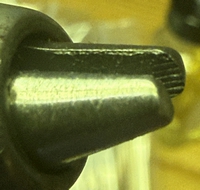
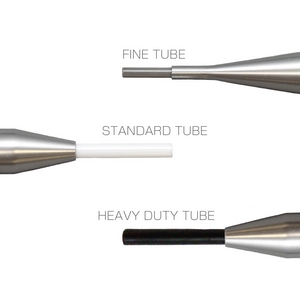
I tested the vise with the standard jaw, then replaced those with the midge jaw. There are numerous differences between the Midge jaw on the Professional and the Midge jaw on the Excalibur. We already mentioned they are not interchangeable, the Excalibur jaw being smaller than the Professional, but the milling on the interior of the jaw is also different.
The Professional Midge jaw has a view striations on the vise jaw at the tip only. The Excalibur jaw is both sharper and thinner, but also has striations of metal the entire length of the jaw (see pictures)
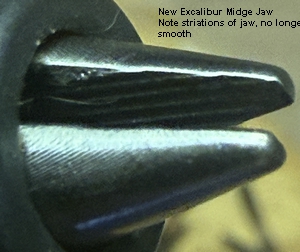
Both jaws for the Excalibur worked quite well. The Midge jaw held hooks as secure as its larger cousin, and sharper tip made it a bit easier to tie really small flies. There is a bit of a learning curve to using the Forcing Cone, mostly learning how much to rotate the cone to increase or decrease the hook by one or more sizes, but in my testing I blame all of the hooks that wobbled or slipped were the result of operator error, not the vise or jaw itself.
In summary, with the proper forcing cone adjustment, the hook holding ability of the Excalibur is outstanding.
Design Oversight or Flaw?
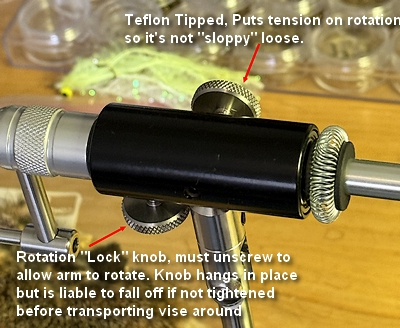
The only issue I would characterize as a design issue or flaw is the location and function of the rotation “lock” knob on the chassis itself.
The knob on the far side of the vise is the teflon tipped rotation control screw that determines how freely the rotation occurs. The teflon tip presses against the rotational body and that resistance must be overcome before the chassis rotates further. In this manner you can rotate the jaws 90 degrees and it will hold that position.
The threaded knob on the bottom of the vise is the rotation “Lock” knob. It must be unscrewed about one and half full turns before the chassis achieves the ability to rotate. There appears to be a slot in the body of the vise that the screw head must withdraw from before the vise will turn freely. One and a half turns of the knob achieves the complete withdrawal of the screw head from that slot.
The problem is you have a loose screw that has gravity operating on it. If the screw loosens further with vise usage, and then you toss the vise in a backpack once the fly tying class is over, I can see this knob dropping out of the vise body, to be lost forever. Note: this knob is not dangerously loose when unscrewed into the “rotation unlock” position, it’s simply loose enough to wobble free over time, and under the right circumstances.
Now you know why I bought a replacement in the list of accessories above, The teflon tipped screw is liable to wear with use, and the rotation lock screw could drop off the vise entirely – simply due to gravity and me forgetting to tighten it back down after extended use.
Warning, below this line is all non-scientific opinion, and impression
You actually have only one REAL question about this vise, is it worth the price?
It is a superb vise. It holds the hook better than most, is of solid construction, will last a lifetime, and is a bonafide engineering marvel.
It is not worth the price.
My rationale is simple. Does the capabilities and construction offer a marked improvement in vise function and are the new capabilities offered by the device either unique – or do they measurably assist the tier in the perfomance of his craft?
The answer is no.
A lot of vises (both cheap and expensive) hold the hook well. Those same vises have both rudimentary or advanced rotational features, and therefore the only feature that has shown marked advancement from my current quiver of vises is the rotation.
Which I won’t be using much …
Why? Because if the bulk of my flies are trout sizes, the greatest number of turns of material on a size 16 or 14 hook, is five or less. The benefit to using the rotational feature to apply four or five turns of ribbing, is negligible.
Example: To rotate on the ribbing, I have to throw a half hitch or two on the fly, then swing the bobbin arm out to rest my bobbin on (a ten inch wide swath across the worksurface of my bench), clean up the head cement the bobbin arm just knocked onto my Grizzly neck, swear profusely, feed five turns of gold wire, then recover my bobbin from the arm, swing the arm out of the way, and tie off the wire.
That’s neither an improvement nor a lessening of effort, so for the trout tier, it doesn’t appear the rotational capability has much use. For larger flies that may take ten or twelve turns of chenille or ribbing, perhaps there is saved effort …
I will certainly attempt to become enamored of unfettered rotation later, on larger flies …
After ten dozen flies tied, what’s my basic configuration?
After a great deal of fiddling with knobs and dials, I run the vise with the rotational lock off, allowing the chassis to spin with tension or pressure applied. This allows me to place my left hand on the chassis and rotate the vise in any direction to examine the ribbing I’ve just applied, or the location and attitude of tails, wings, or anything else.
This free rotation style is why I object to the rotation knob hanging under the vise and subject to gravity. Since this is ALWAYS loose due to my style, a prolonged tying spree may loosen it further. Only experience and use can answer the question, ” Will I find the rotation lock screw in the bottom of my knapsack, later?”
I run the vise with the jaws fully slid upward to get that extra half inch of height. This “slide” is controlled by the knob under the jaw, and is loosened, the jaw moved, then tightened down again.
Stay tuned for the follow up review later this year. I will post additional configuration information and technical detail as I learn it, likewise on impressions for large hook use.
Full Disclosure: As with all of the products reviewed herein, each was purchased using my own money. We don’t do freebies or being gifted stuff so we can write glowing reviews of marginal items. Instead, we write marginal reviews of the really good stuff …