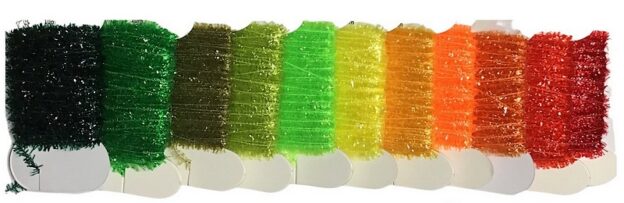
I made the mistake of trying to track down “cactus” or “ice” chenille, and rather than emerging victorious I am scratching my head over the outcome. This type of chenille is commonplace in the needlepoint industry where it’s sold as “edging”, something to border a needlepoint applique or fanciful throw pillow.
It’s a search engine nightmare, and tracking down the different types resold to us fly tiers is a real headache. You can find it under “eyelash” yarn, iridescent chenille, “scrubby” yarn, iridescent chenille thread, as well as using the familiar, “cactus” or “ice” chenille. Numerous vendors exist, many of which are in Europe, and use a different nomenclature for these products than we do. Mylar is called Lurex in Europe, so the search string changes depending on which continent you’re on. In addition there are many colloquial names like, “Cactus” chenille, “Ice” chenille, “Iridescent” Chenille, “tinsel” chenille, “Glass” Chenille, “Mylar” chenille, “Estaz”, and Lurex Chenille, Lurex Garland, among others. It’s made with a variety of materials, some with soft plastic like Estaz, or Kreinik’s “Micro Ice Chenille”, and some flavors feature a much coarser plastic, which we tend to call “Cactus” chenille.
What seemed like a simple item to track down quickly devolved into a multi continent , multi product mess, not the least of which was that fly tying shops sold it for less than needlepoint shops, which added additional mystery, besides being a first …
As I was looking to stock up on what I’ve known as “Micro Ice Chenille“, which is among the smaller versions of the product, I decided to leave all the other products for another day – or another fellow braver than I am …
“Micro Ice Chenille” is a trade name of Kreinik Threads, which is owned by another company called “Rainbow Gallery.” Searching for this product yields a few colors available from a dozen or so needlepoint shops, none of which have a comprehensive selection of colors. Likewise for the fly shops, as it seemed the selection was as sparse as the needlepoint shops. This is typically a bad sign in the yarn business, as it often precedes the vendor going out of business, or the discontinuation of the product itself.
I attempted to track down the status and found a couple old references to discontinued colors, but it appears the company is still making the product, although in less colors, and more importantly, they no longer make the “Fern Green” that is a staple of my warm water damsels and some of my better bass flies.
I’ll live … but only because I bought the last few spools remaining.
Kreinik’s base colors are available on their website, and many fly shops echoed this list, so it was obvious they were stocking the Kreinik product line, as the colors matched. Many shops had additional colors, so more vendors exist, but trade names and manufacturer information is scarce given the repackaging happening in both fly and needlepoint shops.
The best replacement I found was the result of using the search string, “Iridescent Chenille Thread” and while the size and texture was a match, they sold two different styles under the same name. One style of yarn is wrapped on a card (this is the identical version to Kreinik), and the other version was wrapped on itself, no card, and featured a thicker core thread holding everything together. Both worked well, but the tie off of the non carded yarn was bulkier due to the heavier core threads.
I ordered a couple of colors in both styles and they looked good, same soft mylar texture with several dozen new colors – including vibrant florescents, and available as a 10 meter skein, which is double the quantity of the Kreinik product, and about half the price ($2.39 vs $4.30), a great combination. The carded colors have the same thread core as the Kreinik Micro Ice and behave identically on both application and tie off.
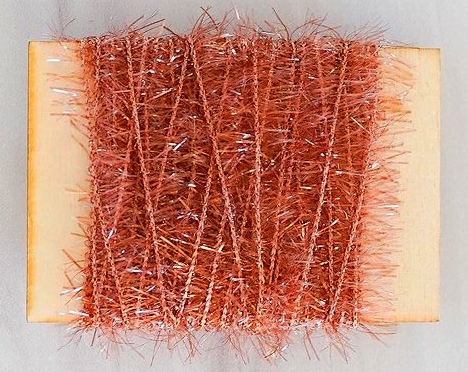
Note this vendor uses the heavy thread core in its Cactus Chenille, better used on larger flies, not on the smaller trout offerings
The above picture shows the heavier thread core used in many vendors variants of these yarns, and you need to be concerned if you’re tying small flies as the heavier core will make a bulky tie off point.
The point of all of this is two fold, there is more than one name for cactus chenille, and once you find some you’ll find many more kinds and types of this yarn available. You need to choose your labels wisely, be mindful of the continent you’re on, and you probably need two or three different vendors to get a semblance of a color selection. Kreinek doesnt’ appear to be adding colors, so it may not be a credible source much longer (my instinct, not fact) .
Most tiers are using the subdued “trout” colors as that’s what’s sold by our fly shops. Mallard, Peacock, and Emerald Green, are the only greens available (Kreinik) , and myself and others would like some Olives, more Browns, and perhaps some Golden Stone type colors. Sprinkle in a few bright colors for Steelhead and everyone’s happy. The Kreinek catalog is sadly lacking all of that, which is a bad sign, so start looking for an additional vendor soon, and you may want to stock up on the colors you use most frequently.
Korry’s Little Shop in the UK has the best color selection but most of the colors we’re looking for are also out of stock. Remember to purchase the carded colors to ensure the same thread core, perhaps buying a skein of the non carded (thicker) core to eyeball before buying more.
I spoke with the proprietor of Korry’s Little Shop and she echoed the same issues I am having. Colors last for only a short time before disappearing, the landscape is ever-changing with most of the product lacking anything in the way of trade names, as it originates in China. Chinese cones are made into small cards for the millinery industry and the manufacturer or common name is neither translated nor transferred to the carded product.
Which puts us flytiers, in a bit of a quandary. I have confirmed the colors on a Chinese website, suggesting they are the supplier, but few if any of the colors are making it to our shores.
I’d like to find a cone of Olive, but it appears that’s not in the cards … and while that was a pitiful attempt at humor, it seems we’ll be dealing with the lack of cactus / ice / glass chenille colors for the foreseeable future.
ICE yarns sells a flavor called Metallic Glitz, but the colors available are fine for steelhead, not so much for trout fishing. ICE (vendor name) yarns is one of the larger players in this space, so this illustrates the paucity of our color selection. No one is making “nature” colors – most vendors are making “Christmasy tinsel/garland” colors instead.
Kreinik sells 50m cones for about $50 dollars, but the lack of colors means that kind of outlay is really questionable. A cone of Olive would be great for my tying, but your flies will differ, so the value of the larger quantity hinges on your planned use. Finding a backup supplier with additional colors in the Olive, Brown, Golden Stone, range would be a nice hole card to have, given the colors cannot be depended on to last more than three or four years …
For those about to begin their own search, note that all these yarns are called “Eyelash” yarns by the yarn industry. As you wander through vendors supplies this is the category of yarn to use to get close to what you’re looking for – a filamentous yarn with short fibers emenating from a central core. Add the material type, Lurex or Mylar to string and you’ll start hitting options that resemble what you want. Now you simply need to wade through the options until you find a match.
I think every fly tyer learned an important lesson with the advent of the Latex Dental Dam craze of the 80’s. Realistic imitation was “in” and natural latex caddis pupa imitations spilled off the pages of Fly Fisherman magaine and into our fly boxes like maggots fleeing a corpse …
We assumed that the waxy softness of wrapped Latex Dental Dam would make the most wary trout succumb, based on its lifelike look and feel, and suddenly fly shops were selling prepackaged Stonefly nymph latex shapes, Latex insect bodies, Latex hopper bodies complete with legs, and we were about to make wild trout kneel before our collective squishy awesomeness.
… then we opened our fly boxes to restock them the following season, and found all that Latex oxidized into broken bits resembling cooked Chow Mein, and realized we had forgotten one tiny little lesson in Physics.
That Which Stretches does not like Sunlight …
Anytime I am contemplating some form of stretchy synthetic in my flies, I remember the painful lesson of latex, and attempt to engineer the material out of the mix, given how little luck I’ve had with elastics.
I have been tinkering with Czech nymphs and their ilk for a bit, and have been slicing the bags the materials came in to make the thin shell backs used on these competition flies. Plastic bags stretch a little, but are not a true elastic material, and I hoped it would last longer than other materials. As the shellback is typically tightly ribbed with wire or monofilament, these flies are less prone to catastrophy than their Latex kin, where the oxidation of the latex eventually unwinds the entire fly body.
“Scud Back” is a material commonly used as the shellback for many of these Czech style nymphs, and I had an idea that I might be able to find the material in bulk form as there are so few transparent elastics used commercially.
Transparent elastic tape is used in the garment industry extensibly, and is used to seal clothing openings, like necks, wrist and anklets, on a wide variety of sports clothing. The transparent color allows it to be sewn into the lining of the aparture without altering the appearance of the outside of the cloth, and is used on nearly every swimsuit, bra, or strapped garment made.
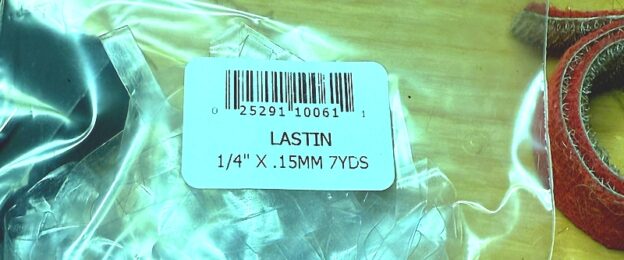
Called “Mobilon Tape” or “Lastin” it is sold in some form by nearly every sewing store, and not suprisingly, for much less than us fly tiers are used to paying. Scud Back is a 1/8″ wide strip of Lastin, available in both clear and dyed colors. 1/4″, 3/8″, and 1/2″ are common sizes of Lastin for garment use, but it can be purchased in 1/8″ wide also. Typically Lastin is available in 0.12mm and 0.15mm thicknesses, just remember that the thinner the material the less likely it will survive hot sun and repeated seasons in your fly box.
Note this is one of the rare times NOT to lay in a lifetime supply. Rather it would prove smarter to replace the material regularly to ensure longevity on your flies. Consider that bras and swimwear see a similar amount of sun and water, it’s likely your flies will last more than a season, but you’ll need to test this due to the uniqueness of your storage method, and your fishing.
I tend to draw the material tight rather than stretch the material over the fly, which reduces the strain on the material and increases its lifespan. My flies are stored indoors in air conditioned splendor, so they are not fried in an overly warm garage, or similar inhospitable space.
Lastin or Mobilon can be dyed, likely with a synthetic dye or acid version, but I am reluctant to weaken the material uneccessarily with colors, hot water, and the mishaps that can occur with increased oxidation. I will dye some later to learn what works best, but that is a low priority.
I have used permanent markers to color the material, but once dry, the color wipes right off.
Lastin Shellback shown on a Czech Nymph
Most of my Czech nymphs use the simple transparent shellback, but I am contemplating a Hot Pink or Flo Orange Shad fly for use in the American, tied Czech style, so I might add a packet from Hareline just to be clever …
Scud Back is made by Hareline, and sells for $2-$3 for three feet. Lastin / Mobilon sells at most stores around fifty cents a yard, or about $7-$8 for a ten yard bag. Considering how many flies you can tie with a single 10 yard bag, I think I would opt to buy it one bag at a time, mindful to toss it every couple of seasons to ensure oxidation is minimized.
The smaller 0.12mm thickness is perfect for smaller flies, as it is noticeably more pliable than the 0.15mm standard. Extra pliability comes at a cost, as the thinner material likely has a bit less lifespan before snapping. When applying the material onto the fly simply draw it tight versus stretching it to the attachment point, as this will reduce the strain on the material as it ages/oxidizes.
I recieved both thicknesses from garment sources, so you’ll need to read the advert to determine which they are selling.
Mandala Crafts sells 33 yard spools of 5/32 elastic tape for about $9. This material is advertised as a thermoplastic, but doesn’t mention the Lastin brand. The material is clear compared to the slight opaque of Lastin tape, and the material can be stained with permanent felt pen. While useful, it suggests more than a single type of thermoplastic elastic tape exists, so you’ll need to try a couple to see which you prefer.
Everyone assumed Mister Whipple’s obsession with Charmin made him some sort of closet deviant, but Whipple was merely a fly tier, pursuing his craft.
I had a similar moment when I espied something that could be useful, and while examining it allowed my mind to wander as to which patterns, what water, and what gigantic fish I might seduce by owning some.
Unfortunately, reality brought me back to the vegetable aisle at Raley’s and I noticed strange looks from the fellow restocking grapes, and the lady selecting cabbage pulled her kids in close before rushing past me …
I dismissed him immediately as Homo Starbuckus, that offshoot of male humanity that cannot boil water, and tossed the Onions I was groping into my cart and made a beeline for the checkout.
Like Mister Whipple, when mesmerized by a new material or item, it’s likely my mannerisms and facial expressions seem out of place in the Canned Food aisle, especially so if the observer doesn’t fish. A lifted eyebrow or a penetrating stare puts me in the same company as grocery store creeps; people that talk to themselves while delving Rutabagas, and Vegans – who sneer at anyone holding animal flesh.
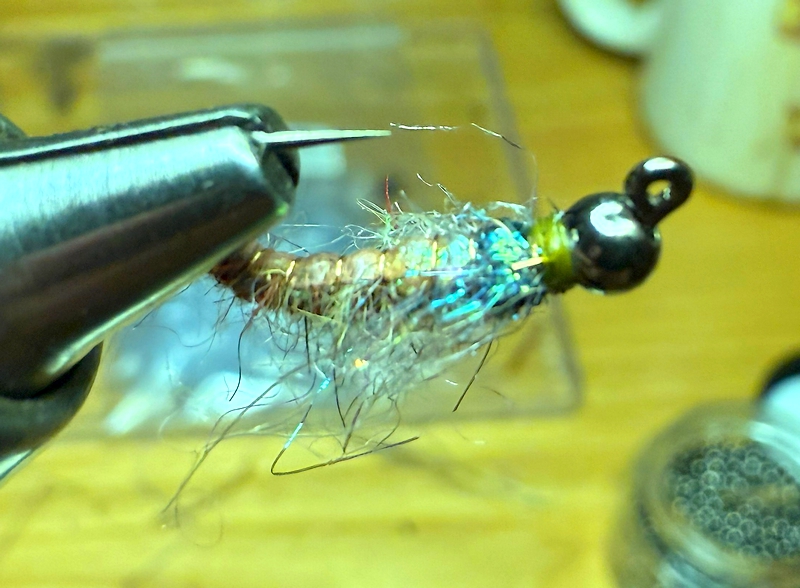
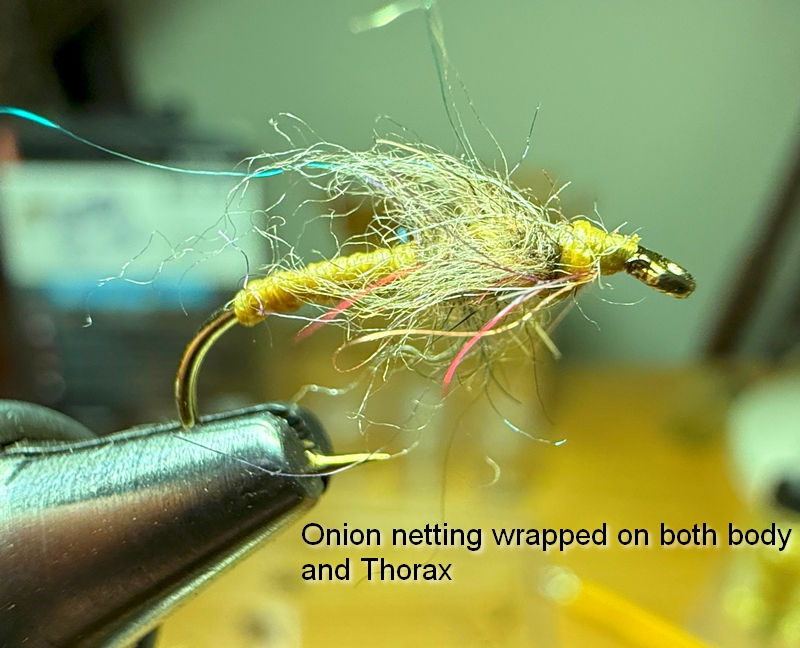
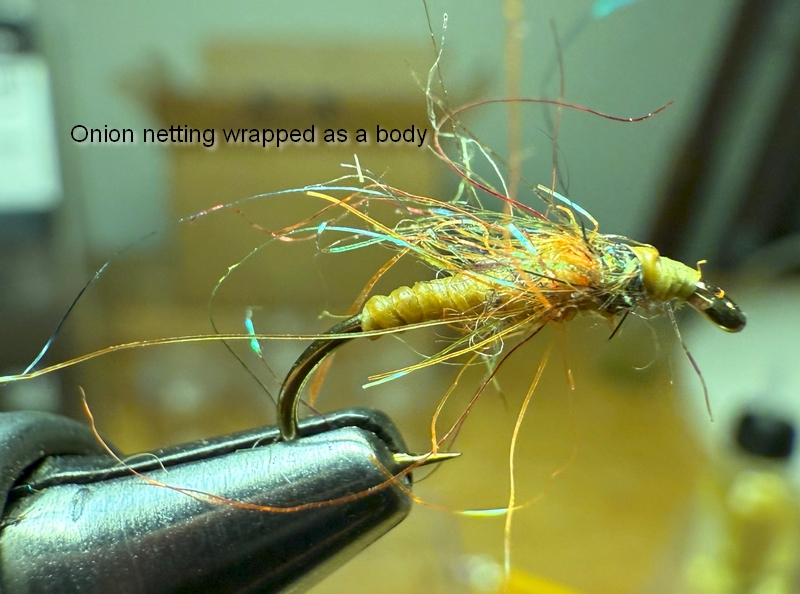
In this case it was the netting of the bag surrounding the Onions that had triggered my Post Traumatic Fly Tying Moment (PTFTM), not the Onions themselves. My handling of those glassine orbs may have appeared inappropriate, but it was the netting that held my interest, not the orbs themselves.
I’ve been fiddling with a fly series that combine soft hackles and Czech nymphs, using fur as the “soft hackle” and the coloration schema of the Czech nymph for the thorax of the flies. These have proven successful on anything I’ve thrown them at – as the fur “hackle” is much softer and more pliable than duck feathers, and the dab of bright color offered by the Czech nymph, makes the fly appealing to both cold and warm water fish.
Both of the above flies are using a “spectral” mixture of dubbing, which is why strands of red or blue are visible. These lightly dressed flies are proving to be a great mixture of traditional styles, new colors, and the occasional Grocery store material ..
The Onion netting appears to be a Mylar derivative. It offers a dark yellow suitable for use on Golden Stones, as well as a few Caddis imitations similar to the above. When wrapped as above it gives a “waxy” looking thorax that appears tasty to my eye.
I’m sure Mister Whipple had a Czech nymph in mind when he handled the Charmin Bag .. as it would be a suitable carapace material.
I wasn’t surprised I had nearly 32 sizes of brass beads, in 8 colors, it was all the nooks and crannies I’d wadded the little baggies into that was the revelation. Once you factor colors and sizes; Silver, Gold, Copper, Black Nickel, in at least four sizes; 4mm, 3.8mm, 3.2mm, and 2.4mm … add in those Olive and Coffee Brown beads you thought irresistible, and the White 2.4mm that you need for Shad, the four sizes of Coneheads for all the Bass minnows you throw … the combination of little plastic bags tucked into drawers, becomes a mess.
Then there’s the fish hook issue. Old hooks in paper boxes, newer hooks in plastic boxes, recent purchases in those silly plastic sleeves, and even though it’s the same hook in three different sized containers, it’s not possible to save them all in the same drawer, and you have hooks spread out among all of your storage choices.
You might say, I’ve had enough …
It used to be a few thread spools we couldn’t find a place for … or an odd lot of tinsels, but now our craft is full of little bits of plastic, little metal beads, things that rattle, things that sparkle, and all of it changes shape everytime the vendor has a fit of pique, regardless of what our storage can handle.
When I started tying it was the Porcupine purchase that made me realize I needed to upgrade my storage. Back then everything was in a cardboard wine box. The smaller the item the deeper it sank into the mix, so routinely I would plunge into the box looking for yellow hackle and have to dig. One day I plunged into the box and came out attached to my chunk of Porcupine hide, and the plasticine baggy it was in offered zero protection to my now-bleeding fingers.
I upgraded to a desk dedicated to fly tying. This meant the Porcupine could be safely stored away from both my loyal hound, and my grabbling digits.
I think we’re there again. Desks no longer offer the kind of small item storage we now need, as their drawers simply aren’t segregated enough to offer their contents efficiently when searched. Little boxes cannot be stacked next to envelopes of fish hooks, as we cannot see their labels and must “deal” them onto the table like cards, to find the Dry Fly #12’s.
Options for compartments are available for this cabinet
What’s needed is the ability for us to decant the vendor’s containers into a standard container of our own choosing, that will allow us to label and store with others of the same size and type.
… and that’s the easy part of the quest, defining the problem.
In all my wandering through craft stores, only the beading community seems to share our problems with storage and container. They’re afflicted by countless small beads and the need to keep them all seperate and within arm’s reach. Figure they got a dozen different sizes and unlimited colors, and their work surface is as cluttered as ours …
I’ve been eyeballing some of their storage solutions. Lots of wonderful little jars that would accomodate hooks swimmingly, we just need the jars to fit within the confines of our existing furniture solution … or add something they will fit into.
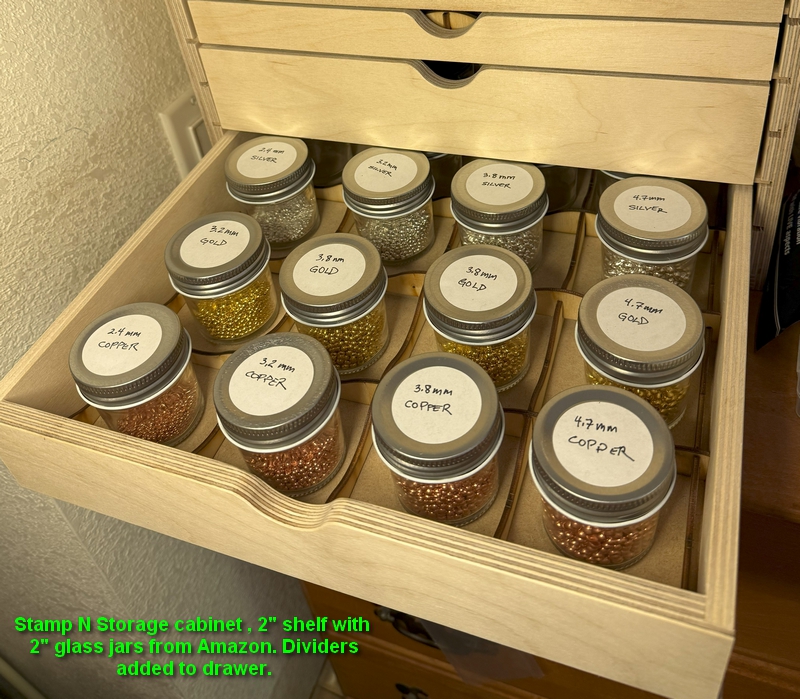
One thousand 3.8mm brass beads will fill a one inch jar to the brim. 5mm beads will fit about 500-600 in a one inch container, so it looks like both the one and two inch jars are needed for a comprehensive solution. The two inch jar can handle the big hooks (by the one hundred pack) as well as the larger beads, coneheads, rattles, and fish heads needing storage.
The above links are for glass and plastic jars. I opted for glass over plastic, given many forms of plastic age poorly and become cloudy, brittle and opaque. Glass allows me to attach labels either to the glass or the metal lids – allowing me to peel or scrape them off year’s later with no damage to the container. Glass is heavier, and if I leave the container on the surface of my tying bench, will resist being brushed off onto the floor much better than plastic. Think several hundred size 16’s sprinkled onto your sock feet and carpet…
The small jars are part of the answer, but what to put the jars into is the balance of the question. Most desks contain four or six drawers in several sizes, and not all are suitable for the one inch size without stacking them. Stacked jars work, but it makes searching for the hook you want a little harder than specialized storage that shows ALL the labels on the jars at once.
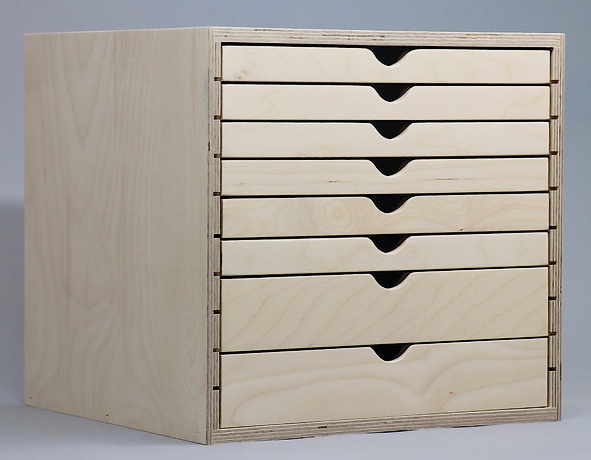
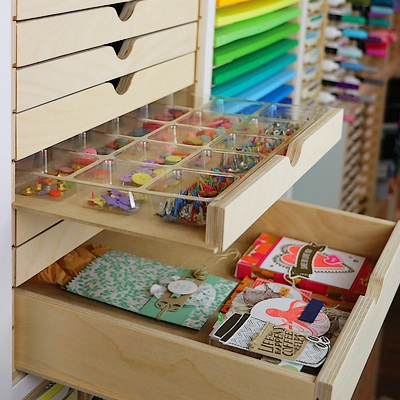
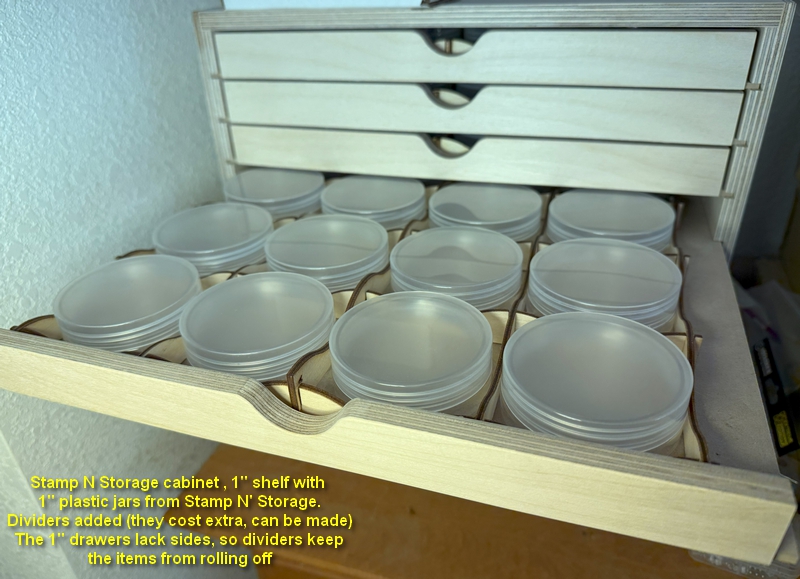
I’ve opted to start with the Stamps and Storage Wooden Drawer Cabinet, to test its storage and retrieval of all my items. It can be purchased with different height drawers, so you can choose the jar sizes best suited for your tying. My first purchase was configured with six one inch drawers and two, two inch drawers. I purchased the dividers to compartment the one inch drawers into sixteen smaller squares, ditto for the two inch drawers. Each 1″ drawer can fit 16 jars, so I have a total of 96 1″ inch jars, and 32 2″ jars, or 128 seperate storage vessels.
Awesome. But Expensive.
The one inch drawers have no sides to them, only fronts and backs, so the strips of divider wood that make them into 16 individual compartments are necessary. The 2″ drawers have all four sides, making the subdividers uneccessary.
I’m thinking the 1″ drawers equipped with 1″ bottles are perfect for hooks, the 2″ drawers with 2″ bottles are for everything else. It’s likely that each unit may have a different configuration, should more than one cabinet be purchased.
The size of the unit will allow it to be used on your table, or located somewhere’s else. This is useful to pre-position all the frequently used sizes of hooks and beads, close to the work area for use. Offloading these items out of your desk storage will then allow you to reposition and optimize certain drawers for use with additional glass jars, making your desk hold additional small items.
See all the labels at once
With 134 compartments in one cabinet (as configured above) you have all of your small things available in storage that will never change shape, and will always have accurate labels, as you can peel the old and replace with the new.
I will be stockpiling a few flies going forward, as Winter is long and I keep fiddling with new patterns and ideas. If this cabinet works well, I will add a couple more configured with only the 2″ drawers to contain additional jars. If you figure 10 nymphs and 6 dries, that’s only a single drawer out of the six, so I don’t need to go overboard on the small size.
The 2″ drawers are better suited for the larger flies, so if I get industrious I might stash some leechs or big stoneflys. I probably not use these for feather storage as the handle area allows bugs access, and a sealed container is always the first line of defense.
Instinct suggests that while a beginning tyer could shift all of his hook storage into one unit, I should not. Firstly, because I have hoarded quite a bit more than your average beginner, and secondly, it’s the most commonly used hooks that i need storage for, not the odd, ancient, or esoteric crap I have squirrelled away. While you might still own Mustad 94840’s in paper containers, plastic containers, and plastic sleeves, you probably only own one type of container for Salmon double hooks, as they’re illegal in most California creeks.
I will be consolidating my trout nymph and trout dry fly hooks to these containers due to the mix of storage types the manufacturers chose over the last decade. The ancient Allcock hooks, and the Carrie Steven’s Streamer hooks I got from Partridge, are hoarded items that I don’t need close to hand.
Whether this makes it to my desk surface is another question. The one inch drawers work well for threads and tinsels, fish hooks, and small amounts of beads, but you’ll need to make sides for those drawers or buy the dividers from Stamps N’ Storage to ensure things don’t roll off the sides when opening and closing them.
The drawers have dividers in numerous configurations, so you need to determine what container size you’ll be using in order to purchase the dividers. I bought the larger size grid, with 16 compartments, but they make many more options. (Note that this 16 compartment option is only available after clicking the Configuration option on the purchase screen, it is not shown)
My desk has several shallow drawers that I had been using for hooks and beads, and now are available for other items, like tools, or packaged dubbing assortments. Offloading the small item storage to the cabinet has freed several drawers to pack with other things that are better behaved in shallow drawers.
The carousels look quite useful also, but I’ll wait on those until I’ve integrated the cabinet. Even without containers in them, I can see filling one with threads and tinsels, wires spools, lead, and bead chain.
For the moment it appears toilet paper is safe, but knowing our President is intent on initiating a trade war, it was prudent to get ahead of the administration’s “Tariff bat” and stock up on all the expendables necessary to continue tying on a grand scale.
Chicken feathers and yarn all enjoy plenty of domestic manufacturers and are immune to tariffs. I don’t need anymore rods, reels, and fly lines, so I dropped the hammer on fish hooks – while Trump dropped the hammer on everyone, and everything, else.
Yes, the price of coffee and chocolate will be going up, ditto for just about everything else produced in Europe, the Orient, or North and South America. The price of duck feathers, Silly Skin, Flashabou, Lead eyes, and everything else needed for fly tying is about to take flight.
… simply because all of these items source from China, which currently has tariffs of 105% levied against them. More if they dare to defy us, and China, being the largest manufacturer in the world, will be calling Trump’s Bluff …
As the American fish hook industry is nearly extinct, almost all the fly tying hooks we need are manufactured offshore. Europe accounts for Mustad, Skalka, Knapek, and Partridge. Asia produces Gamakatsu, Tiemco, Daiichi, Kamasan, and all the Chinese imitators that make our “house” brands, and all will be hit with tariffs.
Japan got hit with a 24% tariff, potentially making Tiemco hooks about $2 more for a 25 pack. Currently Tiemco hooks sell for about $7-$8 per 25 pack, and that makes them nearly $10, or $40 per 100 hooks.
South Korea got hit with a 25 percent tariff on ALL goods, England got a 10% increase, think Hardy Reels, and Norway is somewhere between 16% and 31% depending on which article you read. China? You’ll pay 54%, 125%, 145%, additional on everything they make, which is nearly everything, and as they’ve thumbed nose at Trump and retaliated, it’s likely the Largest Consumer in the World against the Largest Manufacturer, and will likely go multiple rounds before the dust settles.
To avoid all this silliness and extra expense, I looked at the non traditional sales sources; Ebay and a few other vendors to see what was available for me to hoard … and I found plenty.
I also tried a few Chinese knock offs, from the MaxCatch company, to see how these Chinese hooks fare. At $4 per hundred it’s not much of a risk to see if they are any good. I bought a few barbless trout sizes and some standard dry fly hooks to ensure I had plenty before the tariff bat dropped. China tariffs are currently set for 54%, and I’m sure they’ll be higher as China has retaliated, so this price is likely to be available for only a short time. Note that I have not tested these hooks, I am merely trying them to see if they are suitable, so caveat emptor, and you’ll need to test them as well.
Mister Trump is an amateur, so these tariffs policies are likely as firm as Jello. Our president will cave at the first sign of a deal, as he’s going to need some positive press if the Stock Market continues to plummet. Everyone’s retirement savings are in the Market due to 401K’s, so the breadth and depth of the market loss will likely determine which party remains in power, and who gets voted out.
If you plan on stocking up, be alert to the fact that these “excess” Partridge hooks mimic traditional Partridge styles, and that includes very fine barbs and short points. The barbed versions are best fished barbed, so purchase the barbless versions if you prefer to fish that style. The barbless versions offer a longer point, ensuring some safety when fighting fish.
These “Partridge” hooks are also sized to the Redditch Hook Scale, so those folks used to Tiemco’s will find them shorter of shank. Both Mustad and Tiemco make their hooks overly long, and have done so for years, so hooks based on the Redditch standard have shorter shanks, about a half size smaller on the shank than the Tiemco equivalent. Order a few to test before buying more, as you need to ensure these are suitable to your needs.
Ebay vendors are likely not under the same tariff requirements of manufacturers as many are smaller resellers and private citizens, so will avoid the tariff bludgeon initially, until their suppliers must raise prices further.
In either case, you’ll need to act swiftly if you want to join me in hoarding a few items.
Making a dubbing assortment has always been a favorite task of mine, given the amount of creativity involved and the lack of boundaries. I’m fiddling with dry fly dubbing colors, and whether I can port those into nymph colors to minimize additional work. Dry fly dubbing contrasts markedly with nymph dubbing in that both colors and textures are different; dry fly dubbing is typically pastel colors, fine texture and minimal guard hair, and Nymph dubbing tends to be coarser, with pronounced guard hairs and a darker color palette.
I’m rebuilding my prepackaged dubbing drawer with a better suite of dry fly colors; more olives, greys, tans, and a few wild colors to use with the occasional euro-nymph, and will be revamping my nymph colors as well. I might be able to refresh both at the same time, as Dry fly dubbing is almost entirely a “binder” layer of fine fur which is part of the components needed for nymph blends.
I build dubbing like a cigar, with a filler, a binder, and wrapper layer. Each layer contains different color effects AND textures, to give the finished nymph dubbing spike, loft, and a pronounced color mottle. The “binder” layer is typically the finest fibers which hold the mix together as both filler and wrapper tend to be coarser materials, including guard hair.
Most of my blends start as a yarn purchase, wherein I decompose an existing yarn into fur and add other elements to complete the mix. Yarns don’t have guard hairs which are typically unwanted in dry fly dubbing, and I can pick the colors of the yarn to match the shade I’m trying to build. Getting a range of colors is much easier with yarn as I don’t have to dye, dry, and blend furs, which can be extremely time consuming. Mixing disparate colors of yarn is quite easy and will result in “fur” that I can blend with other yarn colors to make the finished range of shades and mottle.
Mottle is important, as this is the mixture of all the colors in the completed blend which yields flies that resemble naturals, as real bugs are never a uniform color. This attribute is why I don’t use “store bought” dubbing blends, as they are almost always a uniform dye color without the subtle hints and shades that a mix of colors can provide – and the natural insect possesses.
Yarn candidates can be chosen based on what you’re attempting to create, a soft dry fly dubbing or a coarse blend suitable for heavy nymphs. A dry fly yarn might start as a soft fur yarn like an Angora rabbit, a synthetic rayon derived from plants, or a fine wool or cotton blend, whose fibers rival the gossamer nature of our aquatic mammals. I often add Mink, Otter, Muskrat, or Beaver to the decomposed yarn “fur” to enhance the mottle and loft of the material, and mute colors to make them more buglike.
Too tight a weave, cannot decompose into fur
Some yarns cannot be decomposed into fur, so you need to test the weave of your candidate to ensure it’s not too tight to be deconstructed. Typically the fine yarns are the worst possible candidates, as their fineness coupled with the weave of the fibers may not allow a traditional grinder to fluff them back into fiber form. Fine yarns resemble woven strands, with each strand resistant to unravelling, yielding a mixture that remains stranded, despite being cut to smaller lengths.
Test everything before spending a lot of money on colors, as some flavors of yarn may be unsuitable for your use. Cut the candidate yarn into one inch pieces and attempt to deconstruct them in a traditional coffee grinder. If they reduce to “fur” they’re suitable for a dubbing blend, if not, toss and try the next candidate.
Things to Consider When Choosing a Yarn
Yarns are like cars, not every color is made each model year. Spring and summer yarns tend to be bright colors, fall fashion tends to be darker, so you may have to select two different yarns brands to get all the colors you desire.
Yarns have a life span, and that brand may not make it more than a couple of years. If you find something truly spectacular, you’ll need to lay in a supply to ensure it will be available to you year after year. Large makers of yarn may keep the product for several years, small cottage makers or artisans may only stock the yarn for a single season.
There are hundreds of fiber types and artisan blends debuting every season, you’ll need to get eyes on a lot of product to understand what’s available to you online. Focus on fiber types and their respective size (coarseness) and loft (spike and curlyiness), as those are the attributes best suited for making fur.
You will need a physical yarn or fabric store to acquaint yourself with the kind and type of fibers and weaves available. Using only online sources is fine, but you will throw away numerous skeins unsuitable for your use as a single website photo cannot compete with a yarn you can visually inspect. Is Bamboo yarn and a Rayon yarn derived from Bamboo the same thing? This can only be determined by a physical examination of the skeins, you cannot differentiate these properties from an online photograph.
Similar issues exist with the different types of wool from specialty sheep. These are all the rage among artisan yarn makers … Some wools are quite fine, other are coarse, a physical examination of the skein will likely answer most questions, where an online photograph will not.
Many artisanal yarns can have incomplete dye results, and many fiber types resist dye and can offer special uses based on this incomplete coloration. Multi-hued yarns also provide a greater range of color for the price, and can make your purchasing easier on the pocket.
Yarn makers aren’t necessarily good at dyeing, especially small vendors intent on raising specialty sheep. You can have a wide range of results from a vendor unskilled at dyeing, especially in the area of consistency of color across several dye lots. Dyeing something Pink is easy, dyeing something the exact same shade of Pink, a second time, is very difficult. Beware small vendors and inconsistency of color.
Mix two existing to make a third new color
Small batch artisanal yarns can be very expensive, especially some of the specialty wools, with a single skein in excess of twenty dollars or more. Try to stay with mass produced yarns unless the artisanal yarn offers some tangible capability the others do not. Small batch typically means inconsistent colors and both inconsistent or limited availability.
Remember Combinations and Permutations when selecting colors
Most of us would rather forget the formula for calculating the total number of combinations, but this is important stuff when determining how many yarn colors from which to build your array of blended colors..
Assume you decide to buy six colors of yarn to start your dry fly palette. Two greys, two olives, and two tans. The total number of colors is 6, and if you mix any 2 colors together it will make a new color. The total number of colors you can make by only blending two is 6!/ 2!(6-2)! = 15 colors. If you blend 3 colors you get 20 colors, and it’s easy to see how quickly you can build a large collection of colors for your use. Because the dry fly palette is much reduced, compared to nymph colors, you can make a workable assortment of colors for your area at minimal expense.
You may not use it, but there’s no harm in fiddling with colors
I am building a dry fly palette and converting some into a nymph blend, but not all the dry fly colors will be useful to me (nor will all the colors you build for dry flies be useful either) as dry fly colors, nor will be members of the darker nymph palette, so I’ll focus my purchase choices on the colors similar to the insects in my area. If the bulk of the bugs you fish are Olive, perhaps purchasing one less tan, and one less gray, and two additional Olives will yield most of your colors as Olive-ish, which is your Sweet Spot.
For the areas I fish frequently, Olive and Grey are the two predominant colors, so I’ll build numerous Olive and Grey blends to capitalize on this. Recognize that a specific fly isn’t the source of a fish’s sudden weakness, it’s a combination of color, size and silouette that made the fish leave that darkened recess and commit an act of wanton gluttony on your offering …
Why not make flies similar in color to your favorites, as they can be used in a pinch when you run out of your favorite fly. More importantly, when your friends pillage your fly box and take all your extras, you can reach for the Secret Double Probationary Brown Olives … and hand the regular Adam’s to them Meathead pals of yourn …
Things to Consider when building your Blend
Are you building a dry fly assortment or nymph dubbing? The differences between the two are significant, so make sure you have all of your darker colors, browns, blacks, dark olives, if you’re making nymph dubbing. You’ll want lighter colors for dry flies.
How much of each color will you make? Remember that some yarns will disappear in a year, some take longer, if you build these wonderful colors unique to your watershed, how many year’s worth will you save of each color? This is important, as the killer color could run out, the yarn is unavailable, and you are left sobbing in frustration as your pals still have a few they “borrowed” from you last year …
Are you smart enough to write down the recipes for the colors you make?How are you going to build more if you forget what you put in it? You added a pinch of yellow beaver, and a handful of Red Fox squirrel, are you going to remember those a year later when it’s time to make more? DO NOT create colors without writing the recipes down, DO NOT make this mistake (like I did!).
(… and by the way, exactly how much is a handful?)
Base yarn colors when converted to fur, much lighter in color than the yarn
Construction of your dubbing assortment starts with you reducing the base yarn colors from stranded form to fur, via coffee grinder. Grinders are perfect for small jobs, just don’t confuse the one used for fly tying with that used for grinding your morning coffee.
Cut the stranded yarn into piles of one inch long pieces.
When building custom colors, use your hand as the measurement for stranded yarn.
Wrap both around the hand ensures 50/50 blend
Issue: Green is composed of half yellow and half blue, but you need to be reasonably precise with your measurements, and lack a scale to weigh a tiny fragment of yarn … So how to ensure the amount of yellow is equal to the amount of blue?
Answer: Your hand is a constant size. Wrap the yellow yarn around your hand five times, then wrap the blue yarn around your hand five times. Even better, grip both yarns and wrap them around your hand together, the same number of times.
Cut into one inch pieces for the coffee mill
Now, when you want to mix two colors, simply wrap the yarn around your hand several times, cut the resultant length into one inch pieces, and grind it into fur. This ensures your color is made from 50% of the first color mixed with 50% of the second.
The last step yields the unknown, as in the samples at left. I don’t think the color will be useful, but not knowing the result of Pink and Emerald added together is likely going to be … an adventure finding out.
The resultant fur when finished, not a useful color for me
In this case, the Emerald completely overpowered the Pink, and the result was a cold pastel of greenish hue … not useful at all, but great colors to show how the process works for the uninitiated.
I have taken great pains to HIDE the brand of the yarn I’m using, as this is not a proven winner, it’s a candidate yarn that may prove useful or may not. I do a lot of tinkering with different yarns as they are often priced cheaply, sometimes as cheap as a single packet of storebought fur, and tossing them into the trash will not break the bank.
Because of the regular obsolescence of yarns, I have to rebuild color selections every three or four years, as the old yarn used is no longer made. The process is fun and useful as I usually find a few colors I didn’t have in the previous yarn – that are now available in the new brand.
Because I write down the color recipes, I can reblend the old yarn colors with the new to remake colors that the new brand doesn’t offer, ensuring I can restock most of the useful colors time and time again.
Mixed three colors to get my Creme Orange dubbing
The above Creme-Orange was an actual color in the old yarn brand I was using, and is a dead ringer for the Hareline Creme Orange used in the original Chuck Stranahan Creme Orange Paradun. In the new yarn I blended Coral, Old Gold, and Sun Glow to make the exact color provided by Hareline.
Top Row are base colors, Row Two and Three are new colors made from mixing those of Row 1
Yes, I could have simply bought the Hareline, but then I wouldn’t learn a damn thing about color mixing, decomposing plant and animal fibers into fur, color and blend componetry – that the old timer’s knew and the new generation of fly tyer has absolutely no clue about …
This is a couple hours work during a rainy afternoon. The base yarn colors are at the top, and the below two rows are new colors I am making out of the blended top row colors. Think Tans, Greys, and Light Olives, as the desirable colors.
I start with 14 base yarn colors, which will yield 91 new colors if mixed with one other color, and 364 new colors if mixed with two additional colors. As the Emerald tends to overpower every other color I add to it, most of the emerald blends will not be useful. The Purple color also has limited uses, for similar reasons. I added the Emerald and Purple with the red, yellow, orange, and blue to give me the primary and secondary colors of the color wheel. This will allow me to build a spectral blend of this fiber as another option.
The only Olive that this yarn had was an Olive Drab, and a weak one at that, so I will be looking for a Black, Dark Brown, and two additional Olives from another brand to complete all the colors I plan on making.
Each of the bags has the recipe written on it and the proportions of the colors in that recipe. The top row only has one name written on the bag, that of the base yarn color, all other bags contain their recipe. In this manner, I can more easily remember the contents given they are written down both on the bag and in my notes.
Porting Dry Fly dubbing into a Nymph Blend
While not typically part of my process, in this instance I will take a few of the dry fly colors and make them into Nymph blends. I’m not going to make a general purpose Nymph blend suitable for big Stoneflies, rather I’ll leverage the fine filaments of the original dubbing and convert the Dry Fly version into a blend for smaller mayfly nymphs, targetting the 12-14-16 size range.
The “Wrapper” layer is the component containing the big guard hairs I would add to make a spikier dubbing, and I’ll omit that in preference to simply adding a “filler” layer of fine Red Fox Squirrel dubbing, and a possible “enhancement” layer – that may offer some sparkle in the finished blend.
The process is nearly identical to the construction of the dry fly assortment, with one exception, when considering how much of each color will I make, I need to factor in the different “enhancement” layers I might add.
Example: If I decide to make nymph blends of the above Creme Orange dry fly dubbing, and I wish two packs of the finished nymph dubbing, AND I will add Angelina fibers (Ice Dub) as an enhancement, AND some Antron, without the Ice Dub, then I need to make enough of the base color (Creme Orange) to make four packs of the nymph dubbing. Two packs with Ice Dub as the enhancement, and two packs with NO Ice Dub but Antron as the enhancement layer.
If I know what I will build in advance of creating the dry fly dubbing, then I will need possibly 8 packs of the Creme Orange. Two packs for the base dry fly dubbing, four packs to turn into nymph dubbing with two enhancement layers, and two additional packs to mix with other colors to make new colors … This is why planning what you will be building in advance, and writing it down, will make your job much easier.
Three stages of conversion, Original, color Muted, and Color Muted with Enhancement layer
The Color changes are far from Over
Just like mixing the different yarn base colors together to yield new colors, the same thing will happen when you convert your yarn blend to contain natural fur. As most animal furs are greyish, they tend to dampen or mute the original colors made from deconstructed yarn, no matter how much or how little is added.
The above picture illustrates this notion. While most of you likely assumed the Creme Orange flavor of dry fly dubbing had limited use, note its transformation into a nymph dubbing, and how the Creme Orange virtually disappears into a tan or tan-brown with the addition of natural Red Fox Squirrel body fur. Red Fox Squirrel is essentially a giant Hare’s Mask, so I shave the skins into a bag, then add pinches of the fur to whatever else I’m making.
To mute the original color and transform it into a nymph version I added about 30% Red Fox Squirrel to the original Creme Orange, yielding a blend containing fine fibers, and a nicely mottled guard hair that will show up when these small nymphs are tied.
Adding a layer of “enhancement” or sparkle is typically never more than 10% percent of the dubbing. This applies to any of the common enhancements, like Ice Dub (Angelina fiber), Antron, or Baby Seal, or anything else that adds sparkle to the fur. Adding more than 10% will overpower the original dubbing and change it too much.
In summary, by adding natural colors to deconstructed yarn I have turned the raw yarn colors into a buggier version that most tiers would love to own. These changes add to our combinations and permutations, and if you can make 91 new colors from 14 colors of yarn, you can make 3 colors from each of those; original, color muted or buggy, and with enhancement, giving your total options nearly 270 different colors with the use of only a single enhancement layer.
270 colors are way too many to be practical, so when starting this journey start with less colors. One Tan, One Medium Gray, an Olive and a Brown, and a few other colors to mix with them. Don’t be afraid of the wilder colors like orange or purple, as they can be muted with natural fur into a color and form much more friendly to the drab Bug Kingdom. If they fail to impress you, don’t use them …. the fun of the project is in making all the wild colors, what’s useful will be a smaller subset of that.
Focus on the inexpensive yarns so you can accumulate a few skeins, and then cut a few Hare’s Masks up to add to the final mix. This is more than enough to get you started on making your own fur, and will get you incredible colors on the first try, as uniformed dye colors suck by comparison.
Simply contrast the uniform original Creme Orange yarn color (above) with the mottled Red Fox/Antron version to see how complex colors always are better than monotone variants. Note that the Original Creme Orange was actually a three color mix, so it wasn’t monotone, but now it has Red Fox Squirrel and Spectral fibers added to it, making the complex color doubly so. The Spectral Blend contains six colors, making the final product contain 10 colors total.
The Creme Orange Paraduns, above, show the tightness of the dubbed body, so the yarn candidate has the smallness of flue necessary to make a good dry fly body. The nymph closeup follows, to show the additional “shagginess” induced by adding a bit of Red Fox fur and a pinch of the Spectral blend.
The Red Fox Squirrel addition added a lot of additional “scruffiness” to the fly. It’s a successful transition from tight dry fly dubbing to the kind of unkempt, well used, look that us meathead anglers prefer. This is an AP (Andre Puyans / All Purpose) style of nymph pattern that can be deployed with any color fur. I see a few strands of reddish Spectral blend, not enough to overpower the dubbing color … just enough to catch the light and make a fish think he sees something that isn’t there ..
… kinda like looking at a Denny’s Restaurant menu, lucious red tomatos, icy green lettuce, and when your plate arrives it’s a greasy, drab turd.
Enjoy fiddling, it’s one more thing to while away those blustery Wintery evening enroute to Spring.
The last couple of years have seen the emergence of “house brand” Chinese fish hooks, those that bear the name of a local shop, versus a national or international brand. I’ve been using them a lot of late, and with Tiemco and their ilk insisting on thirty-five dollars a box, Tiemco has joined the thousand dollar fly rod on the pile of items I no longer buy.
For me, the selection process for a new hook vendor starts with visual screening, then purchase and physical testing. As the fish hook manufacturers are all offshore, occasionally additional hurdles exist in the payment, customs, and political winds, but I’ll hold on those topics given the casual tier is likely to stay within the confines of his/her local fly shop.
For the last several years I’ve been using the Togen “house” brand of fish hook and they have proven a worthy replacement for the more expensive international brands, and I suspect they source from China, but have no way of proving that claim. I would like to buy a few additional styles that Togen doesn’t stock – and I’m intrigued by a lot of the vicious points I’m seeing on many of the barbless “competition” brands, which are also very expensive.
Chinese vendors excel at copying existing popular styles, as Chinese companies can blissfully ignore copyright laws and simple take existing hooks and reproduce them using their steel, which may or may not be as good as the original alloy. Hooks made in Redditch, England, differ in alloy properties than those made in China and Japan, or Norway, but there are many types of steel suitable for hooks. Physical testing will show differences in the steel quality, its resistance to bending, ability to make and hold a point, the closure of the hook eye, etc … but visual screening is just as important, as it is the first step prior to purchase, and there are squillions of hooks to eyeball …
The most important element of the screening process is determining what you’re going to do with the majority of the hooks, as certain qualities may need to be emphasized at the expense of others to lend themselves to your fishing style.
Are most of your nymphs going to wear beads?
Beads make a difference. The point, barb, and bend of the hook has to be able to skewer the bead and at rest, have the bead roughly inline with the shank, to make the fly ride properly. Slotted beads fit a bit wider range of bend, barb, and point styles, than countersunk beads. Keep in mind that every manufacturer countersinks (or slots) beads at different depths, so the fly and its “attitude” in the water may change based on your choice of hook and bead vendor.
Limerick Bend
I buy beads in the thousands, which allows me to use the same vendor, the same depth of slot or countersink, over and over again. Casual fly tiers should select a known vendor and purchase their 25 packs, as use lends understanding of any unique vendor attributes.
If the bulk of your nymphs will be bead headed, avoid hooks with overly pronounced barbs and shanks that end in Limerick, Sneck, or even some Sproat, bends. These bend types are troublesome with numerous countersunk beads, and you will not be able to use beads from Michael’s or other craft stores, that simply have a hole through them, like Glass or Plastic beads, as the bead cannot pass over the transition between the point and barb, or point and bend (if the barb is flattened).
Sneck Bend
To make life simple, where possible use the Model Perfect bend on hooks destined to wear beads. The Model Perfect is the most common bend for dry flies, and is also among the most common bends for nymphs, vying with the Sproat bend for dominance.
Will you fish most of your flies barbless?
Many types of hooks, especially many of the older Partridge trout hooks were never envisioned as a barbless hook, and lack enough point to hold a fish if the barb is pinched down. This is especially true if the hook boasts a Model Perfect bend, as the lack of point coupled with a wriggling fish allows the fish to simply slide cleanly off. Most commercial tiers are requested to tie flies using barbed hooks, unless the requesting shop has special regulations on nearly all of its nearby water. Using barbed hooks and pinching the barb is the only option for those that don’t tie flies, and can be a cheaper option for those that do tie, as “competition barbless” hooks can sometimes be more expensive than the run-of-the-mill barbed styles.
Not enough point, and Model Perfect bend, stay away from this combination
If you want hooks that fish equally well barbed or barbless, you need to ensure they have enough “real estate” left on the point to hold the fish if the barb is pinched down.
The Mustad hook at left shows a style that would be a poor barbless hook, as there is not enough steel on the point to hold a struggling fish once the barb is flattened. This “visual screening” can save time and money by weeding out hooks ill suited to your style, before you make purchases to try them.
Other things to look for are the “fit and finish” items that display the craftmanship, or lack thereof, of the manufacturer. Using visual screening, pay close attention to the eye and whether it’s closed properly. Is it a tapered or ball eye? Ball eye hooks are the least costly to make as the wire doesn’t have to change shape. A tapered eye is harder to make as the wire gets thinner as the eye is formed, and is thinnest as it closes the eye and touches the opposing shank. Poor imitators will favor the Ball eye due to its cheapness to manufacture, a bit more datum you can file away for your decision making.
Turned Up Point
Competition hooks, especially those for dry flies, often feature a “turned up” point similar to a circle hook. this is a nice fish holding touch and likely increases the cost a bit as well. If you’re buying barbless hooks, which can be more expensive, I typically opt for these small features on the styles I use for my own flies.
Imitators often use the least expensive options when producing their hooks, as their underlying knowledge and physics is not well understood in the hook’s use. Simply copying its shape will not produce a competitive replacement, given the variables in alloys, finishes, and barb and point choice.
” Fit and Finish ” touches, eye closures, point and barb styles, are all features you can visually screen candidates without having to purchase any hooks. Use these physical elements to ensure your search for a replacement vendor among the many “house brands” is suitable for the kind and type of fishing you are anticipating.
Testing the hooks “in the Wild” will determine whether the steel alloy is any good, the wire is too weak, or the finish resists rust. These practical application tests will cement the winner among the many contenders you may be reviewing. Visual cues and “screening” costs nothing and is an important tool for the buyer, especially when faced with literally infinite clones and knock offs.
Item 1: I saw in the news about the pending bankruptcy and sale of Joann’s Fabrics, and the closure of about 500 of their stores. Joann’s isn’t necessarily a major supplier of fly fishing gear, but like Michael’s, is often the closest source of yarn, chenille, Holoshimmer tinsel, floss, storage containers, metal beads, wire, and about a thousand other useful items to us fly tiers.
I use dozens of items from Joann’s and have to watch myself whenever I’m inside, simply due to all the odd millinery items I suddenly cannot live without. Many of my Czech nymphs use Joann’s clear elastic waistband material, so I’ll have to lay in a supply if they’re closing …
You might want to keep an eye out for a sale …
Item 2: President Trump is starting to levy tariffs on a number of our trading partners – and while few know what’s in store after all the dust is settled, one thing is certain … a lot of offshore products could be a lot more expensive.
Many of our graphite rod blanks are sourced from offshore (China), most of our fish hooks (Europe, Japan, and China), as well as many other common items like monofilament, reels, etc.
As I expect a lot of political rhetoric suddenly interfering with my hobby, it may be prudent to stock up on a few items, just to make sure we aren’t suddenly the victims in all this.
My concern is fish hooks specifically, as we are particularly vulnerable due to the lack of American hook makers. Most of the “generic” house brand hooks showing up at fly shops are sourced from China, most of the time honored brands like Gamakatsu and Tiemco are Japanese, and Partridge, Mustad, and all the competition brands like Hanak, Skalka, Knapek, etc., are all European.
Some Eagle Claw hooks are still made in the US, but many are made in China as well. I can’t think of another large scale American vendor, so there is a likelihood that in a trade war … the price of hooks may climb skyward.
… the Good News being that Pautzke’s is still American made … I think …
I think the final phase in any fly tier’s development is that implied by the Matrix, where the mind is finally freed of tradition and dependence on standard patterns, and fly tying becomes a series of test flies and experimentals, all of which catch fish.
It takes many years and a lot of fishing to get to that place, as it’s counter to everything you’ve learned to date, all the conventional wisdom gleaned from dusty tomes, chance meetings of kindred souls, and brightly colored periodicals, each hawking costly gear, expensive fishing, and light on real knowledge.
Your initial foray into fly fishing typically introduces you to the Adam’s killing power, and once seen ensures you always have a couple dozen in different sizes in your fly box. Later it simply becomes a fly with mixed Grizzly and Brown hackle, which morphs into a #16 with Grizzly and any body color, and then it hits you … there’s nothing special about an Adam’s, you simply need a similar color to the natural, and the right size, and the fish will eat …
Fly fishing shows you the door, but you have to walk through it …
It’s actually has nothing to do with flies and fly fishing, it’s the realization that your quarry is really stupid, has a brain the size of a pea, and you’re not outwitting another sentient creature, rather you’re taking advantage of a reflex. Slap a Big Mac in front of a Vegan, and watch instinct overcome concious behavior. If he fails to take it, touch up the lettuce and tomato with an airbrush, and slap it on his plate again …
Spoon Boy: Do not try and bend the spoon. That’s impossible. Instead… only try to realize the truth.
Neo: What truth?
Spoon Boy: There is no spoon.
Neo: There is no spoon?
Spoon Boy: Then you’ll see, that it is not the spoon that bends, it is only yourself.
Art and proximity to talent were my undoing. I had a family of trained artists at home and talented tiers at the Golden Gate club that didn’t mind a kid peering over their collective shoulders. Several hundreds of years of fishing experience were at work, and it wasn’t a steady stream of Adam’s and Horner Deer Hairs that were hatching, it was a flurry of unknown buggy things of unspecified color and distinct silouette.
Cal Bird was among the tiers and as an artist and calligrapher used elements of both to bring color and sparkle to his flies. He was instrumental in getting me off of specific patterns and into the look and feel of insects.
The Artist’s Color Wheel was my initiation into the realm of fly tying impressionism, as Cal frequently used “spectral blends” of dubbing to tie his flies.
The Artist’s Color Wheel is depicted at left, and a Spectral Blend is composed of all of the primary colors and all of the secondary colors of the color wheel blended together. The primaries are Scarlet, Cyan, and Yellow, and opposite them are the Secondaries; Green, Purple and Orange. Secondary colors are an equal mix of the primaries. Red + Yellow = Orange, Blue + Yellow = Green, etc,. As every color in the spectrum is composed of the three primary colors, technically all colors are contained in the Spectral blend.
Cal used to say, “…the Fish see what they want.”
Impressionism in fly tying is similar to that of the art world. Exacting imitation gives way to approximating their color, size, silouette, and using movement in your materials to complete the seduction and breathe life into your fly. Only the accuracy of the cast and the quality of your knots determine the balance of the outcome.
By introducing me to the Spectral Dubbing blend, Cal was making it easy for me to walk through the door into outright impressionism. By only altering the dubbing mixture, I could continue to tie the Gold Ribbed Hare’s Ear and understand that adding shards of Red, Yellow, Cyan, Green, Blue, and Purple, to the fly did not make it less of a killer, often it made it doubly effective – and fishing the fly became a crime committed against hungry trout.
Seduction of the Innocent
Neo: What are you trying to tell me? That I can dodge bullets?
Morpheus: No, Neo. I’m trying to tell you that when you’re ready, you won’t have to.
Armed with the knowledge that I was fighting reflex instead of a frontal lobe, and my making minor or liberal changes to established patterns wouldn’t result in excommunication by the fly fishing clergy, I was able to fiddle, tinker, and modify my favorite patterns into untested experimentals. Suddenly flies started to populate my fly boxes based on whim, a theory, or a new material, and their use wasn’t accompanied by an unwelcome lightning bolt from the heavens ..
(The clouds thickened above me several times, and I was quite conscious that carbon fiber was a semiconductor, however …)
FireStar Antron, trimmed to 3/4 inch and ready for blending
As regards construction of a Spectral Blend, Cal used baby Seal fur for its sparkle, but today we can use Antron fibers in the same fashion. The yarn industry uses Antron fibers for weaving, synthetic batting, and other textiles, and Antron fibers are available under the trade name of “Firestar.” Firestar is a white trilobal fiber that is used in spinning, yarn making, and the millinery industry, and is sold in its native sparkly white form, that us fly fishermen have dubbed, “Antron.”
Purchase the Primaries, red, yellow, and (cyan) light blue, and the secondaries, orange, green, and purple, trim them to about 3/4″, mix them together in equal parts. The Chameleon Fiber Company has a pre-dyed multi-colored Firestar that is already dyed in all the primary and secondary colors, and is available for $5 per ounce, which is cheap. All you need do is chop it into 3/4″ pieces and mix it into your fur.
Spectral Bird’s Nest Blend
Making a bag of the blended colors beforehand allows you to mix a pinch or two in with your normal dubbing to make a Spectral variant of the original fly. Simply add some to traditional Hare’s Mask to make a Spectral Hare’s Mask dubbing, then tie it identical to the classic fly.
Cal’s Spectral Bird’s Nest is tied in the same fashion. The traditional Bird’s Nest blend is 10% natural baby seal, 45% Hare’s Mask, and 45% Australian Opossum. You can substitue white Firestar Antron for the Baby Seal, and then add a pinch of the Spectral blend to make the Spectral Bird’s Nest.
Ignore the cries of the Unbelievers when you hand them a few Bird’s Nests and they exclaim, ” … this ain’t the Original, Whassup?” The mix of colors in the Spectral flavor will likely add to the original versus detract, and carrying a couple dozen will be an asset.
Here is a closeup of the finished Spectral Bird’s Nest after the Spectral blend has been mixed itnto the original fly’s dubbing. The classic Gray/Brown coloration of the Bird’s Nest is intact, and the motes of color that radiate out of the fly allow different impressions of color depending on the angle of vision. If the fish wants to see a certain color, it’s in there .. yet the traditional fly is preserved. The silouette, form, and function are identical, only the diversity of visible colors have changed.
Feel free to tinker with color enhancements as you’ll have plenty of Firestar to add color elements to your flies. I typically keep the Spectral blend at about 10% of the dubbing layer, but feel free to increase and decrease this to check the effects of additional colors. Remember there is nothing sacred about a traditional pattern, so get adventurous and let the trout tell you what is and isn’t clever.
Thread is often overlooked due to its construction role in fly tying; considered a “necessary evil” given its bulk adds weight on small flies, and uneven application leaves lumps and bumps in your fly’s body, causing issues with smooth materials like tinsel and floss. While its water absorption is minor, it will trap moisture and contribute to an eventual sinking. To add insult to injury, the small sizes, 8/0 and smaller, tend to part like toilet paper, and have a nagging tendency to break on critical steps leading to catastrophic unraveling and constant swearing …
… and that’s the Good News ..
Like everything else in fly tying, skills come with time and practice and thread is no different, so let’s focus on a few underlying issues that are not so obvious.
Thread, Proper storage and care
Most threads are made of synthetic materials, nylon, polyester, and GSP (Gelspun) – a member of the polyethylene family. The enemy of all synthetics is sunlight, so if you store thread in a tool caddy in direct sunlight, bad things will happen over time. Gossamer threads, 16/0 and beyond, will decay quite quickly, where size “A” thread will be less affected due to the increased volume of material they contain. Heavy threads resist sunlight better than thinner threads, and all will sustain damage over time.
If you have issues with thread breaking, ask yourself whether the fly shop you frequent store their threads in direct sunlight. Is their display near a window in full glare of an afternoon sun? If so, the less commonly used colors, those that remain on the rack longer could be weaker than “fresh” thread. Think of the Steelhead or Shad colors that are only in high demand for certain parts of the year, and remain dormant in the rack for the intervening nine months. When needed next year they might be a bit weaker, and multiple years of storage will continue their decline. If you are plagued by weak thread that seems to break more than it should, remember sunlight is the enemy and both your storage and the vendor’s premises may be contributing to the issue.
Start with Danville 6/0 before moving smaller
I recommend most new tiers use Danville 6/0 thread to aquaint themselves with fine threads. Danville is a wonderful thread and a great starting point for a new tier. Later, once you’re accustomed to the 6/0 you can move down to the 8/0 Uni’s or Ultra Threads once you have skills using fine nylon thread. Thread choice doesn’t lend any “killing” quality to the fly pattern, it’s typically the choice of the meathead tying the fly, not an element that lends to the fly’s deadliness, so substitution of size, brand, or color, is not an issue.
Thread should be stored long term in opaque drawers out of direct sunlight. It’s fine to store active spools on your bench, just don’t leave them there for months at a time.
While thread is considered the enemy, it has more uses than most tiers imagine
Fly tier’s routinely ignore the properties that make thread something more useful. I’ve watched tiers painstakingly select a shade of dubbing for a fly body, or admire an imitation next to a real bug in alcohol, pronouncing how this season … they have finally developed the perfect imitation of the [Insert_Latin_Name_Here], and how they will no longer be denied victory on their favorite creek or drainage.
… and they completely ignore thread and water, despite both being present in every fishing scenario…
Simply put, the thread color can add itself into the overall body color of the fly when wet, especially on lighter colored flies, most of whom are dry flies. Many fly tying videos and fly patterns specify black thread, and this can affect your imitation in the worst way. Light colored flys, will have a muddy appearance as the fly becomes saturated, not at all the color the tyer originally envisioned. As black is among the most common colors purchased, once damp your perfect imitation of the local bug turns into a darker version, and may in part be responsible for a lackluster reception by fish.
The above pair of pictures show a Creme colored dubbing dubbed with four different thread colors. Black, Fluorescent Orange, Light Yellow, and Light Olive, all Danville 6/0 colors. The dry version shows a nice creme hue regardless of thread color, and the dampened version shows how both the Black and the Fluorescent Orange can bleed through the lighter colored dubbing and alter the overall appearance of the fly. Both the neutral colors, Light Yellow and light Olive show less, if any, color bleed.
Matching thread to the imitation, or simply adding a translucent effect
Tying lighter colored dry flies should always be done with neutral colored thread, tan, light gray, light yellow or light olive. These should be the colors most used by the tier for overall fly tying. Blacks and browns are fine on darker flies or nymphs, and specialty flies like Shad, Saltwater, or Steelhead, may require brighter hues given those flies are typically ALWAYS attractors versus a realistic imitation.
As every fly tier ever created goes through an exacting imitation phase … thread color and color bleed through will be extra important on flies tied to imitate a specific insect. Translucent effects can also be tailored to a specific bug wherein the fly body dubbing is chosen to facilitate thread color bleed through, and you can add a tint to the result using the thread color. Saturated light colored dubbing turns into a translucent gel allowing the thread color to bleed through agressively, as shown in the below photograph.
Above is the female Little Yellow Stone (#16) we use on Hat Creek. There are many variants of the fly, using yellow deer hair and other high floating materials, but this is the version I have used for many years. Rather than dubbing two colors of dubbing on the body, I simply start the fly with Hot Orange Danville 6/0, and switch to the yellow thread once I have finished the dubbed Yellow fur body. I put a pronounced band of hot orange hread at the rear to bleed through the yellow and imitate the egg sac, then dub the remainder of yellow body and rely on the bleed when damp to make the egg sac visible.
Threads can be used to tint as well as to overpower dubbing colors. Neutral colors will offer a hint of color, bolder colors will offer much more depending on the choice of body color. The combination of thread color and damp dubbing can add a dimension of translucence to lighter flies that mimic the squishiness of the original. Whether the fish care is immaterial, as it’s the angler’s confidence in the killing properties of his bug that determines success and failure.
In summary, thread use and colors can be as much a science as other forms of fly construction. Use the neutral colors of thread to preserve the coloration of the dry insect when damp, use more pronounced thread colors and light colored dubbing to “tint” the damp fly body with thread color, and use agressive thread colors to make bug parts pop out, as needed.
… and make sure ALL threads are stored in dark closets or drawers to preserve their color and strength in perpetuity.