Category Archives: Beginner info

From Beginner to Better: Whip Finishes

The “Beginner to Better” posts relay small tips used by experienced or commercial tyers to improve speed, quality, or simply enumerate some of the physics behind our tying that beginners are unaware of until much later in their skill progression. Most tend to be overlooked in the Youtube narrations, as even video footage cannot convey physics or the rationale behind the inclusion or omission of a step.

Big Unwieldy heads caused by a dependance on beaded flies

The dominance of beaded flies is hamstringing a lot of new fly tiers, as the presence of a bead eliminates the portion of the fly that would have been the tie off points for the last few materials, and the formation of a slender, graceful head.

Too big of a head, caused by bead usage

Beads mask the finesse of the fly’s finish, and turn it into a thread lump – often as tall or taller than the bead itself. Tiers no longer plan the fly’s finish, they simply lump everything in one spot along with seventy five turns of thread. Gone is the learned thread discipline, keeping turns to the minimum, and with its departure are the “feathered” tie off points that spread the fly finish and thread over a larger area, rather than simply focusing everything in the gap behind the bead.

Instead of ample room and a gentle slope, whip finishes are crammed on top of the seventy turns already present, and the knot can tighten poorly, prove unstable, or the thread can snap due to a poor draw. We’ll cover each eventuality below.

Whip Finish Physics

Whip finishes are a thread running the length of the knot, covered by multiple turns of more thread, that when tightened, cover that tag end when the thread is cut. Of vital importance, is to only make those turns of thread in one direction, down the hook towards the eye. In this manner the thread is covered by the subsequent turns and the knot draws cleanly and tightens properly.

Should you make a sloppy knot, where the first three turns move towards the eye, and the subsequent three turns move away from the eye, the underlying thread will have an “S” curve in it and the knot will tighten less well. If you are using excessive thread, eight or nine turns in your whip finish, and you spray those all over, up and down the fly, the knot will have multiple “S” turns in the underlying thread, and will likely not draw tight at all – or the thread will snap when you attempt to tighten the knot.

Rule 1: Learn to tie whip finishes with the same number of turns of thread.

Rule 2: Whip finishes must start at the top of the head and move in one direction only, towards the eye of the hook. On a beaded fly, the knot starts at the point furthest from the bead and moves towards the bead with each subsequent turn.

Typically I use a four turn whip finish on everything. If the head is large and exposed, like a big saltwater fly, I might take a few more turns, but will adhere to the “each turn closer to the eye” requirement.

Thread Physics

Thread also influences the whip finish in a variety of ways. Fine threads, 6/0 and smaller, are weak and more susceptible to thread ailments. Besides the hammy handed fly tier, the biggest ailments for thread are age and spin.

Age:

Nylon threads age well if kept in the proper conditions, and age really poorly if you don’t keep them properly. The nemisis of nylon is sunlight, so if you are in the habit of putting your extra thread spool onto a dowel on your tool caddy, which along with your tying desk, is near the window … you can expect your fine threads to die a rapid and horrible death.

Nylon threads must be kept in a drawer or opaque container. They will last forever under those conditions. I have several hundred spools of 6/0 that are nearly forty years old, and show no signs of deterioration due to my keeping them out of sunlight and excessive heat.

Spin:

If you spin your bobbin excessively you will turn your single strand of nylon thread into a round thread. As your bobbin hangs under the fly while tying it will spin in different directions due to your striking it with your hands or the materials you’re manipulating. If your bobbin spins excessively in one direction (without being allowed to spin opposite) you could have a slightly weaker thread due to the constriction of the thread induced by the spin.

Should you immediately spray nine turns of a whip finish all over the head of your fly, the weakness will show due to the increased resistance of multiple “S” turns trapped in the knot, and the weakened thread can snap when tightened.

Letting the bobbin “rest” just prior to the whip finish, will allow it spin to equilibrium, removing the tightness of weave due to your spinning the tool for some purpose, like a dubbed loop or brush.

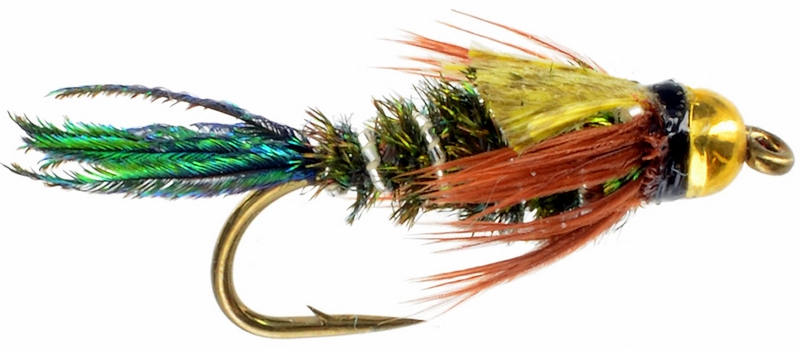
The above ZugBug illustrates the overly large head where the thread head actually protrudes onto the bead. While the fly is fine proportionally, and will fish wonderfully, the combination of tungsten beads (and whether this is a slotted or countersunk bead), will have the fly bouncing along the bottom making contact with the rocks and timbers that make up the creek bed.

If the bead rides slightly offcenter, which can happen with slotted beads, the fly may be bouncing merrily down the creek upside down, and the thread being “taller” than the bead … the knot will be making contact with all the boulders, and not the bead. Heavily weighted flies take lots of abuse and the overly large whip finish area will be a liability due to the damage that area will recieve.

Rule 3: Beaded flies are fine, when tying them ensure your whip finish is smaller than the bead, so the bead absorbs all the instream impacts and not the knot area.

Defining the Fishless Fishing Trip, making poppa proud

Can Man survive if there are no fish?Proof positive that I’m in my dotage, as I begged off a fishing trip; something never before considered, something I’ve always dreaded, and something my Poppa would point to as proof of maturity.

In my (likely OUR) youth, I went fishing so long as there was water, enough gas money to return to our originating zip code, and there was rumor of fish or fishing present.

My dad would see the frantic late night preparation, restringing rods, wadding bologna sandwiches into the same pocket as the bait, and would shake his head solemnly.

Another damn fishless fishing trip … When are you ever gonna learn?

Naturally I would protest mightily of our combined angling prowess, how this trip was completely different than any prior outing, and furthermore … (meekly) … would he be so kind as to drive us there?

It was always a mystery how Pop could spot the fishless fishing trips from the productive outings, but I figured it related to the company I kept – how the neighborhood was slim on Mensa candidates and damn few knew a Nail Knot from a Poke in the Eye with a Sharp stick.

But hell, half the fun was the Out of Doors, and while the fishing might have been on a pier, beach, or piney wood,  it still beat watching Star Trek reruns or doing chores.

Ten thousand fishing trips later – I’ve learned many things. Firstly, I can drive my own self, so the Meekness got kicked to the curb along with Humble. It is a known truism among us Professional Timewasters that only supreme confidence in the fly – and by that extension, confidence in our skills, and the quality of the rumor we’re acting on separating Real fishing trips from the pretenders.

Many thousands of trips have taught us that fishing is like Poker and if our comrades and their behavior are examined, often yield “tells” that mean the difference between a bluff and the pat hand.

If the pal organizing the trip (for the last couple of weeks) calls to confirm the night before, and after your bed time, chances are you’re looking at a fishless fishing trip.

If the nature of that call has so little detail about where to meet, what to bring, and when to show – that your spouse will be unable to direct the police to your corpse, chances are you’re embarking on a fishless fishing trip .

If the fellow owning the boat calls the deckhand, “Gilligan” or “Little Buddy”, you might be considering a fishless fishing trip.

If the tackle you’re directed to bring is “everything”, you are participating in a fishless fishing trip. “Everything” being equivalent to the “Doctor AllCome” blaring out of hospital speakers, and your erstwhile pals are going to let you figure out what the fish are eating, then borrow everything resembling that from you.

If the fellow that learned of this little known secret place insists he hasn’t told anyone and speaks in whispers, you’re headed for a fishless fishing trip. What it really means is the spot belongs to another pal who swore him to secrecy, and you’re about to become an accessory to murder.

If there are more “friends of friends” between the person owning the property and your pal (who swears he has permission), than the number of Degrees of Separation between you and Kevin Bacon, you’re on a fishless fishing trip. Six Degrees of Separation is the limit for knowing Kevin Bacon, and any relationship more distant is purest fantasy.

If the boat you’re using hasn’t been started since last Winter, you’re on a fishless fishing trip.

If the “hot fly” that guarantees the day’s festivities was revealed by some codger at a local gas station, you’re on a fishless fishing trip. Any dumbshit knows that a fly that lethal requires the benefactor to preserve one for posterity. Instead, they’re giving you that “Aw, Shucks” look as they finger your Ginger neck, claiming it was, “ …like this, only more Brown.”

If the number of large ticket items borrowed from you outnumber the fellows going, you are on a fishless fishing trip.

If you have to ask your pals if they have a fishing license, you’re on a fishless trip. Anyone not buying their license on January 2nd of the calendar year is a poser of the highest calling …

If coolers of beer are part of the gear carried to the water’s edge, you’re part of a Band of Brothers engaged in an exciting outdoor adventure that may include serving girls from the local tavern, but there is neither spouse nor fish in your future.

We’ve got Black Ants that size, but they float

Fly tying is a mixture of the two Invariably someone asks me, “what’s the hardest thing in fly tying?”

Most expect me to mention the multiple hours it takes to complete a fully dressed salmon fly, or a knotted leg attempt at realism – involving lots of glue and much effort, but those are simply mechanical tasks and may be time consuming, but are easy once you’ve done them a couple thousand times …

What’s the hardest thing in fly tying?  … giving up your reliance on other people’s patterns, showing a little confidence in yourself and your own critical eye.

It shouldn’t be too much of a surprise if you think about it critically, but fly tiers and baseball players are the last bastion of weakness and superstition – the only difference between the two, is that one carries a rabbit’s foot for good luck, and the other dismembers rabbits and carries all four should the good luck run out …

Fly tiers will invariable take some form of instruction to get them started and then rely on books and magazines, or the Internet, to continue the learning process. Over time they learn never to trust a photograph and always refer to the text recipe – knowing that lighting and focus can change the hue and color of the fly, making the components less recognizable.

Lacking all the printed materials in the pattern means the finished fly is damaged goods. It’s Awesome*, worthy of mention with Barry Bond’s steroid enhanced home run record.

Flies worthy of publication have magical properties, each having killed thousands of fish – and therefore chosen by editors for their killing qualities – not to be tinkered with by mortals, or anyone else having just finished an Intermediate class.

It gets in our head early, and lies there like a leaden weight.

As the seasons whiz by we’ll occasionally venture out and develop a bug for some favorite venue we’ve fished for years. When someone spies them they’ll be a lot of pursed lips and raised eyebrows, once their origin is known, and we’ll get a half hearted shrug before they move onto the brightly colored monstrosity in the next compartment, whose pedigree includes magazine covers, the latest synthetics, and an offshore source requiring a new rod, new leader, and the reflexes of a Cobra to fish it …

Yet the lackluster was our fly, it was us, the sum of our deduction and science merits only a raised eyebrow and a shrug.

… and as our flies begin to look like the magazine flies, and we start to surpass them in quality we’re emboldened. We select a handful of prophets, whose flies and articles resonate with us and we mimic their work and science.

At some point even that’s cast aside and we’re no longer following the rest of the crowd. Magazine flies are revealed to be nothing more than some fellow’s anthropomorphic idea of what a Damsel fly looks like – and it’s tied poorly to boot.

Now a fishing trip becomes a snack food; you’re swept up in all the dark nymphs that worked so well on the last trip, and how we’ll invent new dark nymphs just for the occasion – and we’ll marvel that they outfish anything tied from a magazine and anything commercially available in the store.

…and with that discovery, you’ll realize that fly tying is many years of learning different fly styles and their construction, whose colors are not set in stone like the picture – but are waiting for you to enhance and define.

Now that you’ve mastered the AP style, the standard dry, the cripple, the big stonefly nymph, the leech, and parachute, only now does science, art, and fishing come together, and your muse is a tuft of dander, or a clump of sparkle.

Those anglers that don’t tie flies wish they did. All of them, without exception.

They’ll learn the same truths as tiers only it’ll take them longer. They have much less to chose from then the rest of us, and little to unbalance their loyalties to the commercial giants; Adam’s, Humpies, Zug Bug’s and Elk Hair Caddis. To them a black nymph can be the AP Black, or the Black Martinez, and nothing else is possible in black and size sixteen.

Probably why the average age of the beginning fly tier is nearer forty-five, and the stray kid is taking it because his dad is trying a second time. A decade or so of fishing ensures those same truths, newly self evident, means without an indentured servant for supply, art and science will compel him to submit to moths and head cement, and the hardest thing in fly tying will be the easier.

Chicken Scalps, large dollars, fly tying and dry flies merely add a pretty face

grizz Many would say that nothing in fly fishing is more addictive, the lure of the surface fly and the visual take. Most would insist that no component of fly tying is more expensive, as the surface fly and accompanying visuals come at a horrific price.

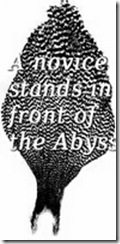
A novice stands in front of the abyss, the friends and expertise of the fly tying class a distant memory, the cautionary advice forgotten, and the long wall of genetic hackle menacing, unfamiliar, and incredibly expensive.

Need is well defined; brown and grizzly for the Adams, Humpy, and Western flies, ginger for the light Cahill, and medium dun for the Quill Gordon and most of the east coast. Price precludes grabbing one of everything, and there are a dozen capes labeled #2, each the better part of a hundred dollar bill – whose shade and cut look similar, only which one to buy?

Is someone going to yell if you take one out of the package? Do I really want to learn to tie flies? The book said to press the barbules against my lower lip, the instructor said to buy saddles, and that fellow mentioned Leon’s Coque made the best tails – I don’t seem him anywhere, and the sinister looking fellow at the register doesn’t seem interested …

… I could use some help!

Forums are ablaze with questions about hackle; where is it cheapest, which is the best-est, and how can I get the most-est – interspersed with; which do I want, what should I get first, are saddles just as good, and the ever-present, “… the guy in the book said …”

Like everything else on the Internet, there’s much wheat and even more chaff.

Chicken Necks – Past to Present

Compared to the past there is much less variety on the wall of the local shop. Most fly tiers are introduced to genetic chickens in their first tying lesson, and rarely encounter capes from China and India – which dominated the trade in year’s past.

Most of the non-genetic hackle goes to the costume market, where they’re made into long feather boas in both natural and brightly dyed colors. India capes are about a third the size of our hormone laced genetics, and Chinese capes are typically about 50% larger than India necks, but still markedly smaller than what Whiting packages.

Occasionally you’ll run across some in fly fishing stores, but not often. Instead you’ll find Chinchilla necks, that mimic the color and pattern of Grizzly, but have irregular barring and a hint of brown in the black markings. As large grizzly hackles have many uses including bass and saltwater flies – and are adored by costumers, it’s the most common non-genetic sold.

As well as the Indian or Chinese capes, you can encounter a semi-genetic flavor. Some grower that’s attempting to perfect a strain or color to compete with Whiting, whose flock is not yet into that rarified zone commanding ultra-high dollars. These are often Grizzly also, as dyed Grizzly in any size or length is quite saleable.

Packaged saddle hackle is still dominated by non-genetic chickens, in large part because eating chickens are raised by the millions and all are white, or off-white, much easier to dye than naturally colored chickens from off shore. Most are hens, but white roosters still abound in great numbers. Genetic roosters must be fed and pampered for two or more years to yield those foot-long saddles, our domestic rooster is likely to live about half as long before it becomes a MSM chicken.

“MSM” is “mechanically separated meat” – which is a process that yanks non-prime elements like lips, snouts, and pucker off the bone once it’s been boiled into softness. It’s commonly known as a Chicken McNugget, or Hot Dog.

Many shades of Awesome

Parts of a Genetic Neck Today’s tiers still insist on the finest, cheapest, and best – but they’re picking between “great” and “fantastic” in comparison with the past. Dry flies always required two (or more) hackles in the 80’s, and a typical size #16 was about 1.5” long.

If you were lucky there was a couple dozen in the inch wide nape of India cape, unlucky and you tied mostly #12’s and above.

The worst of todays genetics would have driven tiers into paroxysm’s of joy. It would of been something to stroke or trot out to the amazement of the rest of the crowd, left pristine or given a female name and worshiped.

Those vendors that grade necks – and mention their methodology – use feather count to determine #1’s, #2’s, and #3’s. More feathers per inch yielding more flies tied, and increased value to both breeder and fly tyer. The grade given by the breeder can be ignored. Simple feather count may be useful to differentiate one chicken from another, but it’s not an adequate measure of value to the fly tyer.

Fly tier’s are unique. Each is a different mix of favorite flies, favorite fish, number tied per year, and most common size fished. While feather count has some meaning, so does cut of the neck, color of the cape, and shape and size of the feathers too large for dry flies.

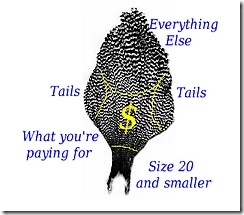
Cut of the Neck: An improper cut usually comes at the expense of the tailing material. Tails are from the right and left edge of the neck’s shoulder, markedly darker and stiffer than the rest of the cape, shaped like a “spade” versus long and skinny, and can be too few to tail all the dry flies the hackle can produce.

Color of the Cape: Color is responsible for probably half of the purchases, especially if the color is uncommon or rare. Color would also describe other visual features such as dark barring, light barring, or black tipped – such as Badger and Furnace necks. Dun necks are particularly valuable in different shades, and is often purchased for the color alone.

Shape and Size of the Feather: Genetic necks make poor hackle tip wings, largely because of the narrowness of the feather. At the tip a slim feather can be quite small and the effect lost amid a thickly hackled fly, especially on Western flies which use much more hackle than their Eastern counterparts. Some genetics can offer a wider large feather which may be suitable for hackle tip wings, and this quality weighed in the purchase decision.

Feather Count: It matters certainly, but is best used to select a candidate tuned to your fishing, not the single criteria that drives purchase. (I’ll have more on the subject below)

How to select the best Neck

The most common size tied should be high on the neck, not down at the narrows Most fly fishermen tie many more flies than the traditional dry, and often fish for other species in addition to trout. It should be no surprise that there are many great necks offered on the rack, but the best neck may have qualities unique to the tyer, with “best” differing from one angler to the next.

The dry fly capable hackle may only be spread over 30% of the genetic cape, why not consider the other 70% as part of an overall grade?

If the tier has a split season, or fishes for multiple species, the shape of the large feathers may dictate his steelhead hackle, bass poppers, or his large saltwater flies. Some necks may be suited for tying these flies more so than others, based on long narrow feathers, or extra wide webby hackles, or just wide blunt tips for wings. A fly tyer conscious of his planned double-use may find the best neck is a combination of his dry fly needs, coupled with his other interests.

… and the grading system used to price the necks, has less value when averaging all the requirements.

You have to remove the neck from the packaging to examine it closely. There should be no objection from the shop staff, but you’ll have to be considerate and not mangle the cape in the process. Both necks and saddles are often stapled to cardboard backing. Flexing the cape a lot will start pulling at the staples – and may even add a bend into both feathers and backing. Your proprietor will not mind a casual exam, but would prefer your hammy-handed tendencies not mar the package permanently.

Each fisherman has a “most common dry fly size” that he uses, and an examination of his fly box will reveal what size that is – this will be our examination criteria for neck selection.

Find the most common size used : Flex the neck just enough so that the feathers lift off those behind, and find the horizontal line on the neck containing your unique “most tied” size. A great neck will have that area in the widest part of the cape, not down low on the narrow isthmus area. Wide equals more feathers, and ensures your most common flies fished match the neck you’re purchasing. It’s very simple, as higher up the cape means better in every cases.

Examine the tailing area : Now examine the shoulders of the cape to ensure the cut has preserved both areas of darker tailing material – and the two regions appear as mirrors of one another.

Examine the larger feathers for optimal uses : Take a look at the shape and size of the larger feathers at the top of the cape. Ensure they match any other use you’ve planned. For hackle tip wings you want broad rounded points, for steelhead hackles you’ll want nice dark barring and the appropriate sizes present, bass poppers should have nice wide feathers to assist in moving water, and saltwater or Pike – perhaps length is the only criteria.

Ensure the color extends to the webby area : On those necks where color is a primary requirement, ensure the desired color extends down through the area you’ll peel off and discard. Avoid those whose color at the tips is perfect – but the color doesn’t extend far enough down the feather.

If you’ve satisfied the criteria above and selected the neck that’s the best fit for all, you’ve got a great neck. Now look at the price, as vendor grade and price is the least important of all.

If it boils down to a #3 and a #1 that are the final two, buying the #3 will the better choice … “a good deal” being the last check on our requirements.

The Neck versus Saddle debate is Over

A Whiting Medium Dun Saddle Necks are no longer as compelling as a quality saddle patch. If you’ve marveled over a 12” #16 hackle you’ll understand what I mean. Necks have been considerably refined from the days of the India cape, but saddles have come even further, to the point where #16 hackles can be a foot long – or even longer.

A quality neck may feature 30 or more hackles that match a single size, perhaps another 15-20 that are a bit too long, or a bit too short. Assuming you get about 50 feathers suitable for a #14, and it’s often one feather per dry fly, the neck has exhausted the supply after four dozen flies.

Take a similar quality saddle with hackles 10-11 inches long, and you can get 3-4 traditional dries with a single feather. If a saddle has more than a dozen such feathers you’ve equaled the capacity of the more expensive neck, and whatever remains is why saddles are a better deal than necks.

I’d suggest that a quality saddle can produce 15-20 dozen flies in the same size versus 4 dozen for the cape.

I converted to saddles some three years ago, the down side being there’s no tool or container on the bench to hold scraps of hackle that’s seven inches long …

But nothing is the Perfect Feather

Saddles offer greater value, but there are pros and cons with both necks and saddles, and it’s important to understand all the issues.

Necks:

Stiffer stems, greater variety of sizes, tailing material present, wider feathers, blunter tips, hackle under size #18 available.

Saddles:

Flexible stems, fewer sizes, longer length, no tailing material present, narrower feathers, needle tips, no hackle under #18 available.

Each of the attributes mentioned above has a corollary in tying that will either be hindered or assisted. Probably the most important difference between necks and saddles is that no tailing material exists on saddles where it is plentiful on necks. Perhaps the fibers on the largest saddles can be long enough for tails, but they are not the hard, shiny, fibers present on the shoulder of a chicken neck – they are much softer by comparison.

Having dozens of left over capes lying around, most of which are missing the small trout hackle, means that I can find tails on older necks and use the saddle only for the hackle that supports the fly.

In summary, a tyer needs both – but necks are likely to be upstaged by saddles via cost and additional capacity.

While genetic feathers show no signs of relinquishing their grip on the hackle market, there is still plenty of uses for a non genetic neck or saddle, only they’re becoming increasingly hard to find. Both hackle tip wings (Grizzly) and large well marked feathers are still in great demand on many styles of fly, and while we get increasingly spoiled with better and longer hackles, we’ll still need plenty of the regular feathers to handle the ignoble tasks other than holding up a dry fly.

Part Last – Singlebarbed teaches the beauty secrets of the Shao-Lin Masters

As we mentioned in Parts 1 & 2, the measure of true fly beauty is held by fish not humans. Unfortunately only averaging  9 days afield your flies are viewed most by people, and suffering their continual criticisms can make a fly tyer resign himself to please both anglers and quarry.

… and in the doing, gain the precision to make his flies sturdier.

We’re down to the final three, each so hideous and daunting as to cause fly tiers to scream, gnash teeth, or give up the craft entirely. Three crucial steps that professional tiers do subconsciously, that plague beginners for decades, are rarely mentioned, and completed so quickly you’ll miss it on a video or live demonstration because you’re drawn to more glamorous materials and technique.

Watching a talented tier can be mesmerizing. A crowd of fellows inching forward looking at some vindictive SOB who’s just palmed a couple ounces of yard-long #16 saddle hackle in Coral Pink. You’re trying to stammer the question, “… Wh … where’d you get that?” – and you miss a half dozen gems of technique while he pretends he’s got a closet full of the material and doesn’t.

Here’s what you missed:

three In prior posts we mentioned the difficulty of keeping materials from moving around the shank – either via thread torque, bulk, or method of attachment.

I’ll ask a simple question;

Which holds the tail of a nymph onto the shank, the six turns of thread you used to tie it on, or the forty turns of thread that come with adding ribbing, body, and all remaining steps?

Light bulb.

Thread management is part art form and part physics. Thread is your enemy and we use it as sparingly as is possible. It’s heavy, lifeless, and is always applied in great quantities where it’s least useful.

A tail isn’t “lashed” onto a hook with tight concentric turns, it doesn’t require taming where all traces of it are buried under thread, it’s anchored with three tight consecutive turns of thread at the tie-in point, and then the thread is spiraled to the next step.

That’s true of wings, wingcases, ribbing, bead chain eyes … and everything else.

The anchor wraps occur at the last portion of shank before the fibers become tail. The butt ends will be bound securely by the thread used to dub the body and attach the ribbing, and we don’t need any additional turns to hold them mid-shank. Any tail movement will occur at the anchor point – not in the middle of the fly.

Understanding the physics behind this practice is the hard part, execution is much easier. “Anchor points” exist where the stress will occur – and the thread wraps and tension used are critical only at that spot – all other wraps position the bobbin for the next step.

Less thread pays off in slim profiles, small heads, and buoyant dry flies – and is as memorable to the critiquing angler as is the curves of a Supermodel.

two

Hand in hand with the notion of “anchor” is the tapered cut. As described above the anchor is needed to hold the material firmly to the shank. Once the three wraps of the anchor are in place, it’s an automatic trigger for the cut.

New tiers are still unfamiliar with everything; small hooks, tiny scissors, unfamiliar materials, and insecure grasp of proportions. They’re thrilled to cut the material at all – and usually after securing it with 46 turns of thread.

Often they’ll “blunt cut” the item, scissors held at right angles to the hook shank so they can square cut the wing or tail butts – leaving a promiscuous gap between material and shank that will have to be addressed by subsequent materials.

Intermediate tiers will have learned the horrors of the lump left by the blunt cut, and will taper their cuts – scissors parallel with the hook shank – cutting downwards at the shank.

… after they’ve secured the item with 26 turns of thread.

A blunt cut can only be used when the material covers the entire body area of the fly.

All that’s needed to attach any part of a fly to the hook shank is three turns of thread.

Bold words, and you’ll note I didn’t say it was attached permanently. If the anchor is the only thread needed to hold the material stationary – and subsequent steps will add more thread to lock down the butts that extend over the body area, than those three anchor turns will hold the material well enough for us to cut the taper – yet will be loose enough so if torque has carried the fibers too far to one side, we can straighten them with finger pressure.

Which is why the Golden Rule applies: Nothing on a fly can be fixed by laying more crap down – because the “three-turn-anchor-tapered-cut” allows us to reposition it before we move to the next step.

We fix as we tie, because we’re learning thread management.

The taper we induce as part of the cut is every bit as important as the anchor and the three-turn trigger cut. For flies that please humans, only two kinds of cut are permitted; the blunt cut when the material covers the entire body area – as in the tail of a dry fly – where it’s trimmed behind the wing, or the tapered cut – which produces the finished body contour.

Using cuts to define body shape is easier than adding the right amount of dubbing to thread to have a thin arse and thicker middle. Beginners and Intermediate tiers haven’t mastered dubbing yet, asking them to be doubly clever in its application will not work.

… and tapered cuts have to be learned anyways – as not all flies have dubbing to make contour. The Quill Gordon is a classic example, it’s body is the stripped quill from a center strand of Peacock eye and the taper of the body is caused by the cuts made on the prior materials.

It’s easiest for a new tier to learn to dub “level” – that’s something he can gauge easily as it’s the same thickness of fur over the length of thread used.

… later, after he finishes digesting the three parts of this post, he’ll be able to master a tapered dub consistently – and will have an additional tool at his disposal.

one

Nothing gives the prospective fly tyer more trouble than dubbing. It’s deceptively simple, a simple twist between thumb and forefinger – nothing devious or hidden, no wrist motion or hidden timing.

It’s “mash crap on thread” – yet the proper technique of this routine task eludes most tiers for decades.

That’s because there is no technique.

It’s no different than loading a paint brush. A tiny thread, whether it’s waxed or no, can only trap a certain amount of fur tightly. Anything more than that will be trapped loosely – and if you add more will degenerate into a lump of sodden crap that resists your saliva, glue, hammy hands, and everything else you throw at it.

Golden Rule of Dubbing: if you can’t see through it, you’ve got too much.

I like to use “mist” to describe the dubbing process to students, as all mists whether water, vapor, or solid, are transparent.

The average #16 dry fly uses so little fur that you could snort it without sneezing … but the gag reflex is horrid.

The inability to apply the correct amount of dubbing, and the myriad of issues it raises, adds a common visual roughness to all your flies – as it’s among the most common tasks performed, and is so very visible.

It will not matter how many videos and demonstrations you’ll watch, the right amount of dubbing is an afterthought to the presenter – he’s mastered dubbing and is busy explaining why you want to fish his Hopper over someone else’s. “Mist” isn’t visible to the camera lens unless it’s within inches of the fly, and much of the action is off screen.

Dubbing can be a very deep subject to us reformed-whore-nutcases, that two percent of fly tiers that go where others fear to tread. We blend fur types and textures, layer colors, give it loft and sparkle, or shape it to replace traditional fly components. But the average tyer still struggles with loading it on the thread, and his Messiah is strict adherence to the Golden Rule of Dubbing above.

Once mastered you’ll realize there are many kinds of dubbing, some are well suited for the task, and others are very poor dubbing choices – but are endured due to the color or sparkle they offer, some quality not found in traditional fur bearers. Baby seal is a great example. A transparent sheath surrounding a white inner core, designed to reflect sunlight away from the animal so it doesn’t burn to death while waiting for that insensitive Canuck to mash its life out with a club.

… sure, you’re all tears now, but that’ll change once someone offers you a nickel bag.

Dubbing that’s suited for dry flies are usually the waterborne mammals, fine filaments and soft to the touch. Nymph dubbing can range from fine to coarse, often contains a goodly component of guard hair, and may contain synthetics to offer sparkle or other qualities.

Just because it’s the right color doesn’t mean it’s the proper tool for the job. Store bought dubbing is simplistic generalist dubbing, not the premier designed-for-dry-flies that us nutcases are fond of …

Putting it all Together:

Let’s put these hideous lessons together in an assault on the traditional Catskill dry, a magnet for criticism whose light coloration shows every lump, knot, and tear stain:

Light Cahill 1: What I see that you don’t
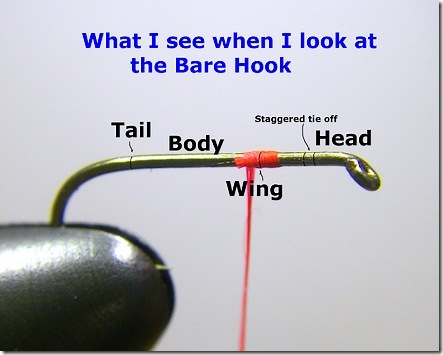
This is what I see, and you probably don't

I can’t help it, I see all the tie-in and tie-off points, where I’m going to put the wings, tie everything off, start the head, where the body ends, the entire fly just by looking at the hook shank.

With this “tie by the numbers” approach coupled with thread management, I know when I’ve strayed over a boundary line – and correct it right then, rather than let the problem slowly compound.

Light Cahill 2: Three turn anchor, trigger for the tapered cut
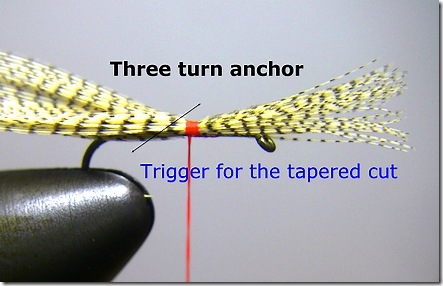
Three Turn Anchor

I’ve attached the Woodduck with three turns of 6/0 Danville. I’ve tied them in about two turns of thread past the mark where I want the wings to stand – this space will be consumed by me folding the material upright, something that most beginner and intermediate tiers forget. Transitioning anything from horizontal to vertical will consume space on the hook shank – and if the heads of your dry flies are perennially crowded, you may be forgetting that critical physics lesson.

Three turns is my trigger for the tapered cut. I’ll come in from the wing side and cut downwards towards the shank. If you have tungsten tipped scissors, it’s the most dangerous cut possible, as tungsten is extremely brittle and you can chip or remove the points if you catch the hook shank in your cut.

Light Cahill 3: Body taper complete
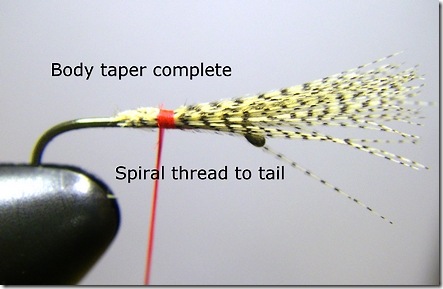
Body Taper compliments of a scissors cut

The tapered cut is complete and my body taper established. The anchor point holds the materials firmly so I’ll spiral the thread to the tail position and mount the tail now.

Note: Us old geezers that used Nymo thread in the 70’s and 80’s recognize that nylon thread can be used in two manners. Spinning the bobbin will essentially turn the filament flat (which is why my thread appears so wide) and will create less bulk than a normal strand of 6/0. Spinning the bobbin again will restore the spun flat fiber to round – best used for the anchor wraps themselves as they can bite into the material.

It’s all part of the art of thread management. Thread is a lot more than it seems…

Light Cahill 4: Tail anchor
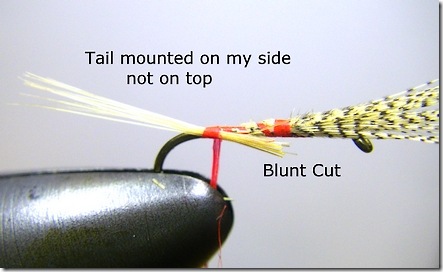
Tail anchored

There’s a lot to see in this picture, as this is where a lot of techniques start to pay off.

The thread has been spiraled from the wing anchor to the tail mount point. The tail has been mounted on my side (thread torque) with a three turn anchor. The tips of the tail have had a blunt cut (scissors at right angles to the hook shank) but are long enough to traverse the entire body of the fly.

A blunt cut can only be used when the material covers the entire body area of the fly.

… so we have adhered to the rule as stated above … and now we’ll begin to see the reward.

Light Cahill 5: Token Blurry Picture
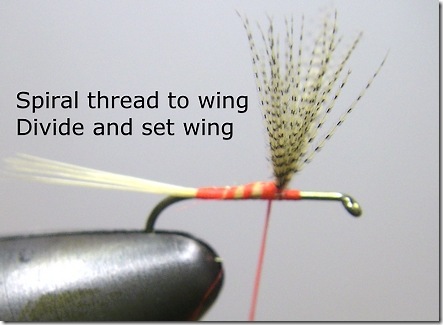
Taper preserved

Because the tail butts are uniform thickness and cover the entire body, the taper induced by our scissor cut has been preserved.

Note the spirals of thread as it was moved from tail mount to the base of the wing. That’s not 56 turns of thread, or even 24 – it’s exactly three. Also notice the tail as compared to the picture above; we’ve only wrapped three turns of thread since the anchor, but note how far towards top-dead-center the thread torque has moved it.

I’ve lifted the wings (consuming some horizontal shank) and divided them, the tie-off and head area remain untouched.

Light Cahill 6: A Mist of dubbing
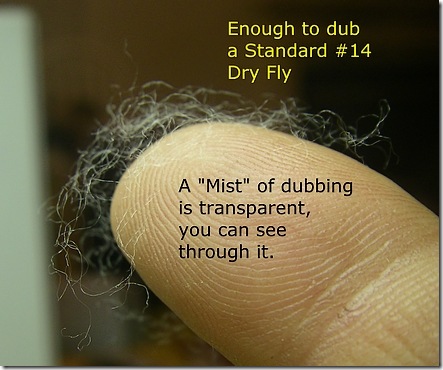
Mist of Dubbing

A mist of dubbing is transparent and even at its thickest point you can see right through it. It will lock onto thread like a fat kid on a candy bar, it will do anything you ask it without complaint, with little coaxing.

Your dry flies will be buoyant and float twice as long as there is so little water absorption, and they’ll dry with a flick or two of the rod. Beauty, with good physical properties to back your play.

Light Cahill 7: A mist on thread
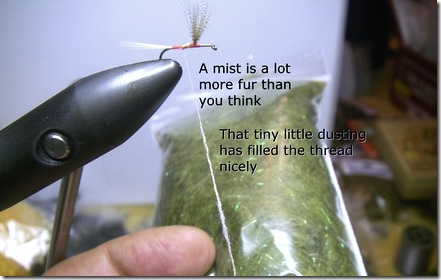
Mist on Thread

That’s the same small dusting you saw on Step 7 above. It doesn’t look so small anymore. I’ve switched to tan thread (which is what I use on the Light Cahill) so the thread color won’t overwhelm the dubbing I’ve added.

Note the tail, it is now top-dead-center … bloody miraculous.

Light Cahill 8: The final dubbed body
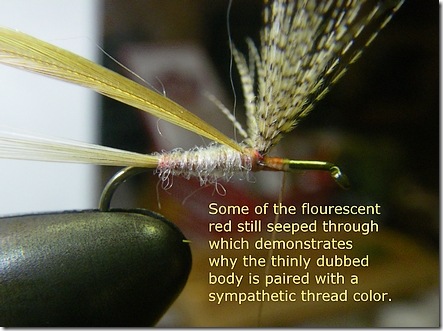
The dubbed body with hackle tied in

A bit of the tail anchor florescence has peaked through – partly because of my reluctance to cover absolutely all of it with tan thread. Thread is always your enemy even when you’re demonstrating what not to do.

The staggered tie off area and head are untouched. I’ll put 1/3 of the hackle behind the wing, 2/3rd’s in front. It’ll be “westernized” – we use a bit more hackle than our eastern brethren due to the brawling nature of our rivers.

Light Cahill 9: Tie off
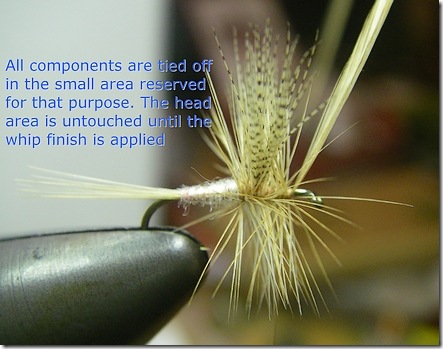
The tie-off area gets thread

The hackle has been applied and the reserved area for tieing off the final materials has been intruded upon. The head, which we planned since the bare hook shank, has its area yet untouched.

Light Cahill 10: The finished “westernized” Light Cahill
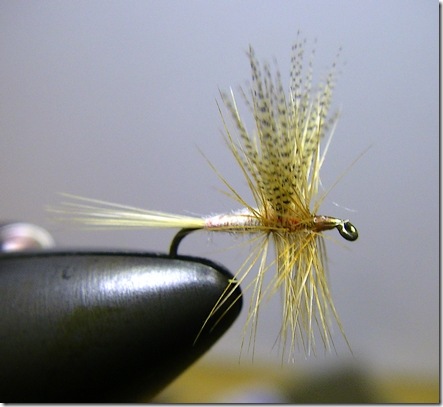
The Finished Light Cahill

The finished Light Cahill using most of the lessons we’ve described in the past three posts. This magnified version shows all my foibles – which I’ll gladly admit to while pretending I didn’t see you add it to your fly box.

I’ll do better on the next hundred dozen, honest.

Tags: Light Cahill, Catskill dry fly, small tapered head, fly tying tips, thread anchor, dubbing, tapered cut, tungsten fly tying scissors, beauty as perceived by anglers, fly box, hackle, vindictive fly tyer
When seven minutes buys you a couple extra decades

Us semi-pro eBay reel collectors are occasional victims of unchecked avarice – greed mostly. The pictures omit the missing screw, the bent rim, and the seller that’s hoping you won’t notice an unsightly wobble or loose spool.

That’s because we’ve got visions of Sugarplums dancing – the missing 3 1/4″ Hardy Princess Multiplier that we’ve lusted after for a decade has finally shown itself, and the “Buy it Now” button looms large and vibrant.

We open the box later to find a hint of malice – then gash ourselves for trusting anyone from Connecticut, especially with a seller ID like “Pwned.”

Fixing these aging warriors is a labor of love for me, akin to tying flies – with each scratch and wobble telling of great deeds and greater pratfalls, all in the name of fishing.

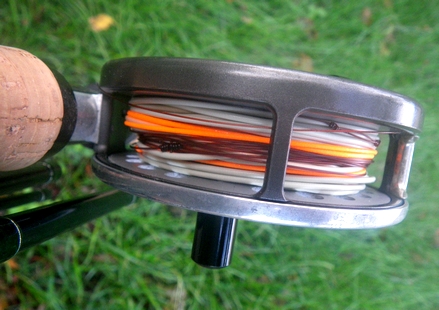
The spool latch mechanism is one of the few moving parts on a fly reel that is prone to eventual failure, yet so simplistic that it requires little more than a staple or hairpin to give a reel another hundred years of life.

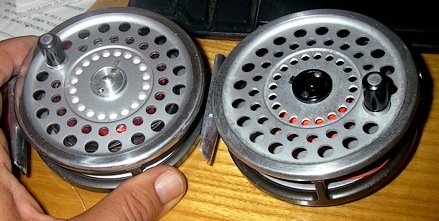
The two styles of Hardy's (SA) system reel

Above are the two styles of System reels made by Hardy for Scientific Anglers. The black plastic center cap is the older series and had a poorly designed latch mechanism made from plastic – which failed early and often.

The second series replaced the plastic latch with the traditional aluminum cover and latch assembly common to all other Hardy models – a time tested design offering a greater lifespan.

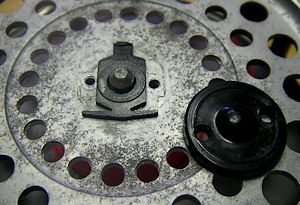
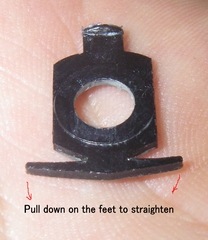
The Plastic latch, pull the feet flat to add tension

Failure of the plastic assembly means the “feet” have weakened and need to be returned to their original shape.

Remove the cap to expose the plastic latch underneath. The two feet at the base of the plastic latch press against the cover to give the “spring” effect. Once the feet weaken and achieve a shape matching the interior of the cover – they’ll allow the spool to slide right off the center spindle. To repair the issue, merely pull the two feet back into a straight line as shown above, that’ll return it to a “spring” (as it’s pressed against the interior of the cap cover) and allow the spool to be mounted or dismounted while retaining latch integrity.

Old Style SA latch It’s a bad design, plastic just doesn’t have the longevity, and fatigues much quicker than the surrounding metal.
It appears wrapping some fly tying thread at the neck would also offer additional resistance to the feet being deformed – and for the terminal case, perhaps a replacement could be crafted from the stiff plastic of a pill bottle top.

The metal capped Hardy latches are a much sturdier design, but even metal springs weaken over time and have to be replaced.

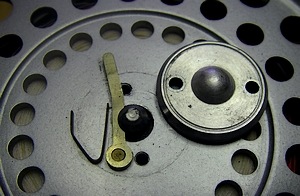
The latch itself is a bar of aluminum or steel that’s been riveted to the spool. A small “V” of spring steel lies adjacent the bar and its contact with the interior of the cap provides the spring holding the latch tight against the center spindle.

Metal latch costruction

If the spring breaks it can be replaced with a similar “V” made from a hairpin or a spring steel staple from a heavy cardboard box.

Depending on the width of the flat replacement wire – you may have to grind it down a bit to fit under the aluminum cap.

Most of the time you can simply spread the existing spring outward, giving yourself another couple of decades before you’ll have to repeat the process.

Despite all the advances in reel design and materials, the latch mechanism is still quite simplistic – and over time the spring material will lose its vigor and need some coaxing. Contemporary large arbor reels are no different – and cracking open one of these engineering marvels can reveal equally simplistic mechanisms that’ll be prone to the same longevity issues.

The old Hardy’s use brass screws to hold the cap assembly in place, and these deform really easily. Make sure your screwdriver is sized to get complete purchase on the slot, if it’s too big it’ll shred the screw instantly leaving a ridge of razor sharp metal to greet them fingers.

It’s the perfect rainy day project, combat premature dubbing loss with Mohair

Mohair is the fur from the Angora Goat and has been used in textiles since the 16th century. It’s a wiry, spiky fiber – with muted luster, and unkempt appearance. Synthetics, with their bright colors and sparkle compete for our eyeballs in the same aisle, and the cornucopia of synthetic yarns has purged most of our aging stalwarts in recent years.

It’s also cheap, readily available in hundreds of colors, can be purchased at any millinery store, and blended with other fibers to make it softer, less spiky, or more durable.

I buy it in the “mutt” styles where each skein contains one to three colors and use it as filler on my dubbing blends. It’s a low cost alternative to an Australian Opossum (~$45ea) and is available in a bewildering assortment of colors.

Each skein is approximately a half pound, and if purchased in quantity costs about $1.50 each. It’s the preferred agent to learn “dry dyeing” or blending colors and natural fibers so you’re no longer dependent on the narrow range of dubbing available at your fly shop.

Creation via Destruction – Making the components

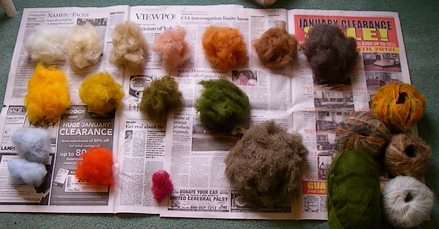
I’ll yank off 40 yards and break the yarn apart into its component colors. This is a great task for weekday quality time – when either the spouse insists on a romantic comedy or you’re stuck minding the rugrats.

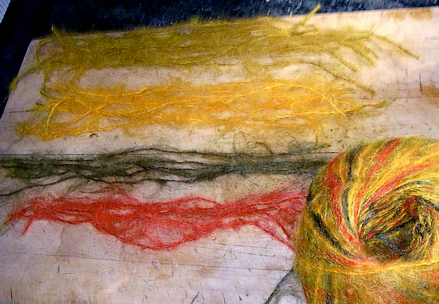
Mohair "mutt" reduced to lengths of the component colors

The weave of the yarn dictates how small you’ll have to chop it to reduce in your coffee grinder. Sometimes twisted, others are woven – just make sure it’s 100% Mohair without the weave being a different material. 3/8″ segments should be small enough for both twisted yarns or the woven variant.

Each color is chopped into 3/8" segments and piled together

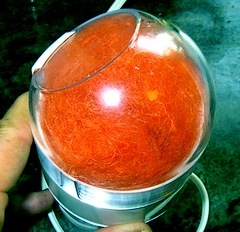
Your coffee grinder should be “blade” style, not the newer “burr” grinders. The cheap flavor is around $15, and you’ll need to be sensitive to heat buildup – as you can easily burn the motor up making a pound or more of dubbing.

It should not be the grinder used to make coffee unless you like drinking mustache.

I try to make at least a half ounce of each color, and when you start fiddling with blending primary, secondary, natural fibers, and sparkle – you’ll be a creative dervish and can burn that little toy motor into slag.

Stretch the process over a couple of days, use multiple blenders, and let them cool down between sessions. You’re going to like the result and the temptations to make additional colors will keep you coming back to grind again.

The Art of Blending – How to tear and mix without swearing

That ball of fiber needs to move around the container to blend The quantity of shreds added to the blender determines whether it’ll blend or simple remain immobile and make funny noises. In order for the grinder to tear apart and blend the yarn it has to move the contents freely inside the container, spinning the fibers like a cotton candy machine.
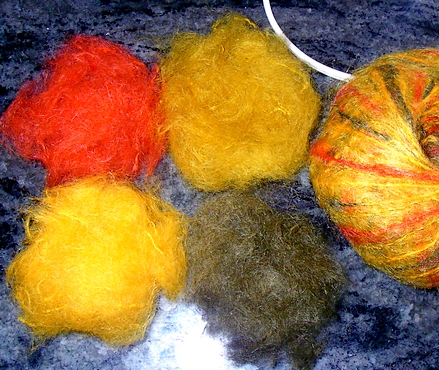
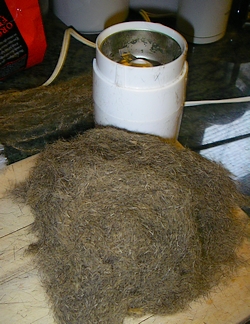
If it’s immobile it’s not mixing anything, you’ll need to remove fibers until the ball of material spins around unimpeded.

Run multiple small batches through the grinder to build the larger lump of fur. As each batch is reduced to fur (97% fur and 3% shreds), yank it out and start the next pinch.

Maybe you’ll have to run 10 or 15 small batches, but most won’t take more than 30 or 40 seconds each, so the task is neither time consuming nor arduous.

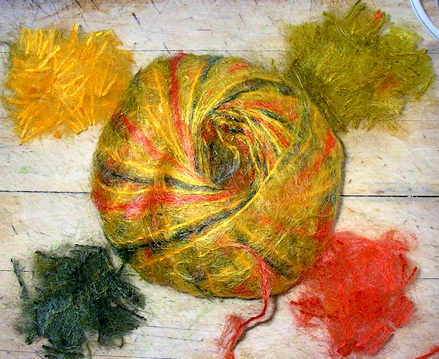
The resultant grind

There will always be some few shreds that don’t reduce, I’ll pick these out later (or use them) when I’m tying the flies.

From the above four colors we can make at least 8 additional colors by mixing them, and if we add sparkle and natural furs to the blends we can make upwards of 50 separate shades as well as multiple styles.

For a dollar you’ll become the next Picasso, but it’d be wise to consult the Artist’s Color wheel as it’s the bible for building shades and tints.

Adding Mother Nature – how to prepare animal fur for addition

I’ve never cared for commercial monochrome dubbing, most are made by dyeing white rabbit pelts and every fiber in the bag is the same color. Hareline and most vendors make simplistic dubbing – tossing skins into the dye bath and trimming the result into the plastic bag you purchased.

Mother Nature doesn’t color her bugs in a single drab monotonous color, and a mixture of shades and hues appeals to me on a variety of levels, both scientific and artistic.  Mohair is the base fiber of my bulk blends (beaver fur is the base for fine), and I prefer to break it up with natural fibers and guard hairs from both the Red Fox Squirrel and Woodchuck. Both of these animals are giant versions of a Hare’s Mask, and offer the same wonderfully marked hair.

Sometimes I’ll dye the Squirrel or Woodchuck for a specific effect, the rest of the time I’ll add them in their natural color, letting the amount of colored mohair determine the final shade. Small amounts will just break up the dyed mohair color slightly, larger amounts will make a new color – a drab, toned down version of the original.

As we’re fiends for earth tones, drab or muted color is exactly what we’re looking for in trout patterns.

I’ll use scissors or razor blade to remove all the fur and guard hair from the center spine of the hides, and toss them into a paper sack. We’ll have to break their affinity for each other with a coffee grinder, and that’ll turn the regular barring into a disorganized speckled mass of colors.

Ground Squirrel and Woodchuck

The same blending rules apply for natural fur; use small amounts from the pile to blend, and if the ball isn’t moving it’s not mixing.

All we’re doing is reorienting the fibers so they no longer stay together – they’re not all pointing in the same direction, or matted by grease so they stay together. When we add this to our Mohair color we’ll want these fibers to mix evenly with the colored mass -throwing some air in for added loft.

If you wish to make derivative colors by combining two batches of mohair it’s easier to do with the natural fur absent. Jot down notes if you want to reproduce the colors again – using color wheel style notation, it’s much easier to remember that way.

Ex: 2 Parts Green, 1 Part Yellow, 1 Part Dark Gray/Black, yields an Olive. Add yellow to make it a “warm” olive, and green to make it colder, add gray/black to make darker.

With the natural fibers you can make two styles of dubbing; you can make “tints” by adding small amounts of color to the natural, or you can make muted colors by adding 2/3 color and 1/3 natural hair.

Both Woodchuck and Red Fox Squirrel have a dark gray underfur and that will dampen the colors considerably.

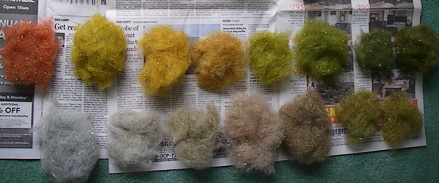
Component colors ready for mixing

The top row contains white to dark brown. Equal parts of adjacent colors will make a shade in between. Use the bottom colors to flesh out your selection so the result gives you full coverage for the shades you’ll use most often.

Completed color range with natural fiber added

The above shows the shades of color made from mixing adjacent colors and adding “warmth” or “cold” to the result. The Woodchuck/Squirrel blend has been added to mute them into earth tones.

At this point I’ve built a color range of 30 different hues, not bad for the purchase of only 4 balls of yarn, 1 woodchuck, and a single squirrel skin. This has used about 1/6 of the yarn, so I can make 5 more batches in later seasons.

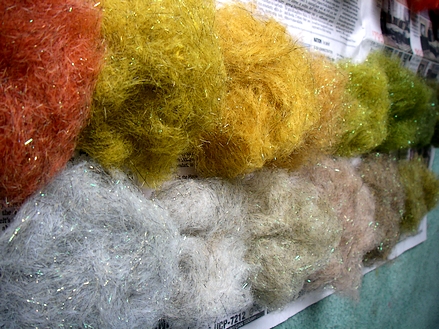
Mohair-Squirrel-Woodchuck with Soft Crimp Angelina added

Each of the piles is just under a half ounce – 4-6 packs of the small servings sold at the fly shop.

I’ve run these through the grinder one last time to add the Soft Crimp Angelina fibers for sparkle. I prefer adding sparkle as a separate pass as it offers better control over the overall effect. This yields 12 colors with sparkle, and 12 additional colors without glitter.

AP Nymphs showing 8 of the 30 colors made

It took most of the weekend to construct all this – as the grinder motor has to be watched carefully due to the volume of grinding and overheating. Having a second grinder would prove useful – but it’s easy enough to grind a half dozen colors every four hours, letting the assembly cool down between fits of artistry.

The perfect rainy day project.

OMFG, it’s less than two weeks away

This is the weekend where you remember Opening Day is only a scant 14 days away. Tomorrow “Momma” is going to wonder why you’re mowing the lawn without her having to ask six times, why you’re suddenly attentive, and why that squeaking laundry room door suddenly claims your undivided attention.

She’ll remember as soon as your behavior changes –  and show her appreciation by leveraging the remaining thirteen days into a year’s worth of chores you failed to complete.


Secretly she’s thrilled you’ll be asking to abandon the family unit for the entire weekend – as she’s tired of your underwear in the sink, tired of your iron grip on the TV remote, and no longer considers your snores from the living room couch musical…

There’s another way to accomplish the same goal … it’s much less strenuous and keeps your dignity intact.

Take Momma, a couple sandwiches and a jug of the Good Grape ..

Here.


.. also here.


… and here.

Now yank that cork, plunk her on the tailgate, and when she’s got a firm grip on that sandwich – ask “can you have the weekend off” …

No need to thank me.

Technorati Tags: , ,

Part 2: Spey Kung Fu: There’s two kinds of experts, them as can cast – and them as can’t

More danger to myself than to the fish After a week of practice I’m the second kind of expert; I have a theory or opinion on absolutely everything, I’m quick to point out the trifling defects in everyone else’s casting, in both tackle and form, but don’t ask me to show you, ’cause I still can’t cast for beans..

I got some assistance from the fellows at the Washington Fly Fishing forum whose site is blessed with a low “signal to noise” ratio. Lots of talented folks that fling these lines in anger, and readily share what they know with a clueless prospect.

I’d found a couple resources that listed grain weights and had deduced I needed a RIO Windcutter or Airflo Delta Spey, these are mid-belly lines markedly different than the Skagit head I already owned. The Echo website suggested the Airflo and the WFFer’s suggested The Red Shed, a small Idaho fly shop, whose proprietor, Poppy – was strong in the ways of the Force

They weren’t kidding, some fellow answers the phone and as I stutter a greeting he says, “You seek Airflo, for your rod, the #7/8.”

Now that I’m armed with the proper line, I’m captive to the weather – which is alternating between icy fog and rain. The gleaming unsoiled rod is parked by the back door and in between squalls I’m in the backyard committing a multitude of casting sins.

The pop-crack-whizz flushes every cat and squirrel hidden in the underbrush, the fleeing felines get everyone’s dogs barking, and I’ve got Grandma looking over the fence sternly – assuming I’m harassing “Pootsie-Poo” her pampered and fat Persian.

Part of the noise is my use of a  “grass leader“; a knotted leader with barrel knots about every 3-4 inches and the tag ends left untrimmed. The friction of knots and tags in the grass offers additional resistance and assists in loading the rod akin to ripping the line off the water.

Despite my daily sessions I’m not able to get anything resembling what’s desired – my loop is open like a roll cast, and a completed stroke dies horribly in mid-air; no power or direction and I’m left scratching my head.

Saturday breaks with “bluebird” weather and I’m on the creek as soon as the sun is high enough to light my path. I figure an hour of practice and with my newfound “l33t” skills I’ll be rolling in fish. I figured the floating tip would be the easiest to fish with … and destroy.

Multi-tip spey lines include a floating, intermediate, 6″ per second, and 8″ per second sinking heads. They’re 15′ feet segments looped onto the line belly (both are equipped with welded loops) using a loop-loop connection which is unnoticed when casting. This is one of the areas of confusion for us beginners, some Spey lines are incomplete unless a tip is added – and are underweight because a tip is expected. The converse is also true, some lines are just tips – with no belly and it’s mighty important to understand the difference.

I’m focusing on two casts, the Snap-T and the Snake Roll, figuring I’d have them committed to memory quickly via numbing repetition rather than divide my time between a dozen different maneuvers.

There’s a wide pool a couple hundred yards below the duck blind, (far enough away from the watchful eyes of anyone inside), and I figure if a wounded mallard floats by I can grab a couple fistfuls of flank with none the wiser. Striking my best heroic pose I launch my first cast – watching it soar across the frothy water and land an astounding 20 feet distant.

That’s no mean feat with 54′ of belly, 15′ of floating tip, and attached 9 ‘ leader.

As an experienced one hand caster I know how to control the cast stroke to do my bidding, I thought I could translate the timing to the two hand rod and get some semblance of the correct cast.

I was dead wrong.

Water tension replaces the wait on the traditional rearward false cast, and the amount of time the line is on the water determines how much you’ve got to rip off the surface on the forward stroke.

Terms like “kiss and go” have meaning now, a peck on the cheek is what’s needed – and I keep swapping tongues..

The Snake roll was easier to learn and I was able to get distance even with an unguided and hideous open loop. The Snap T was a disaster – but I was able to get the snap portion operational. I think I managed about 40 feet with 70′ out of the guides.

The water is the backcast, therefore casting is entirely foreign – it’s neither intuitive or easy to understand the rod physics or the water load component.

My biggest problem is too much strength. Watching the videos on YouTube you see the rod cradled by the upper hand, and I’m “white knuckling” the cork with all the finesse of a baseball bat.

My hour passes and then some – and because I insisted on realism, I’m out a dozen flies. All of them cracked off by my baseball version of the Snap T. None entering my torso unbidden – so I’m succeeding at building the necessary self preservation skills.

I managed a little fishing, but the fish had all expired in laughter – I couldn’t see their carcasses as I’d put a nice “head” on the creek akin to bruising a good lager. 

I’ve confirmed what Spey is useful for and what it’s not. It’s a “big water” fling and swing style ill-suited for my little creek. Retrieving flies close means you have to shake all the line out of the tip before the next cast, and while the casts can be used in close quarters with traditional lines – it’s not a style requiring you to suddenly replace all your tackle in a mad rush to be first.

The extra handle below the reel does have issue with bulging front loaded vests. It’s used in lever-action mode, drawing it into your brisket with each cast.  Once I learn the proper cast – this may not be much of an issue, but I thumped my fly boxes routinely – something unnoticed in my backyard proving ground.

I’m going to transfer the line to my one-hander. This will eliminate the unknowns of the long rod and let me experiment with the timing and casts with known equipment. It’ll also aid in fishing, because I can fish through the run using traditional casts, then beat the water to death afterwards.

After wind milling a 13′ rod through 30 minutes of Snake Roll, I was feeling the exertion. It’s a great workout – it’s not supposed to be, but I’m grasping at any positives.

The last train from Gun Hill, the Little Stinking MilitiaThe wind started to pick up a bit, and I’m hearing the staccato reports of gunfire upstream – not duck hunters, someone’s unloading seven round clips of Eastern Bloc high powered stuff – which can go some distance.
I’m up and out of the streambed quickly so’s I can be seen, and stumble into the last convoy out of Sadr City. Four motorcycles, 2 ATV’s, 2 trucks, and a dozen pimple-faced hardcore types looking stern and scanning for FSW’s ..

FSW’s are more dangerous than IED’s and common to California watersheds .. it’s easier to yell “FSW” to alert your buddy to “Fleeing Startled Wildlife” – otherwise you’d fail to empty the entire clip into its carcass.

I gave them a wave and headed out of Baghdad, hoping to clear the watershed before the gunships rolled in…

More suffering to follow.

The first decision is whether you’re a collector or a fisherman

I started with the best of intentions; first the news of the Hardy manufacturing exodus to Korea, and me suffering that odd moment of clarity, where I’m wondering about all those extra spools I promised myself I’d eventually get – and never did.

Anglers are a superstitious and fastidious lot – willing to put an asterisk next to any item that isn’t precisely the way it’s always been. We label items with pre- and post- to rarify them far in excess of their true value.

The best Hardy’s were always pre-War, polar bear was pre-ban, the biggest fish were post-extinction, and you fished twice as much pre-marriage, somehow we’re all inexorably tied to one or the other prefix.

Anyone that’s fished for a couple decades has a sizable inventory of hardware with years of service left, unchanged by treaty, economic uncertainty, or Act of Congress. Our reaction to change is predictable; we scramble around moaning, and score what we can before someone cleans out the spare parts.

It’s a pilgrimage to the vendor’s back room or an overlooked dusty shelf somewhere behind the register, or its eBay, that bastion of castoff’s, semi-sales, and shade-tree dealers that delight in our lust for the dubious all-star equipment of yesteryear.

Fishermen are patient, and study their prey

I was a huge fan of the old Scientific Angler System series of fly reels, made by Hardy under the Scientific Angler, and L.L. Bean labels – and sold in England (by Hardy) as the Marquis. A solid reel, not overly ornate, with a heavy exposed rim allowing you to drape a thumb on it for increased control.

I needed a reel for an Scientific Anglers System 8 (SA 8), and a extra spool for an SA 9. I still haven’t figured how I had the spool but no reel, I figure a buddy or older brother was involved.

Like a small minnow in a pond of bigger fish I darted out and slammed the first spool that showed, in hindsight paying double what it was worth.

Lesson Learned: One of them will show every week, due to the US, Canada, and most of the UK emptying their garage. Before buying, watch a few auctions to see the range in price for the item.

After my initial taste of being a “food group” – I settled in and watched a half dozen spool auctions complete – without me. Like the eBay rods, trout sizes command a higher price than Steelhead and Saltwater tackle, and an extra premium is put on pristine condition, and unique history of the reel.

As a fisherman – not a reel collector, all I’m going to do with a pristine reel is use it. I’ll swear mightily when I scratch it, get misty eyed when it’s dented, and bounce it off of every boulder and stream bank I stumble over. When I’m done, it’ll be recognizable by the patina – the record of every fish caught, every misstep taken, and every pratfall endured.

Pristine is nice, but I’ve got no business paying that extra premium.

Lesson Learned: Decide whether you’re a fisherman or a reel collector, stay out of the auctions that you don’t belong in – you’ll save a lot of money.

The discovery that professionals are involved in many trades was a bit of heartbreak, but not unexpected. I was looking to fill a simple need and some sharp fellow is in there throwing elbows to turn a profit. Feedback from past sales showed me who were players and who were the amateurs, and knowing what company I was in suggested when to bid and when to play it cagey.

They love tinhorns, we’re emotionally involved and even if it’s a couple extra spools or a Ross reel we’ve always wanted to own, they’ll descend in the last 3 seconds of the auction and snatch it away for a great price – with us fumbling to respond.

Then they put the reel up again under their name (or another account) and force the price higher.

They use bid sniping software that guarantees the bid will land in the last 10 seconds of the auction. We’re watching the clock tick thinking it’s ours – and a bargain, and they snatch it right out from under while we struggle with the keyboard.

The software is automated and requires no human interaction other than max bid, and while we’re shaking fists at the screen, they’re at work oblivious to our hatred.

The unscrupulous professional will auction the reel he’s just won a week later at a starting bid of .99 cents, and when you put down your max bid of $145, you’ve just played into their hands. Often a third account (usually with “0” feedback) is used to bump the price until they’ve recouped their costs – then they’ll allow the tinhorn’s to fight over table scraps, guaranteeing they’ll sell it for more than they paid.

Lesson Learned: Look at the feedback of the person selling the reel. Look at what they’ve bought and what they’ve sold. If it’s all fly fishing gear, you’re dealing with a professional. That’s good and sometimes bad; good because they’re describing the item accurately and fairly, and they’ll be practiced at prompt delivery. There’s the occasional “player” – who’s just trying to turn a buck, that’s not so good. Look for accounts with low (or no) feedback that come in and bump the price $5 a crack … and then mysteriously stop near some preset value.

Lesson Learned: Never bid what you’ll pay, only bid $1.00 over the current price. If there’s a shady dealer he’ll stop bumping it once he’s the high bidder. Use automated software to bid your maximum in the last 10 seconds of the auction.

On eBay a “CFO” isn’t a “C.F.O.” – and the best deals come on a misspelling or an incomplete description. Professional resellers always use the “Hardy” word in the title, “.. a Scientific Anglers reel made by Hardy Brothers,” that’s because “fly reel” is too vague, and you’re likely to use the vendor name to search for specific models. Their goal is to put the merchandise in front of the folks looking for it, so they’ll use all the keywords possible, it’s good marketing.

Someone selling a reel or spool from a deceased relative doesn’t know Hardy Bros. from Laurel and Hardy, so they’ll advertise the reel as a “Scientific Anglers System 7”  – precisely what the back of the reel says; they don’t know what it’s worth and they’re hoping you do. Absent the “Hardy” label in the text description, their auction will only see half the eyes that are looking, virtually guaranteeing the reel sells for at least $20 less than one using all the right words.

Lesson Learned: Misspellings and the text used in the advert determine how many do ( or don’t ) see the auction, if you’re after a particular model, always search for it by what it says on the back of the reel. A non-fisherperson will invariably use that as their auction description.

The Beauty of Fingerprints

Fine reels are like any finely crafted item, the marks of Time gives each a unique tale and also speaks eloquently of it’s past life and owner.

Well fished reels look the part – and while a lot of the finish may be missing around the rim – and it hasn’t been oiled recently, it still has another hundred years of service left. Reel collectors avoid the worn reels – as if a damp reel put away prematurely has lost all luster. It’ll certainly destroy the finish, and it won’t be terribly pretty, but mechanically the reel is sound.

Bent spools can be “unbent” with finger pressure, and worn latches that cause the spool to slop off can be fixed with an “elbow” from a hairpin. These are simple mechanical devices that can be restored easily. Bent rims and frames are entirely different – and typically snap if you attempt to straighten them.

I gravitate to a lot of well worn and damaged reels. I can repair many ailments myself, and a lot of parts can be salvaged to keep your current stable of functional reels tuned and precise.

Sometimes you can get the spool for half the normal price, as the reel surrounding it is damaged beyond repair. Your fellow anglers will ignore auctions with obvious damage, often allowing you to swoop in and recover the spool for half it’s normal value. Parts are in short supply, sometimes two cheap damaged reels equals a single functional reel and a reservoir of extra parts.

Lesson Learned: You don’t compete with collectors on worn or blemished reels, they want pristine condition, and a little rust or wear keeps the casual types at arm’s length.

Lesson Learned: On a damaged reel ask the seller enough questions to satisfy your diagnosis. Many will take additional pictures for you and will describe whether the spool turns smoothly or not. Be patient and thorough in your questioning – the owner may not be a fly fisherman.

Know History, or pay the price

Certain reels are worth more due to vintage, history, or some pre- or post- issue you aren’t aware of – it’s important to understand why a CFO IV sell for $320, and another just like it sells for $150.

The most highly sought after reels have always been the Hardy Perfect series. There are numerous books on the subject outlining their lineage and value, and many other makes and models have a similar legacy and a rabid following, like the Orvis CFO series.

The first CFO models were traditional click-pawl drag, and had four visible aluminum rivets visible on the rear of the frame. These are prized much more than any other variations – largely because they’re lighter than subsequent CFO designs. These rivets vanished when Hardy changed the drag design, and are absent in the current “disc” models as well.

Orvis still sells the CFO III and some of the smaller models, (made in China) but the CFO IV and CFO V are no longer made.

A similar regard holds for the Hardy Princess family; the LRH Lightweight, Featherweight, Flyweight, and Princess. If the line guard features a “two screw” attachment to the frame – it’s worth quite a bit more than the single screw model.

Lesson Learned: Due to issues of vintage and legacy some reels are worth more than others, even if they look identical. Know the differences in what makes them so – to save yourself both a lot competitors, and paying a much higher price.

Postage and Payment

It costs about $3.00 to mail a spool or a reel anywhere in the continental US – assuming adequate wrapping, some foam to disperse shock, and some tape to seal it tightly.

Always check the postage costs before you start bidding. It’s one of those really clever ways to get another $10 out of you, and is pretty common on eBay. The better vendors (those with storefronts, or are doing this professionally) will refund the difference between the stated postage and what it really costs – back to you.

The unscrupulous merchant won’t, that $12.00 shipping charge nets him another ten dollars profit over what you paid, and is part of his overall plan for world domination.

I prefer PayPal payments and don’t bid on auctions requiring a money order or bank draft. (Get your sorry, lowtech ass off my pristine electronic marketplace, Grandpappy.)

Avoiding eBay addiction

All the stories you’ve heard about eBay addiction are very real, especially when it comes to collecting sacred angling artifacts.

You have to keep iron control over what you’re bidding on – especially in the face of the increasing number of reels and spools on the market. A lot of the brotherhood are in mortgages they can’t afford, about 1 in 10 have too much house, so there’s an increasing amount of fly tackle on the auction block.

The last six months the number of reels listed has jumped from 75 Hardy’s per week to nearly 125 today, ditto for almost every other contemporary maker – regardless of arbor type. In the face of this unprecedented glut of fine tackle – you’ll need to make sure you don’t go off the deep end and use the “milk and egg” money.

I managed to get what I needed without going overboard, but the lure of quality tackle and real possibility of a bargain is so very compelling. I was innocently filling in some missing items (and lusting over almost everything) and it almost got me…

I’ll wait awhile and let my ardor cool off before I go back for that last missing 3 3/8″ Perfect spool.

Those of you with a couple decades of tackle that are interested in doing likewise, I’ll leave the field to you. Remember, you cannot possibly keep pace with the flood of goodies; be precise, be surgical, and bid only up to your preset “bargain” price. There will be an identical spool next week, so let the other fellow win some. Be patient and you’ll acquire everything you think you need at prices that’ll surprise you.