In Part 1 we covered most of the dyeing process – and the difficulty associated with matching a known color. The steps are the same for dyeing anything; first a cleanse and prep of the original material, followed by immersion in hot water so the shock of the dye bath doesn’t induce physical change.
Feathers are difficult because much of the time you’re dyeing loose materials, which can cause problems with their tendency to float – and your tendency to chase every last one, while the mass continues to darken even though its been removed from the dye itself.
By comparison chunks of hide are much easier. Furbearer’s may have some natural oils that prove resistant, but as you’re dealing with a single swatch you can pull it and rinse it as often as you like.
In essence, the hide chunk itself becomes the “test feather” – pulled routinely and rinsed until you have the desired color.
Big animals contain all manner of dirt, nettles, and dried guts or blood. If you’ve been gifted by a hunting buddy, you may have a lot more preparation work to get the hide suitable for coloration. This may include scraping all flesh and fat off the hide with a grapefruit spoon (serrated) before adding Borax or cornmeal and stretching the hide to dry.
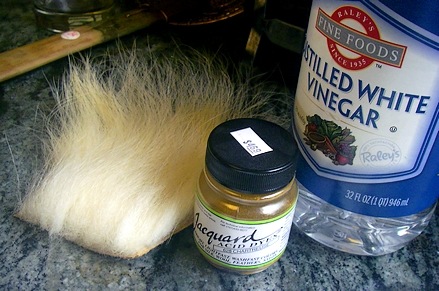
Other concerns are the age of the hide and its integrity. A hot dye bath and a vigorous clean and dry can be enough to break apart an old hide – especially Polar Bear, whose last legal importation was in the 1970’s.
We’ll repeat the process used on the feathers for the Polar Bear shown above, and in doing so – I’ll get to test a new color of Jacquard acid dye to get some familiarity with the vendor and their idea of Chartreuse.
As mentioned in Part 1, each vendor has a different palette and the label is a reference color – not a guarantee of the outcome. Chartreuse being a yellow tinged with green, I’m going to test their dye on a small piece prior to dyeing a larger amount.
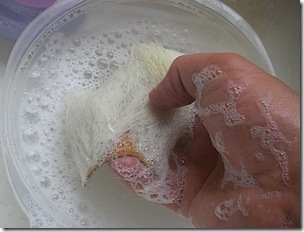
The cleaning process is identical to feathers. A little dish detergent into the soak bowl, followed by agitation to remove any dirt particles at the base of the hair.
Always handle the item by the hide. Most hair is dyed for the tips and not the underfur. Gripping the hide will allow you to feel it break up, if it’s an old hide, and will not bust up the tips which is the portion we’ll be using on completed flies.
Rinse the completed section two or three times to remove the soap. Refill the soaking bowl with clean water and return the section of hide to it.
The Fur Difference:
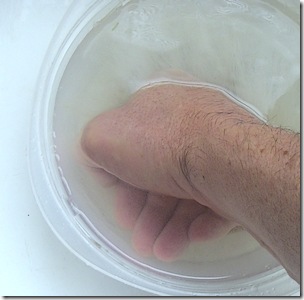 Where dyeing feathers and fur differ, is that hides trap lots of oxygen in the underfur and matted hair. All of which must be removed before we can insert the piece in the dye bath.
Arrange the section “fur side down” and press your knuckles against the back of the hide to force out the oxygen. Do not allow the piece to surface. Rhythmically press down firmly and release (leaving the piece completely submerged) until no more bubbles escape.
It’s no different than loading a sponge. By pumping the back of the hide we’re pulling in water to replace the released oxygen, super-saturating the entire piece.
We do this to ensure that when the hide is placed in the dye bath, the pigment can reach all of the fur simultaneously. If it can’t, some sections will be darker than others.
 Similar to those strung saddle hackles or Marabou you buy in the store. The tops are nicely dyed Purple, or whatever color purchased, but the butts are mottled with undyed sections of white. This is a result of not supersaturating the material. The dye hit the top three-quarters of the hackle while the butts retained oxygen, preventing color from soaking into the feathery marabou at their base.
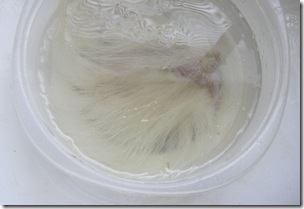
The piece above is now supersaturated, note how it remains on the bottom.
Like the feathers we’ll add the piece to the dye bath without draining it. That will allow the dye to replace the fresh water uniformly, and the piece will be the same tint in both underfur and guard hair.
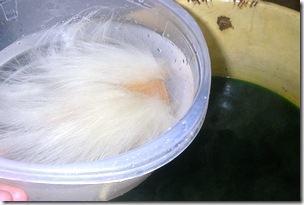
At right, we’re adding the Polar bear into the dye undrained.
Chartreuse being a mixture of yellow and green, I will expect to see the material yellow immediately and the green to alter the shade over time.
Yellow is one of the rare colors that’s nearly impossible to screw up. It can be too dark or too light, but always “yellows” successfully. Because this is a new vendor and a dye I’ve not tried before, I’ll be alert to color change. If anything goes wrong the piece won’t be ruined, I can use green or yellow in flies, so there’s little risk.
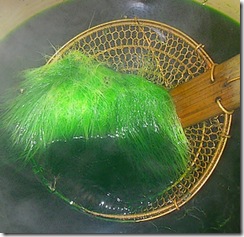
It’s been in the bath less than thirty seconds, yet I’ll it to measure absorption. The super-saturation is evident by all parts of the hide, underfur, and tips, are receiving color.
A bit scary to see so much green”? No.
Many complex colors are a mixture crafted to deliver pigment over time. Most would think a Chartreuse dye would be predominantly yellow, yet it’s the opposite – a Kelly Green color.
I’ve always assumed it was the absorption rate that dictated mixtures and bath color. Yellow absorbs instantly, green having to fight its way past the yellow to lay itself down. Hence the Kelly green is added to overpower yellow.
Unless it’s Rinsed it ain’t that color
Polar Bear is a unique fiber, essentially a hint of color surrounded by a transparent sheath. Like most guard hair it’s a really tough material, and will take color slower than underfur, which is similar to feathers in absorption.
Color can only be confirmed after a rinse. Like our pulling of sample feathers to check the coloration, hair must be removed and rinsed to confirm its hue – as the fibers themselves are much tougher and resistant to color absorption.

I’ve held the piece above the bath allowing the dye to drain out. It looks like a good chartreuse (note the underfur is dyed completely down to the hide – no white “roots”).
Rinsing will determine whether I’m done.
Holding the hair so the water is going in the same direction as the grain of fur, rinse it under cold tap water while alternately squeezing until the water runs clear.
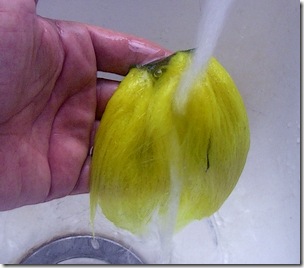
Cold water will close the pores of the material and the steady stream of water will cease coloration.
I have a nicely dyed piece of Yellow Polar bear, the chartreuse is largely gone.
Note how all the green seen in the above slides has vanished. Also note the fur is dyed completely, all the way to the hide.
Did I screw up the dye bath? Should I add more dye, more heat, or more fixative?
The answer is found on the back of the hide. Remember, we’re dealing with a vendor unfamiliar to us, likewise with a color of his we’ve never attempted …
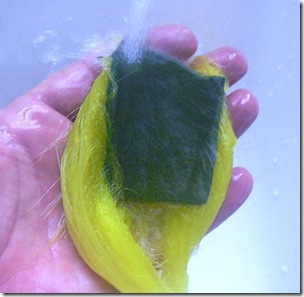
Shown at right is the back of the hide, which has the telltale clue.
The hide itself is green, not yellow. That tells us that all colors of the dye were activated properly, and the result is likely what the vendor has chosen as Chartreuse.
There is a tiny hint of green in the color (your monitor may show it differently), given the material is soaking wet I’ll dry it completely and assess the color tomorrow, when all the variables will have been eliminated.
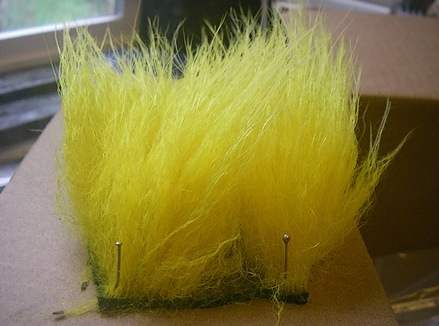
Hides curl when dried – and it won’t matter whether the skin was naturally cured or tanned, it’ll roll up like a potato chip if you let it. Always tack the piece down on the corners using pins and cardboard so that it will dry evenly and remain flat.
Cardboard will wick water from the hide and assist the drying process better than wood. I’ll cut up a box and stake out all the pieces before taking them into the garage (or outside) to dry.
Note the uniformity of color in both guard hairs and underfur. No white splotches at the base, no slop.
… and the sign of success? Those nice pink fingers shown in all the illustrations above. Skin is protein, and will take the dye really well, expertise is judged by the color of your fingers – as that determines the color of your spouse’s kitchen and her precious linoleum.
Always wipe down the countertops and sink area. Dry dye powder can occasionally escape – and won’t become activated until something wet hits it. Better you to find it now than eating jaundiced Cheerios …
Tags: Chartreuse acid dye, dyeing polar bear, protein dye, dye bath, dyeing fly tying materials, marabou, strung saddle hackle, fly tying materials, fly tying

These posts are invaluable, thank you for taking the time to help save the rest of us time, money, frustration and heartache. I know I will be reading this post and others several times as I learn this craft, nice work Barton.
Any previous humor aside, I agree with winonaflyfactory. When and if I have an area available to try these experiments, I’d love to give it a go…
If only to satisfy the need to say that I could do this.
KB,
I finally got all my ducks in a row and just tried dying some rabbit a Chocolate Brown (Using Pro Chemicals Acid Chocolate Brown), for a brown dubbing.
Well, one man’s Chocolate is another’s Purple, I guess.
I don’t understand it. The die bath looked very “chocolate”, or a color of cola. Yet, the fur came out completely purple. I tried soaking it for longer, which just resulted in a blackish purple. No brown, whatsoever!
My steps were (following Pro Chemicals instructions):
1/2 tsp dye into 1 cup boiling water. In another pot, I brought 1 cup water, 1/2 cup vinegar, 1 tbsp non-iodized salt to a simmer, and then added the dye solution. Slowly bringing this to a boil, I then added the hide just before boiling. I checked it with tongs periodically, and it never really had any brown look to it, just different shades of purple!
Disheartening, really. I figured brown would be a shoe-in.
Going to try an “Herb Green” next, and see how that turns out.
Any thoughts on what I could’ve done wrong?
Spencer,
It sounds like you did everything right. It mirrors my attempt to mix red and blue to make a brown dye for polyester – which was a disaster, as I didn’t even get purple.
If I was a guessing man I’d say there wasn’t enough blue in your dye mixture, brown is a red +blue in roughly equal quantities – then more red if you want a reddish brown, or more blue if you want a darker variant.
This may be an issue with the vendor – as my brown failed as well. You should have no issue with the green.
Can you over-dye the purple with another color to get a dark brown – or is it too dark already?
That’s the traditional way of saving the material.
…otherwise “welcome to the party pal” – destroying materials is part of the game. You could try overdying it with a RIT dark brown …
Hey Keith,
I gave it another go this evening. I first tried a “Reddish Brown” from Pro Chemical & Dye, hoping it would fare better than the Chocolate Brown. Alas, another purple…
I cleaned out the pot, and tried an “Olive Drab”, only to end up with a Reddish Brown color! The rabbit came out looking like my natural Red Fox Squirrel. Nothing close to “olive”, but at least this will be usable.
What’s really weird, is when I remove the rabbit from the bath and put it in a pot of water on the way to the sink, the water turns a really nice greenish color, none of which is evident in the rabbit. It’s as though only certain color components are binding to the rabbit, which makes me think I’m doing something wrong?
Is it possible that certain color components take longer to absorb into the material than others? If this is the case, then maybe I should just use 1/16tsp of dye instead of 1/2tsp, and let it soak for 30 minutes instead of 30 seconds.
I’m definitely grasping at straws here, but I think I must be doing something wrong. Three for three failures doesn’t seem like a vendor problem.
Thoughts?
Compensate with an under-dye. Dye the swatch you’re planning on making olive with yellow dye.
Empty the pot and make the batch of olive. Toss the still-wet yellow swatch into the olive dye – and pull when it’s the right shade.
The Olive drab from Pro Chemical is a brown-olive which is where the red is coming from. You can get a good rich olive from it by dyeing the piece yellow first to compensate.