I was never at a loss as to what to call it, my only concern was whether I would call it the same thing twice or merely be content with whatever epithet I spat from clenched teeth.
A technique about as awkward as is frustrating, and while those that attempt it are not likely to mention genius in the same breath, it shows rare possibilities of extending traditional wet fly hackle into materials and styles not considered traditional.
As hackle typically covers the tie off of everything that came before it, all you need remember is the amount of “hackle” you prepare must change based on the number of turns you’ll apply, as well as the circumference of the thread you’re about to cover. As “less is more” in wet fly hackle, consider using no more than three turns total – more if using this technique to build a “Palmer” hackle or specialty hackle like a Spey fly requires.
I start with a slip of paper about 3/8” wide and three inches long, and smear a hint of tacky wax to the bottom two inches, giving me an inch to hold that is not sticky. Two inches of “awkward” hackle is about 3-4 turns of a #8 hook.
The beauty of this style is that any fiber is eligible to make a hackle flue, so you can select them based on color, texture, action, or stagger lengths so one color is short and close to the fly – and a second fiber is longer and drapes over the body.
It can also be used to “right size” feathers too big for the hook size you’re tying, as you can pull the fibers short now they’re no longer connected to a bothersome stem.
Clip a few fibers of material and press them into the tacky edge of the paper at regular intervals. Select a second, third, or fourth material and fill in the spaces with additional fibers to make your finished hackle.
In the below example, I’ve added Maple Sugar Teal flank fibers every 1/4 inch, and filled in the gaps with Olive dyed Hare’s Mask guard hair, using both feather and fur to make my hackle. The teal flank is set longer than the Hare’s Mask, which should project a few tips out past the halo of Olive fur, ensuring their color shows separate and distinct.
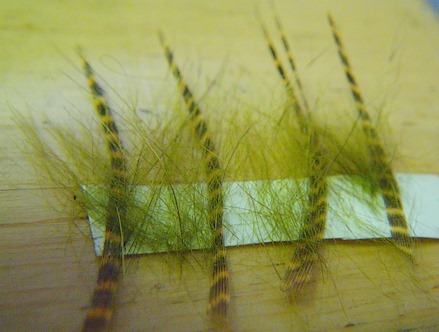
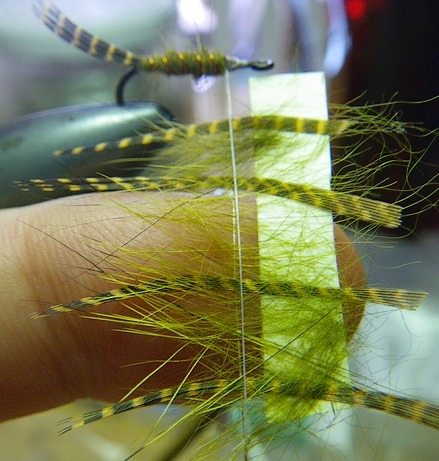
Once the amount of fibers is appropriate for the hackle density, simply throw a loop of thread from the hook shank and slide the fiber side of the “hackle tape” through the loop, holding onto the top (or bottom) inch that does not have wax on it.
Now grit your teeth and hold the loop closed with your left thumb and forefinger and run your scissors up between the gap of paper and thread and cut away the paper.
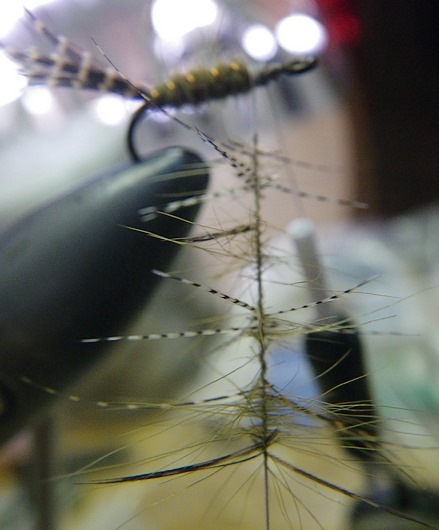
Now spin the mixture as quickly as you can to have the thread loop capture each fiber and lock it between the threads. If you’re not swearing yet, start – as really profane swearing can alter gravity and it’s attempt at dropping all your earlier work out of the loop and into your lap.
Transfer the loop to a set of hackle pliers and continue to spin the combined materials tightly. The more turns per inch on the resultant hackle the better the fibers will be anchored on the completed fly.
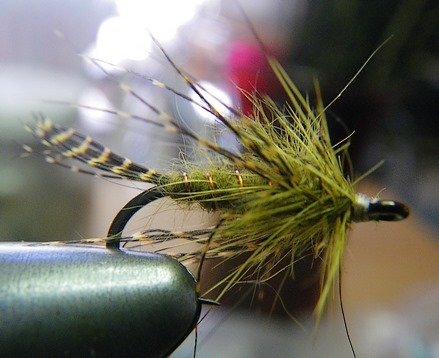
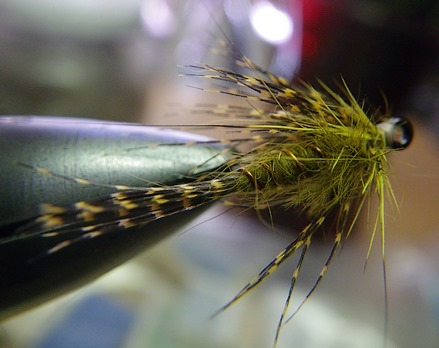
Here is the completed “Awkward Olive” nymph showing the final hackle. The Maple teal was set longer than the Olive Hare’s Ear guard hair, and the regular rabbit duff found along with the guard hair was left in the final mix to offer softness and motion once wet.
Here’s the same fly shown from above which allows you to see the two lengths of hackle added with a single application. The long teal fibers offer considerably more motion than usual as they are not connected to a stem, and the secondary fibers of Olive Hare’s mask pulse when wet, giving the result a compelling action unavailable in traditional hackle.
Use your imagination, add feather fibers and marabou strands, hair, deer hair fibers, any fibrous material can be used including yarn fragments and bits of tinsel. The only caution is the larger the fiber diameter the harder it is to lock tightly with thread.
Don’t be afraid to add a loop of Size “A” thread or even Kevlar thread for super coarse materials or extremely large flies including those tied Spey style. Wax the loop assist it holding the materials in place for the delicate cut that must be made.
While wax is not as popular as it once was, any tier worth his salt ignores what the crowd likes in favor of what works. It comes from too many icy winters filling fly boxes with bits of dead animal, the kind of behavior that depresses your Facebook “friend” count and neighbors looking to borrow sugar …

Very nice neat trick that, I like the variation of lengths of the fibres that can be achieved. I include a link to another way of “cheating” and using fibres too long for standard wet fly ties. I hope you won’t mind.
http://paracaddis.wordpress.com/2011/07/28/cheater-soft-hackles/
Regards
Paracaddis.
Great tip and great to have you back! On another note I think you even posted more times than the Trout Underground this April…
Oh,snap! C’mon,TU has two rugrats and the lifestyle of a rich and famous blogger to mantain….SB lives in a schoolbus/old trailer compound by the Yolo Canal..Who has more time?
(I know,I know “You’re going to Hell”)
It’s not for the lack of desire, my absence is largely due to work demands.
Tom has always been in it for the groupies, and popularity has it’s own debris field to tiptoe through …
Both of us are mellowing nicely.
I will try to post more often.
… and Tim, that is a neat little trick you’ve posted, I’ll have to try that.
I’ve used the Marc Petitjean Magic Tool. It creates a similiar effect. Splitting the thread is lots of fun to try.
I’ve been having lots of luck recently with partridge and organge flies and RS2’s For the RS2s I’ve used the wonderful Singlebarded dubbing and it’s produced lots of fish.
Nice post! I appreciate your work, its sometimes hard to make things so clear in a short article, you definately nailed it. Good looking fly, Thanks