Flat tinsel is one of the many thousands of fly tying tasks that are intuitive in concept and unduly difficult in practice. Tinsel in past decades was flat metal, which sliced through fingertips with only slightly more resistance than tying thread.
The switch to Mylar eased the bloodletting and ended tarnish, but had the same problems with its application. Now you had to remember to tie in the color opposite what the body would be, as one side was silver and the other gold, which would result in the only cost savings two hundred years of fly tying has ever produced.
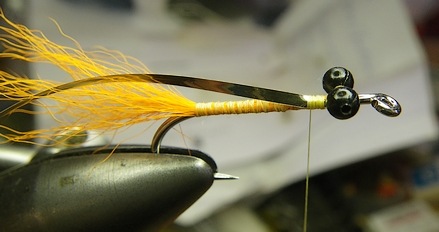
Figure 1: Gold side facing you means the fly will have a silver body
Tinsel bodies are quite common in trout streamers and steelhead flies, and can be tamed with three simple tricks; always use the widest tinsel available to cover the most with the least number of wraps, never overlap turns, and always double wrap the body, never attempt to single wrap the fly.
Tinsel is cheap – there’s little advantage in hoarding it.
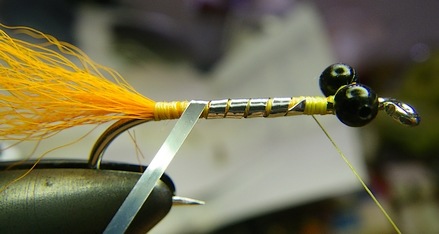
Figure 2: No turns overlap
If even the slightest overlap occurs it will create a “bubble” or air gap that will eventually slip to reveal the thread wraps beneath. Always wrap the first layer so you can see thread color between turns.
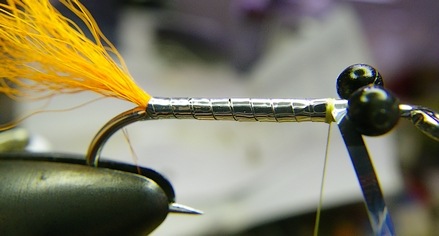
Figure 3: Final layer of tinsel added
There are no overlaps on the upper layer of tinsel either. Because the two layers are at right angles to one another, no thread is visible despite our leaving rather obvious gaps on the bottom layer.
In the above “Comet” style of steelhead fly, I used an under-the-tail-wrap to change direction and bring the second layer forward to the eye. This makes the change of direction seamless, and lifts the tail away from the hook bend.
As an additional step, one that I’ve been asked about, is how the “tip-first” style of hackling subsurface flies can accommodate a second color.
Comet’s have a mixed orange and yellow hackle, and “folding” hackle so it drapes back naturally, precludes a second color – given that winding it forward would bind the first to the shank.
Instead, treat both feathers as if they were a single feather. Size the hackles by spreading the barbs perpendicular to the stems with your fingers. Place one on top of the other, and using either the thumb (top feather) or forefinger (bottom feather) slide the two along each other until the stroked barbules are the same length, as below:
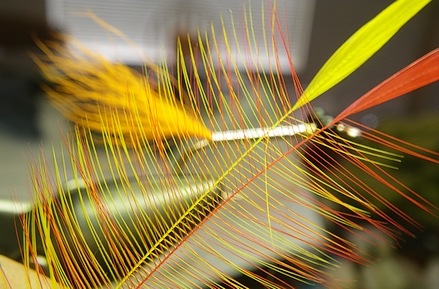
Figure 4: Both orange and yellow fibers match in length
A better view below, showing the two hackles now tied in, yet spread from the stem so you can see they’re of identical length …
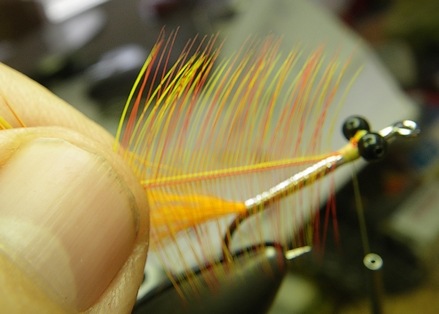
When gripped thusly, the forefinger controls the tension on the bottom feather, and the thumb controls stem tension on the top color. Note how the stroked perpendicular barbules are of the same raw length.
Now all that remains is to keep the stems together under equal tension when you stroke them at right angles with your scissors, or saliva equipped fingers, whatever is your favorite tool for moving the fibers to the same side.
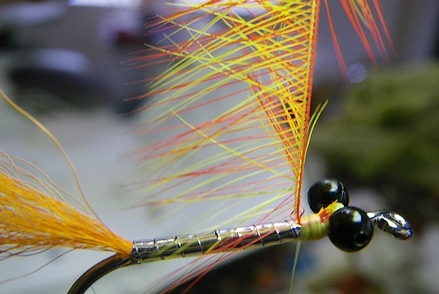
Figure 5: Fibers stroked roughly to the same side
I use the edge of my scissors scraped towards me to break the backs of all the fibers and push them to a single side. Fingers finish the task, by stroking anything unruly back into line. Note how close the two stems are kept, they might as well be a single stem.
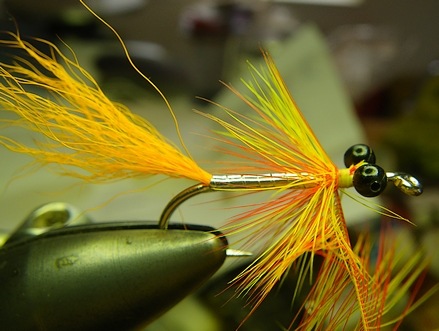
Figure 6: Winding both colors forward
This technique ensures the proper balance of colors as one turn of orange yields one turn of yellow, and the mixed color is exactly half of each. Adjust the stems over lumps or bumps using the finger that controls the wayward stem – bring it back in line with the other so they wind as a single object.
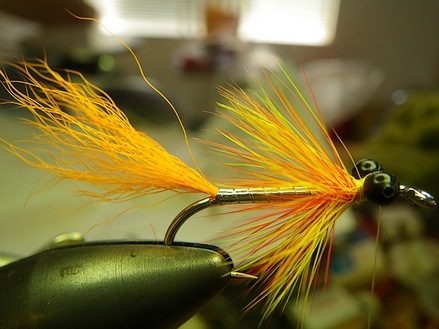
Figure 7: The completed “Comet” style
This style of hackle does away with the overly large head caused by wrapping over the “dry fly style” hackling and forcing it down and over the back of the fly. A fly tied with this style hackle can have a head no larger than a trout fly if done correctly.
Note how the sizing we did at the beginning yields flues of equal length for both colors? No more guesswork needed to pick two hackles, simply slide them around until the flue length matches.
Using the right “style” of hackle for the task is a very important distinction a tyer makes on his path to mastery. When he understands why he abandons “butt-first dry fly hackle” for his underwater flies, it’s a real milestone in his formative process.

Thanks for the tips. I was given quite a bit of tinsel that’s sat unused for too long; time to get it out and give it a try.
So how do you get that very first wrap to lay flat? I always get a bit of creased tinsel sticking out with my first wrap.
Angle the tie in to make the first couple turns of thread cross the tinsel at a 45 degree angle. When the first turn of tinsel is taken you’ll get a neat fold (visible above). Often you can trim the end into a knife shape that assists you in tying in the material at a slight angle. When you make your first turn, flatten the fold with a fingernail or tool. As I want the top layer wound in the same direction as the thread (so tying it off tightens it further) make sure your first turn goes under the hook, making the first layer wound clockwise.
Larger flies typically use floss to smooth the underbody of a tinsel-bodied fly, this aids in removing most thread caused lumps and oddities.
I’m trying for the life of me to prove you wrong by identifying another fly-tying cost saver…but I can’t. Even the spools that thread and such come on are useless now that the are plastic. Used to be, when they were wood (ahh, the old nymo days), that you could burn the leftovers to keep warm in winter.