Despite all of the maturity and sophistication of my later years I retain a child’s fascination for dirt. It exists at two levels really, the notion of washing a fishing vest or well seasoned hat being completely repugnant, and a lot of my fly tying revolves around “dirt” and its many colors.
Harken back to those heady watercolor and finger painting episodes of grade school and you’ll remember it as the puddle of all colors; a brownish tinge to whatever else you’d slapped on the paper and the budding Picasso next to you.
Faced with a plethora of hides, yarns, and synthetics, in both drab and riotous colors, the fly tying artist makes “dirt” about every third attempt. It’s a natural tendency when exploring a new medium, and often the “less is more” idiom is learned before something other than dirt colors are the end product.
“If chocolate and peanut butter taste good together, let’s add strawberry preserves and yogurt, then some sauerkraut …”
Like all crafts, clean colors lies in the edit rather than the inspiration.

You nodded vigorously when “Momma” told you to document everything, then ignored this all important chore completely. As that bulging baggy slimmed down and the bodycount of duped fish increased, you found yourself asking, “was it Orange Hare’s Ear I added, or was it Yellow?”
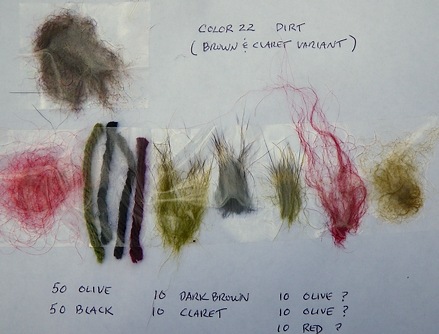
Above is a sample page of my color book, showing the detail needed to make an awesome color a second time, any damn fool can make a great color once …
Samples of each of the materials used are taped to the page, as well as a generous dollop of the final dubbing at top left. I’ve coded the component description in my own unique system, designed to obfuscate and confuse – while the wife may get half the pages, they won’t be worth much without an interpreter.
Snippets of the original materials are included because they won’t always be available. At some point the yarn or one of the furs will be rare or no longer made, and a small snip of the original allows you to search for a replacement with a sample in hand.
It’s a lesson every fly tier learns painfully, some not at all.
As many of the above components are dyed from the original color, the color book allows you to compare with the contents of the dye pot, so you can reproduce a needed shade without guesswork.
Mix more than four colors together in roughly equal amounts, and you’re playing with mud. But “mud” isn’t as bad as those first grade self portraits might’ve seemed …

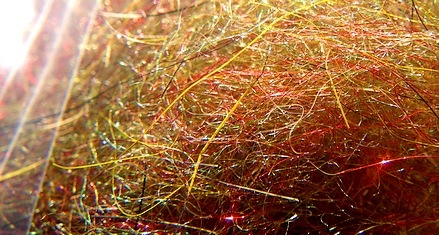
The proof being when you get in close. Paint molecules being so much smaller than hair follicles, color loses integrity, while fur still retains the sum of its parts.

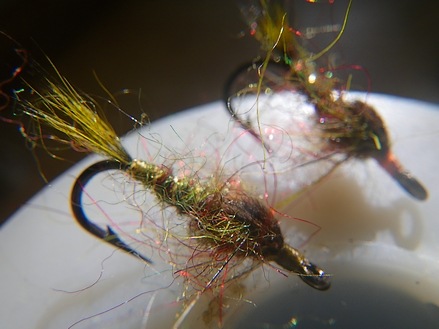
I can’t shake the feeling there’s something special about a touch of claret or burgundy in any fly. While on paper adding bits of this and that yields a muddy and largely indescribable brown, the finished Gold Ribbed Dirt Clod (Olive & Claret) shows its true self as plenty alluring.
This is one of many tidbits that Andy Puyans and some of his ilk adored. The debut of the AP nymph in Angler magazine had nearly 10 variants of the now standard AP Nymph, two of those featured claret highlights as shown above.

As someone with an admitted claret fetish, I couldn’t agree more with the ‘touch of claret or burgundy’ comment. Whether in the fly or in the glass.
Interesting post, I like your method for a color book, seems like it could be used for a lot of applications in addition to flies. Thanks for the great idea!
It’s a trick I’ve modified from my commercial tying days. For the odd request like Atlantic salmon flies on waddington shanks I’d insist on a sample fly that I could keep.
That allowed the customer to reorder them at any time and we didn’t have to describe them. I’d keep a page with the customer’s special flies and reproduce them as needed.
Dyeing and blended dubbing just followed along naturally – as mentioned above, any fool can make a great color ONE time …
“any damn fool can make a great color once …”
I hope so. I mean, it would be nice if I could do so just once.
KB,
I noticed some of the fur in the picture appears to be dyed. Are only furs that have been soft tanned able to be dyed? Or can you dye the skins that are just dried? You know…the ones where the back looks like something you’d give to your dog to chew on? I’m hesitant to drop a 12 buck tanned squirrel skin in a dye pot, but would have no problem with a 4 buck dried one…
Rex – there are four different natural furs in that mix, of which three have been dyed.
You can dye anything equally well, in fact, I’d go so far as to say that dried hides should be chosen over tanned, simply because of the result:
A tanned hide always costs more than a dried hide, and after dyeing (depending on color and temperature needed) the dyeing process can sometimes remove the tanning suppleness and the dried hide is stiff as a board.
This is largely caused by dye bath temperature – where extra hot can really shrink a hide (just like a chicken neck) because it cooks the hide just like meat.
I use dried hides because (as you’ve mentioned above) they’re much cheaper. In many cases I may even shear the fur off when dried – so the hide is no longer attached, and an afterthought only.
You can also shear the fur off the hide and dye it as a loose mess. In rare cases this may be as effective, but put all the hair in a nylon stocking (or similar porous bag) so that it can be treated as a whole – for purposes of length of time in the bath and amount of dye it’s exposed to …
Loose hair has to be strained out with a deep fry strainer – plenty can be missed until you dump the pot into the sink. Anything not picked up by the strainer can be one or two shades darker – occasionally that may be an issue for you.
Dyeing any type of hide will give you the opportunity to pin it out flat on a cardboard box. If a hide isn’t pinned down it will shrink and curl when dried. If you have such a piece and want to correct its shape, you can also toss it in warm water without dye – until it’s saturated, then pin it down flat for drying outdoors.
See the older post:
http://singlebarbed.com/2010/01/11/part-2-the-timid-fellows-guide-to-dyeing-hair/
Good questions, feel free to ask plenty more.
Awesome. I can’t wait to dye up some squirrel and rabbit. I’m tired of paying out the nose for little packs of red fox squirrel nymph dubbing. Everything here in Indiana eats those nymphs, and I tend to go through a lot. Judging by the price of the red fox squirrel belly fur, only printer ink costs more per ounce.
I bet Dave Whitlock is hoarding it all…
Pingback: Each fly could be a big fish or a new friend | Singlebarbed
Keith,
Did you ever dye with picric acid? Some tyers over here report good results with that.
If memory serves Picric Acid is dangerous as all hell – which is why it is banned. It makes a beautiful yellow, but isn’t worth losing your fingers over …
The big concern has been with finding dehydrated picric acid. The most dangerous situations is if the bottle is old and has a metal cap. Under these circumstances, shock sensitive metal picrates may have formed on the cap contact area. Explosive experts should be contacted under these situations.
Knowledgeable bomb disposal experts will use a robot to pick up the container and place it in water to re-hydrate the material (14) or remove it for detonation elsewhere.
If a plastic cap is present, and the acid inside has dried, some crystals may be on the threads and the friction of removing a plastic cap might be enough to detonate the container. Under these circumstances, the container may be safe enough to place in a pail of water. Submerge the bottle to allow water to enter the cap and threads and dissolve any crystals that might be on the threads. Add ice to cause shrinkage of the bottle to enhance
penetration of the water. Leave it like this for several days, until water can be seen inside the bottle. At this point, it is safe to open the cap and re-hydrate the acid inside (15).
Whenever in doubt, contact explosives experts.
I think we used an ethanol-dissolved picric acid here, diluted with water. But it’s been years… Got some very nice dubbing from combing our cats (one red&white and one black&white)dyed with teh explosive stuff. Not very easy to dub, but good, fish-catching flies. Ah, well….