Singlebarbed reader Spencer has trod where only the crazed and obsessed have dared and in traditional fashion I’ve started making excuses while flailing about trying to help.
“ … you mean you actually took my advice? That was your first mistake.”
The issue is simple. A dye manufacturer boasts of an olive or brown and both are complex colors made of multiple sub-colors. From your watercolor days, brown can be made a thousand different ways (usually by all the colors running together), but most vendors use a combination of reds and blues or orange and purple to get brown.
Spencer dutifully tossed in his really expensive Whiting neck he hasn’t owned up to inexpensive rabbit fur test chunk and wound up with a nice purple for his trouble.
Been there. Spent most of last weekend in the exact same place with RIT dye. If I knew more of what comprised color on the mineral side I might have a definitive answer, right now it’s lumped under “sucks to be you.”
Dyeing destroys a lot of materials during the learning process but over time you can handle certain types of calamities, the rest you dry and do your best to find a use for – the material hasn’t been destroyed, it’s just not the awesome medium olive you’d hoped it would become.
If you can’t get a brown to dye brown , there’s little you can do to fix it – and the only variables are listed below:
1) Heat – make the dye bath hotter or colder from the failed temperature. Some minerals may only dissolve at certain temperatures, so if you dye brown and get bluish purple, it could be the red is activated only by higher temperatures than the blue. Purple means that some red and blue fired, but blue-ish purple suggests more blue than red fired.
2) Over-dye or tint the color back into the acceptable range. It works best for lighter colors as you’re adding additional color to an already dyed material. Dyeing dark purple with yellow will have no effect, but dyeing a light green with some brown and yellow will yield an olive or olive tint.
3) Time – leave the mess in the pot overnight. This should only be done on the darkest colors as even Tan left overnight will yield a brown feather. Perhaps time is required to get the other color(s) to precipitate onto the feathers.
Over-dyeing is also not for the faint of heart, but it’s one of the ways you can get the rarified colors like bronze blue dun or a multi-colored feather.
Last weekend I’d agreed to reproduce some of Cal Bird’s teal colors and had approached the issue with great trepidation – Cal being a trained artist and therefore fully fluent in the manipulation of colors and tints.
 I’d dutifully followed the vendor’s color guide and built an olive and a brown from other colors. RIT lacks an olive, and their brown was too dark, so I mixed the custom colors in a proportion that I thought would yield something close…
It didn’t, and I was left scratching my head like friend Spencer.
The dye was largely RIT forest green with about 10% RIT tan, but the green vanished no matter what temperature was used.
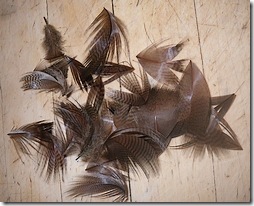
I yanked the feathers before they became too dark, but left a pinch of them in the pot to test the overnight method. The result is above, a rich dark brown.
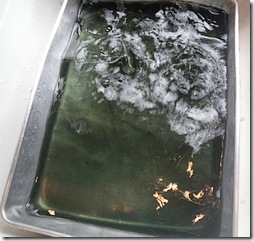
It didn’t matter what I tried, more heat, fixative, or dye yielded a pan full of forest green water and tan feathers. Over-dyeing was the only option, as I’d run out of suggestions from the manufacturer – who insisted I’d get an olive with the two colors mixed.
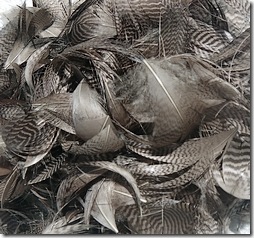
This drab, cold tan is shown below. It was yanked from the 90% green bath earlier – at the point when it had added all the tan needed to make the base color.

It has a miniscule amount of green in the feathers – just enough to turn the color cold.
I lump quasi-colors, those that I wasn’t expecting, under the destroyed feathers outcome; the colors are useful and the feathers are undamaged – only the end result is unexpected.
A couple days later I subjected the now dry “cold tan” feathers I’d pulled early, to a bath containing only green and a bit of yellow. I needed only the smallest tint of color added to warm it to the sample color.

The second bath applied what was missing to alter the color into the successful range. Green being equal parts yellow and blue and adding additional yellow – allowed the color to “warm” the feathers without obscuring the tan. There are hints of green in the feather duff at the base of each feather, but this is a brown-olive as dictated by the sample on the right.
Cal’s instructions are shown on the envelope, “olive and maple sugar.”
You can destroy feathers in millions of ways, with only a couple options to salvage the result. Consulting the color often allows you to pull the feathers when the unexpected results – and alters the problem from imbuing a light item with the finished color, to altering the existing color to match a desirable range.
Sorry, Spencer. It’s all part of the craft.
Tags: RIT, Cal Bird, teal, over-dyeing, tint, brown olive, bulk fly tying materials, custom dyed feathers, TINTEX maple sugar, whitefishcantjump.com, feather dyeing

You know, those bad batch materials may still yield fine flies…….check them for good UVR levels and tie away if they glow. Depending on the mineral content of the dye, you may be able to get your color and high UVR……….or go crazy trying.
You can thank Reed Curry for placing another mind bending dimension to the puzzle………what happened to the good old days when we really didn’t know squat about that stuff, and were left to argue about the merits of size, color and presentation????
I’m off to have UV cones lazered into my retina……..
That’s the way I see it. The first attempts wind up saving your bacon years later. It wasn’t the color you wanted when you dyed it, but your introduction to some new fly – or new watershed makes you thank your lucky stars years later.
As long as the feathers aren’t damaged, it’s all good.
Reminded of what they said in that famous college documentary (Animal House): “You screwed up. You trusted us.”
See?! This is why I stick to making home brewed beer!
If you have not tried it already, FLYDYE, from organic dyestuffs, is the best tying material dye that I know of. Seems to be about 10 times stronger than RIT, and I have had great results with it.
I’ve never tried it before Doug, thanks for the tip. Certain colors are hard to get from the textile industry and easy to get from dye outlets that cater to fishermen – a good range of Olive being the poster child for this phenomenon…
Ha, been heads down the past few days, and just saw this!
So, I somewhat figured out my problem with the acid based dye. My original suspicion, that different color components take longer to absorb was correct – I even called Pro Chemical and Dye for verification. I’m now using 1/32 – 1/16 of a teaspoon, and instead of letting it sit for 1 minute, letting it sit for 15 minutes.
Problem solved, to an extent. I’ve got brown down pretty well, still haven’t cracked the Olive nut… But, i’m at least not getting purples anymore, and am ending up with different natural colors. Blending different quantities together has resulted in some nice dubbing.
Next step is to start experimenting with different materials, preferably light colored materials, so I can darken them to the color of choice. Need to take a trip to the fabric store and the local fly shop – River City in Portland has every material known to man, except seal fur.
Pingback: Well just refine what Mother Nature started | Singlebarbed