I don’t expect Science will ease a fly tier’s burden anytime soon. Even if they manage to add the vocal gene into a Salmonid and trundle the tank up to the podium … while all us fishermen crane forward waiting to hear what fish really like – it’s liable to eyeball a flybox and croak, “… needs Garlic.”
In the meantime, our best efforts are subject to the opinions and wit of brutish fishing pals – who continue to pillage our fly box despite their being; “too small”, “too yellow”, “too thick”, and “too few.”
Our goal is to weather criticism knowing that only fish determine beauty, and the success of the “well chewed fly” is ample proof. Pursuing visual perfection will teach solid construction technique – ensuring both ratty and perfect flies can be well chewed without falling apart.

Absolutely nothing can be corrected later. A tail that’s flopped onto the far side of the shank, the lumpy tie-in point for the body material, that upright and divided mallard wing whose center stem was not clipped, nothing can be corrected on the fly by adding more crap on top.
Nothing.
Perhaps a master fly tier can fix a lumpy body, but he’d never tolerate those lumps on the initial application. Lumps, bumps, cocked, and twisted, are caused by something wrong – or something you failed to do properly.
Elimination of these unsightly blemishes will take decades, as unfamiliar materials and the techniques to tame them are committed to memory.
Learn to back the material off the fly and reapply it. That will mean unwrapping 56 turns of thread (beginner), 30 turns of thread (intermediate), or the six turns (advanced) used to secure it.
A case in point:
The body of the fly and its transitions determines the finished fly’s appearance. In Part 1, Step 8 I made the same claim for lead wire on weighted flies, both are essentially the same thing. Lead is the underbody and whatever covers it has the ability to influence all the critical final steps of construction.
Anglers adore tapered bodies – it reminds them of the mythical Supermodel lounging on the rock at the next bend – whom doesn’t exist, and they’ll never date…
In Part 1 we described the “gap-fill” process to overcome the rearmost transition which allowed a smooth taper from tail to thorax. We’ve got a similar dilemma on the front of the fly, an unknown number of steps and materials remain, we don’t want to influence their shape, but still need to close the gap between lead-filled thorax and hook shank.
You need a taper in front as well.
Especially critical for flies that have wings laid over the back (wet flies), hackle you want swept back and close to the body (soft hackles) or thorax materials placed on top and only tied in at the front, like Polly Rosborough nymphs or the wingcase of a Zug Bug.
A forward taper can be induced at the front of the fly using the body material itself, or by staggering the tie off points of the remaining steps to make an orderly transition from the thickest portion of the body (thorax) to the bare hook.
A nice front taper will put a finishing hackle or wet fly wing just far enough away from the thickest part of the body so that it doesn’t wedge against it and flair outward or upward.
Figure 1: Tied too close to the body lump
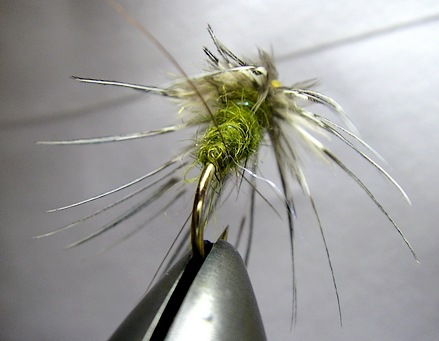
If you have too abrupt a transition from body to hackle and wingcase, those final steps will be “flared” outward; wings or hackle are pushed away from the body by the bulge of dubbing at the thorax.
Figure 2: The Double Tapered body
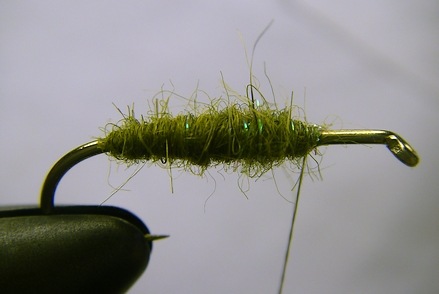
Put a short taper on the front of the body to allow hackle and other components to lie flush with the body rather than flared outward like a dry fly. When hackle is brushed back against the smaller diameter tapered area, the fibers will rest easy and encase the body in a cone of barbules.
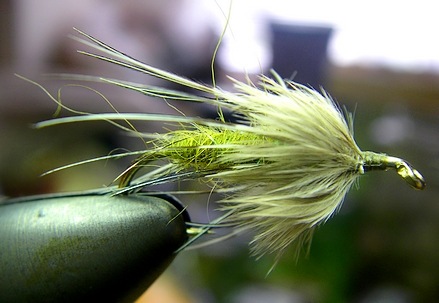
Figure 3: Due to the taper the hackle is closer to the body

The head of the fly is never shown in schematics. It’s the only part of the fly that defies known physics; it has no mass, no size, consumes no hook shank – defies taming, and persists in trapping our hackle and ensures the hook eye is plugged.
It’s the fly tying equivalent of a pimple on the end of your nose; turgid, menacing, and so very prominent.
It’s a fly tier’s signature, equivalent to a woman’s breasts; the first thing you see despite all efforts not to, and unduly influences perceptions of quality and beauty.
… which is why the divorce rate is so high.
Despite the many thousands of fly types and styles, beauty is consistent; the head should be free of materials, small or tapered, or both.
Tiers will commit the “2/3 body, 1/3 hackle” (or thorax) shank allocation to memory. They’ll spend the precious moments to ensure the tail is mounted correctly, the body is thinly dubbed, wings upright – or cocked at a rakish angle … and then destroy the fly by tying off everything in one brutish move, capturing a third of their hackle as they’re pressed for space, slam six or eight turns of whip finish onto the stubble – then dip the result in lacquer like it was a French fry…
… and the porcine lump of thread that results is deserved.
Small tapered heads require space. While the “2/3 – 1/3” rule is quite valid – your instructor was shy and didn’t mention that he’d allocated 1/8” behind the eye for the head – and it’s “2/3 – 1/3” of what remains…
That precious allocation will require you to adjust your lead placement on nymphs, and the location of the wing on dry flies. “Small” guarantees the whip finish to land on bare hook shank and not on materials. There are many types of fly and many adjustments that must be made to the “where” and “how” of the final knot – but every head on every fly must be planned.
Figure 4: Reserving space in advance
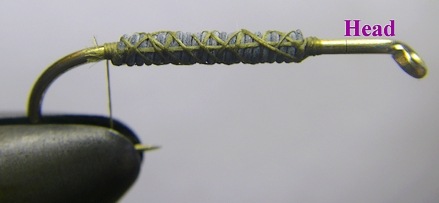
Recognize that Step 6 above, and the forward transition from fly body to whip finish is linked completely with the final small whip finish. Planning the forward transition determines how the naked thread is covered by the final materials ensuring the whip finish lands on shank.
Figure 5: The Sacred space is still inviolate
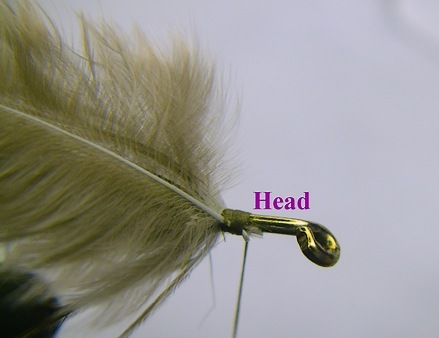
The above shows the final step on a modified Gartside Sparrow, winding the front philoplume just prior to the whip finish. Note that the area reserved for the head remains untouched.
Keeping the mental picture of the head as you apply the finishing materials to the fly, ensures loose fibers and crap are not part of the whip finish, and ensures all the tie-off points are staggered so everything isn’t crammed together in one final orgasm of knot.
The head will be small and delicate, will evade rocks as other parts of the fly will contact it first – and will cause your critical viewing audience to swoon in appreciation.

Torque is one of those subjects most of us skipped out on in High School. “Grab-assing” on the back steps was so much more important in the day, and physics combined with the post-lunch digestive period guaranteed slumber.
A right-handed tyer will move materials clockwise around the shank, even if they were tied in and secured earlier.
Many fur and feather fibers are slippery, and as we hold them precariously near the shank attempting to secure them, we’ll move them off of top-dead-center just with the torque of our thread wraps.
Tails are especially vulnerable as we may have to tie in both ribbing and body material on top – and if our thread strays too far back in any subsequent step, we’ll move the tail away from us – perhaps even to the far side of the hook.
Some of this can be corrected by grabbing the offending item and giving it a yank in the opposite direction – which is acceptable after the fly is finished, but if it’s still in the vice the Golden Rule of Step Six –adding more crap can’t fix anything, is gospel.
Flies with lead underbodies are especially vulnerable. Securing lead has always been an issue and subsequent steps may rotate the body or thorax due to the pressures of thread direction and torque. Large flies with heavy wire or oval tinsel rib – or synthetic monofilaments like V-rib allow tiers to get heavy handed on the fly – which can induce movement.
Recognizing this phenomenon allows you to watch for it. Tying in tails and body parts 10°-15° off of top dead center on the near side will allow you to adjust troublesome wingcases and tails, and proof them against subsequent steps.
Later as skills develop you’ll have an easier time of it as you’ll learn to anchor materials differently (see Part 3) which will resist movement and proof you against everything but your own strength.
Note: if your tongue is clenched between your teeth as you apply ribbing, or your sweating profusely afterwards, that’s bad.
Our last post will feature the Big Three, techniques learned only after climbing the mountain barehanded, walking across hot coals, and observing the tying secrets of ancient Shao-Lin masters.
Tags: Gartside Sparrow, torque, lead underbody, V-rib, oval tinsel, fly tying, monofilament, ribbing, Philoplume, whip finish,

Good stuff, Keith. While there is a lot more to thread control than torque, it’s nice to see you hit on it here. IMO, probably the most overlooked concept by beginner fly tying literature is thread control. Of course, I probably only think that cause it was pounded into me when I first started out, but knowing how to make your thread do what you want it do, or what you didn’t even know you wanted it to do, is 75% of it.
I know you sometimes take a lot of crap from your readers, but these articles you are doing are very well done. I know I have tied a lot of nasty looking flies due to making some (ok many) of the errors you pointed out.
Looking forward to the next lesson.
Well most of the crap is well deserved – comes with the sticking of your chin out there looking to get poked.
Glad to assist, these are extremely painful lessons for most fly tiers – myself included. Shortening the frustration cycle is my goal – even if its only a few stalwarts.
Quote : “I know you sometimes take a lot of crap from your readers,…”
Crap, I’ll give you crap!
Why haven’t you done more of these great fly tying/tips atricles is the past?
These are OUTSTANDING and very much appreciated.
I was going to put the “how to” articles on the Singlebarbed tying blog – but the thought of updating two blogs is a bit much.
I’d be thrilled to add more of this type of stuff, just not sure the crowd is interested is all.
please keep adding more of this type of stuff. it will help beginners and experience tyers.
thanks
The unwritten law of blogging: Those brave enough to comment, gets what’s asked for – and them as lurk, must endure.
Consider it done.
I’ve only dabbled with tying, but I’m determined to pick up some skills over the winter… posts like this will keep me busy all winter long! Thanks for the help
I wish I was a fly tier professional. My flies never looked as good as this.
Pingback: Part Last – Singlebarbed teaches the beauty secrets of the Shao-Lin Masters | Singlebarbed