Fly tying is six weeks thinking of nothing but the fish, tying small stuff to smaller stuff, the shock and awe that all insects don’t suck blood or whine in your ear, the majesty of the first fish caught on your own fly, and the amazing riot of colors and animal parts coveted and purchased …
… and then it’s forty years of attempting to make your flies resemble someone else’s – validation not so much duped fish as successful copy of a book photo, or an appreciative comment from a fellow angler.
You start tying flies for fish – and wind up tying flies for fishermen.
It’s not a conscious decision, but aesthetics and beauty are as insidious in fly tying as they are in life.
The industry has always embraced beginners with great fervor, as they’re the source of a great deal of revenue. They need everything and a canny shop owner loves to host a class as it guarantees commerce. Fly fishing clubs love them as well. It’s a great way to be “hale fellows well met”, attract “lurkers” that don’t show for banquets and Beef au Jus’, and co-sponsor them with local shops happy to provide a small discount for students.
… and six weeks later you’re mounting that gleaming new vise to a table wishing you had someone to ask the hundred-thousand questions that occurred since your final lesson …
Magazines, books, and Youtube provide inspiration but spawn more questions than answers, and despite the fellow at the fly shop claiming “Cree” is nearly as good as Grizzly, your unimpugnable sources are gone and you’re left to figure it out … alone.
Intermediate and Advanced classes are few and far between, as there’s no agreement on what techniques or flies belong to either, there’s little retail traffic, and finding a master-instructor that has all the answers and is sober is more difficult in a club setting.
When offered they’re usually a three-part chain; beginner, intermediate, and advanced – and often filled with recent graduates of the beginner class, who’d be better served if they tied 5 or 6 thousand flies before stepping up the complexity.
If you’ve made it past the beginner class and resolved to master fly tying, knowing full well that further precision is largely vanity as the “well chewed fly” and its effectiveness has debunked taut, tight, and pretty…
… I’ve got nine steps for you to master if you want to catch fishermen.
The “Why” of it all
Refining your tying for the critical gaze of other fishermen will make your flies sturdier. All the painful lessons you’re about to learn are lost on fish, fish are stupid, lack artistic sense, and eat cigarette butts.
If you smoked you’d know this.
“Refinement” is a fancy word for discipline. Holding instincts in check and enduring someone else’s artificial sense of style, proportions, and method.
Beginning tiers lament the movement of materials on completed flies, loose tinsels, flopped over tails, and precarious hackle – and are heavy-handed with thread on all subsequent attempts. Reaching inside that glossy plate to give the author’s fly a twist will yield movement too, but it won’t unravel or fall apart – and yours might.
The difference between 30 years of fly tying and a recent initiate is about 8-9 fish. Even the best flies disintegrate and replacement is required.

In its day the flat tinsel body humbled most tiers. It’s not used as much presently but the lesson learned holds true for all wound body materials, doubly so if they’re shiny.
Dubbing bodies allows a tyer to add a little more or take a little off, but yarns and chenille don’t share that quality. They’re a constant diameter that shows every lump and foible of the materials underneath, and completely unforgiving.
Mastery of these materials is simple if you get to watch someone else do it. For chenille, downsize it one size and tie it in at the front and double wrap the body.
A double wrapped body of small chenille is the same size as a single wrap of medium, yet you can add taper, wrap it tighter, and tie it off with less thread than the larger size.
Flat tinsel and floss are identical. Wrap from the front of the fly backwards to the tail then wrap back up the body to the start. You’ll have a gleaming body absent gaps in the tinsel or “bubbles” – where overlapped tinsel pops out of the turn next to it leaving a small area of underbody and thread showing.
A large area to work with doesn’t make the task easier. Large trout streamers with their 6X long hook actually magnifies the floss or tinsel’s effect on the overall fly – as it’s much more visible. Working with floss requires you to cover your fingers as the sweat of your grip will immediately remove the shine or stain light colors.

Lead wire on nymphs and larger flies dictate the look of rest of the fly. A poor choice in placement or the inability to address the obvious lumps of where it starts and stops, cannot be corrected.
On trout nymphs the lead wire is the thorax – giving you a pronounced lump that ends the body and defines the wingcase. It should be positioned on the fly exactly where the thorax will occur – and the number of turns used should be the exact width of your planned thorax area.
…that’s right, planned. Flies don’t wind up with proper proportions by accident, and tail, body, thorax, and head are all mapped in your mind before thread touches the hook.
On larger flies lead wire may cover most of the shank, or it may be larger diameter, and no amount of thread or glue will keep it from rotating. Bind it as best you can and use the tail and body materials to plug the gap between shank and the rearmost end of the lead.
The mistake most make is not leaving enough room for the forward transition at the eye of the hook. All your materials will be spiraling off the lead coils and secured on the much thinner hook shank. Dubbing can be used to hide many sins, but wound materials like ribbing and chenille will always have trouble on that transition.
Positioning the thorax too close to the eye of the hook will yield a crowded eye – and worse – if a couple of turns of hackle need to be wound in that area to complete the fly. If the tie off area is still abrupt in definition hackle will flair outward away from the body due to the bulge – rather than close as it’s intended.
Lead placement dictates everything – including the hackle shape.

If it’s not dry fly hackle then it’s tied in by the tip and folded, then wound.
… and there’s some very good reasons for that unshakable rule …
Hackle is the most fragile component of any fly, dry or wet. The thin tip gripped by your pliers limits the amount of pressure you can use when hackle is wound around the hook shank. Tying in the tip means the stem gets thicker with every turn and you can apply more force when it’s wound palmer up the body – or used as a collar on nymphs and steelhead flies.
… and at the eye – where it’s tied off, the stem is thickest yet, perhaps enough to withstand being barked on a rock on a low backcast or torn off a tree limb on a misguided forward stroke.
The real value is the effect. Hackle fibers get longer as you move towards the butt of the feather. When winding collars with a folded hackle each turn is longer than the last. Longer fibers obscure the shorter fibers of earlier turns – giving the appearance that all the hackle is a perfect cone of exactly the same length.
It’s beauty were after, remember. Sound science is merely an accidental nicety in our quest to catch fishermen.
“Folding” a hackle is the act of tying it in my the tip and running a right angled object (like your scissors) up the stem to break the fiber’s back and make them slant backwards towards the rear of the fly. This process is shown in all the best fly tying books and is instantly recognizable on the fly itself.
Tying in your hackle by the butts and winding a nymph or steelhead fly’s collar will require you to wrap thread backward onto the hackle to get it to lay down, resulting in a ungainly head that’s got hackle color peeking through – and is prone to damage.
Putting it all together
We started with the least important beautification tips, working our way to the most important. Putting items 9, 8, and 7, together – let’s see how we can use them on a standard #6 Silver Hilton.
Silver Hilton 1: Lead Placement and Downsize
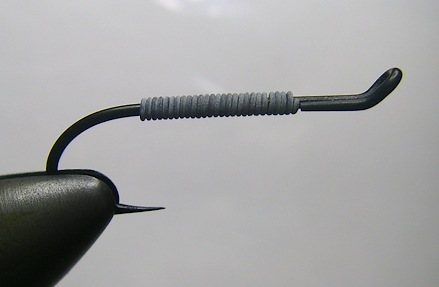
Do I use 10 turns of 2 amp lead wire or 20 turns of 1 amp?
Downsize: I opted for the smaller size as I could cover the body completely – guaranteeing the lead is uniform over the entire fly. No lumps or transitions to worry about and I squeezed in 5 extra turns of the smaller wire, making it heavier.
Silver Hilton 2: Gap fill
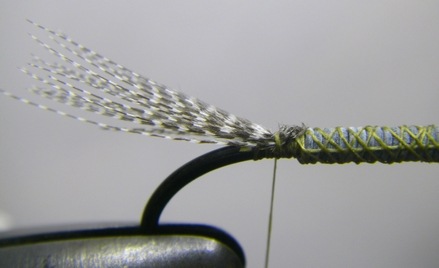
Lead is secured with three runs of 6/0 Olive thread (chosen so you can see it). It’s not going to prevent a vigorous twist between thumb and forefinger – but neither will 50 runs of thread. Thread is always your enemy, use what’s needed and nothing more.
Gap Fill: The teal tail is tied onto the hook shank leaving a transition I’ll address with subsequent materials. The balance of the tail material is trimmed at the rear of the lead, about a 1/4” of tie down/transition remains.
Silver Hilton 3: Gap Fill
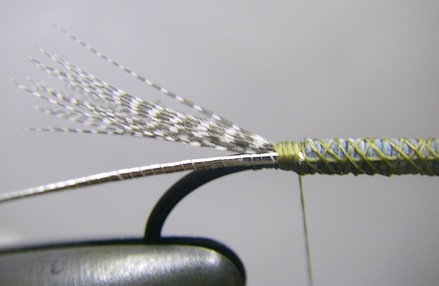
Gap Fill: The oval silver tinsel follows the tail, tied in exactly the same spot and trimmed identically. The “gap” is slowly closing so the transition will be imperceptible on the body material.
Silver Hilton 4: Downsize and Double wrap
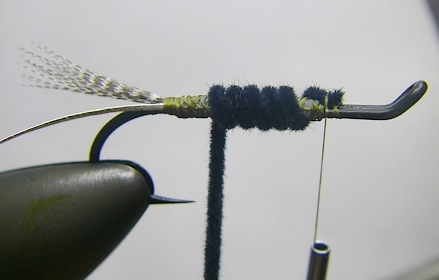
Downsize & Double Wrap: Rather than medium chenille I’m using fine velvet chenille. Regular chenille is just as good but I prefer the finer grained Vernille (velvet chenille) to regular rayon. It’s tied in front so I can make a double pass of the fly body; the first offers bulk, and the second will be drawn tightly over the first to give a smooth gap-free look.
Silver Hilton 5: Double wrap
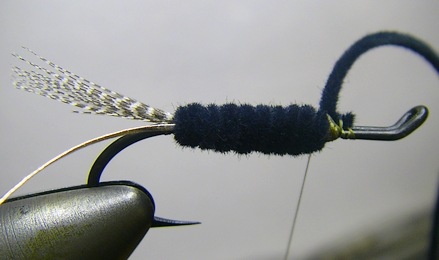
Double Wrap: A nice plush body with a hint of taper, the result of gap fill and the second “finish” wrap of chenille. The second allows me to fill gaps and address contour, resulting in a “fisherman catching” look – and structural integrity.
Silver Hilton 6: Double wrap
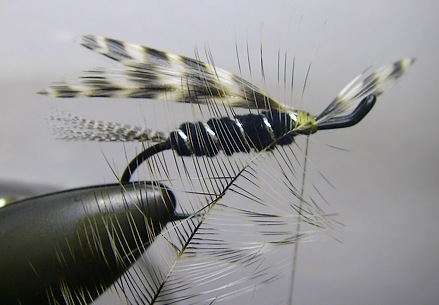
Because of the fly body being a double wrap of chenille, note how the oval tinsel stays on top of the body versus digging into the material and being lost from view. The extra density of two layers means all subsequent materials will not vanish into the “grain” of the wound chenille.
Likely both fish and fishermen can appreciate that …
Silver Hilton 7: Tied in at the tip and folded
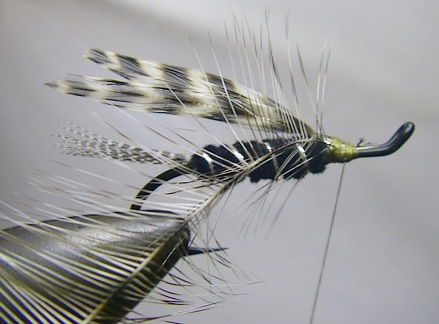
The hackle has been tied in at the tip and folded. I’ve drawn the right angle of my scissors towards me breaking the spine of each fiber and in so doing they’ll point back toward the tail of the fly naturally.
Silver Hilton 8: Folded hackle
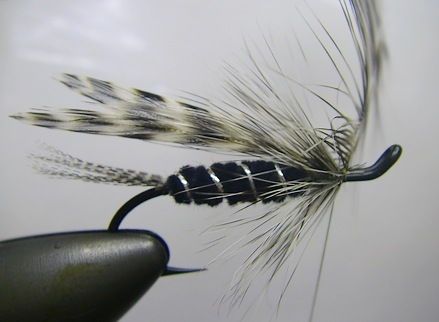
Folded Hackle: The hackling is complete. Note how the hackle lays back over the fly naturally without being coaxed by 65 wraps of thread. In fact, where’d all that thread go?
Because I can “crank down” on the hackle after the first couple of turns, I’ve laid it exactly where I wanted it – covering the thread tie in area we saw in the previous picture. I’m about to start my whip finish and only two turns of thread are visible.
Silver Hilton 9: The final “fisherman catching Sumbitch”
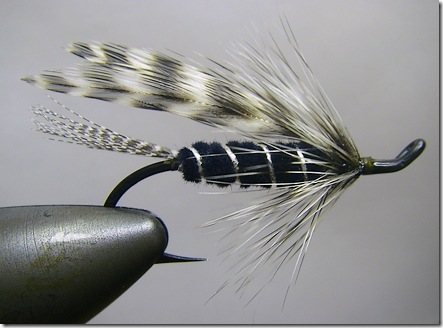
The completed fly.
Tiny head. No gaps or foibles noticeable – and the eye is clean of cement and feather dander. It is a fisherman catching SOB, and your buddies will compliment you with great sincerity while palming all of them off your bench.
Small things that seem trivial, yet added together can make a huge difference in the way your flies look, last – and how they’re perceived by others. It’s of little consequence when running the fly through a riffle as only fish are a true test of what looks tasty and what doesn’t.
In the meantime, if you’ve just finished your six lessons of beginner class and are feeling your oats, you may want to commit these simple steps to memory.
Next Week: Three more pearls of wisdom as defined by hisself and his questionable wit…
Tags: Silver Hilton, lead wire, tapered fly body, folded hackle, Vernille, velvet chenille, Mustad 36890, teal flank, oval silver tinsel, beginner fly tying class, intermediate fly tying, advanced fly tying, flies that catch fishermen

“…Refining your tying for the critical gaze of other fishermen will make your flies sturdier…”
I think this is true. I’ve taken to joining in fly-swaps as a way to improve technique. I always choose a new pattern for the swap and then learn to tie it with the knowledge that I’ll be giving them to other fly fishers. It makes me a much more careful tyer. All the little details may not matter to the fish, but some do. Plus like you said – you end up with sturdier flies when you use good technique.
Great post! Keep these coming.
I’ve been tying tons of steelhead flies lately, and always end up doing the 65 wraps of thread to make the hackle lie down properly, and end up with an unsightly head in the process.
Excellent tips.
spencer
Spencer,
Here is a short tutorial on “folding” a hackle, most books have the technique – but it’s often not featured prominently. Often mentioned with English fly tying or wet flies.
http://www.hawaiilure.com/feathers.html
About 1/2 way down the page. Describes the process using fingers (and spit) versus the “right angle spine buster” method.
Pingback: Tying Flies for the Approval of Others and Maybe the Occassional Fish « SwittersB & Fly Fishing
One of the many great things about fly tying is the multiple solutions to simple problems. Lots of ways to do it and all will work. To wit; chenille can be easily trimmed to a taper, lead underbodies can be tamed using sports wrap though it is an extra step, winding hackles in reverse and coming through with the thread as a rib will somehow make the hackle lay well without many wraps. The wonder of it all.
Top post KB….Nuff said!
Pingback: New Fly Tying Tools: "Sixth Finger" Scissors : Avid Fishing
Great demo
Pingback: Part 2 – Singlebarbed teaches the fundamentals of fly beauty | Singlebarbed
Pingback: Part Last – Singlebarbed teaches the beauty secrets of the Shao-Lin Masters | Singlebarbed