Fly fishing from a kayak is a welcome transition for the heretofore shore bound angler, as many of the issues that haunt slippery rocks and low hanging branches vanish with the mobility that boating offers. There are also many new hazards you’ll encounter and many tendencies that must be left on shore where they belong.
Getting Your Mind Right, dealing with Hoarding Instincts
 The only storage constraint on the wading angler is the capacity of his fishing vest. The practice of wadding everything into a maze of pockets to resupply the angler afield has morphed into a garment carrying old sandwiches, partially consumed protein bars, fly boxes, foam floats, rain ponchos, snakebite kits, tippet spools, insect repellant and the obligatory snarl of toilet paper.
These hoarding instincts we learned early as doting parents insisted our “angling empire” fit into one tackle box, later one fly box, and culminating into one overly warm car trunk, or closet.
While there are many kinds of kayaks and all with different options, angling kayaks offer the illusion that you can increase the amount of gear carried as the boat does the physical lifting instead of you. Suddenly that onboard storage sprouts neo-essentials like; extra drinks, dry clothes, spare spools, baby diapers (from a prior adventure) and a backup rod, and you must resist this hoarding instinct – as it will be your undoing.
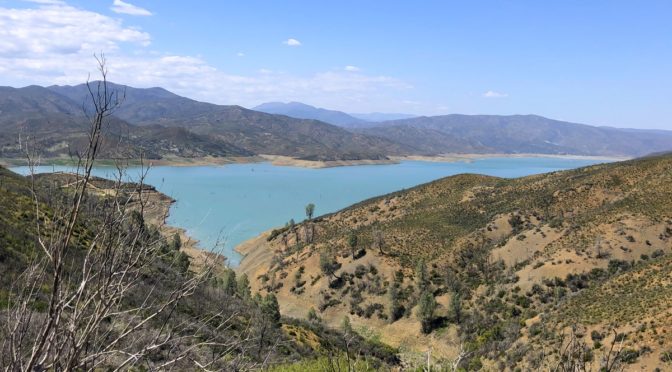
The size and weight of your boat will influence where it can be launched. Longer kayaks are faster in the water but can be heavier on land. Wheel assemblies can be added to most kayaks to equip them for pavement, dirt, or beach sand, and assist the launching process tremendously. The wrong wheel type makes the launch extra burdensome, as thin narrow pavement wheels will dig into mud or sand and make the boat hard to move. New or strange lakes offer unknown launch scenarios and our Western states are in a multi-year drought, complicating matters further. As lake levels recede due to drought, the distance between parking area and the water’s edge increases. Man made lakes are typically steep “bowls” designed to as much water as possible, so it’s not a long, level walk to the water’s edge – it’s a sloping downhill slide with your kayak threatening to alternately run you over or drag you downhill.
Complicating things further is the composition of the newly exposed slope, which is often alternating bands of decomposing rock, loose soil, and shale. As you near the water include weeds and scrub growth, as well as sand and mud, ensuring your footing and launch are a mix of dicey and downright treacherous.
Fortunately, the easy part is getting the boat downhill … Gravity is a willing accomplice and while strenuous, rolling the boat down to the water’s edge gives you an invisible helper.
The return trip is another story…
After a long day on the water you have a physical and arduous climb UPHILL to the car. Cart wheels will fight you on every rock and root, dig deep into mud or loose cobble, and your footing will be uncertain due to loose shale and gravel, making that 100 yard trek back to the pavement nothing short of heart pounding torture. Adding to the mix is all the water you added into the hull via pedal motor housing, or simply slopping it into the boat via flopping fish and exuberance.
Many launch scenarios may have your boat out of sight of the parking lot. Multiple trips to offload gear could find you leaving the boat filled with valuable tackle, cameras, and other expensive items undefended, in a high traffic area like a day use area or beach. You need to keep your boat light enough to handle the return all gear to your vehicle in a single trip.
Be frugal with gear. Consult the dry weight of the boat and remember you will be adding food, drinks, tackle, anchors, drink holders, floatation devices, and many things you have no expectations of owning … fish finders (containing transducers, batteries, and cable), anchor trollies, milk crates, rod holders, onboard wheel assemblies, and assorted cordage, cable ties, and pool noodles.
Traditional paddling kayaks (sit inside kayaks) are light with many 12 foot models only 50-65 pounds. Angling kayaks (sit on top kayaks) can weigh twice that as they contain many amenities unnecessary to a paddle kayak. Seats, storage, battery harness, cable controls, and pulleys all add extra weight, and boats can weigh over 100 pounds dry.
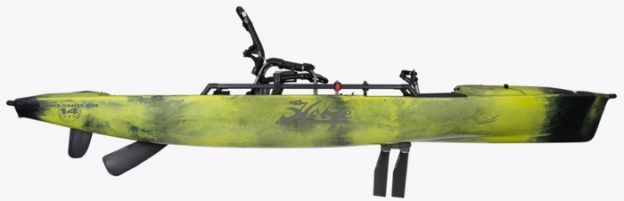
My Hobie ProAngler 360 kayak is 12 feet long and weighs 105 (2020 weight, 2022 weight is 109.5) pounds empty. It is the “leaden battleship” of angling kayaks, not due to its size – rather due to its features and ability to expand via the Hobie Rail System. Assume you’re carrying nearly 40 pounds of tackle, 10 pounds of anchors, cordage and landing nets, a couple of rods, 5 pounds of drinks and food and all the leashes, tethers, and floatation devices (PFD), and you’re likely to tip the scales at 160-170 pounds, counting the inboard water. This is not a trivial burden on a thirty degree slope with uncertain footing …
You need to remain vigilant on what you add to your kayak, and you need to unload items unique to a specific trip on your return – so they don’t add unnecessary weight to your boat. Lowrance and similar fish finders are easily mounted to your new kayak, but do you really need to know there are fish fifty feet below you? Fishing a jig, fifty feet is nothing, fishing a fly and that same fifty feet is an insurmountable depth.
I carry a thermometer instead. I can check water temperature as needed, and while it’s not as convenient as on a Hummingbird screen, it is a hell of a lot lighter.
I can’t tell you which kayak is best – neither can the staff that sell them ..
There are many really good angling kayaks, most run between $1500 –$5000, which is significant cost, nearly all are worth every penny spent.
There is no “best” kayak, there is however a “best” kayak tailored to you, your needs, and the uniqueness of your fishing. Some will use them in both freshwater and salt, some in still water only, some for fly and spinning, some will troll, some in estuary or riverine environments, all will be stable and seaworthy craft, but the features you need for fly fishing are not obvious …
Pick your new kayak based on its power plant, its ability to reverse direction (instant reverse), and extensibility. These are unquestionably the most important features for fly fishermen.
Power Plant: Pedal versus Paddle: Both work, but one seems tailored to fly fishing
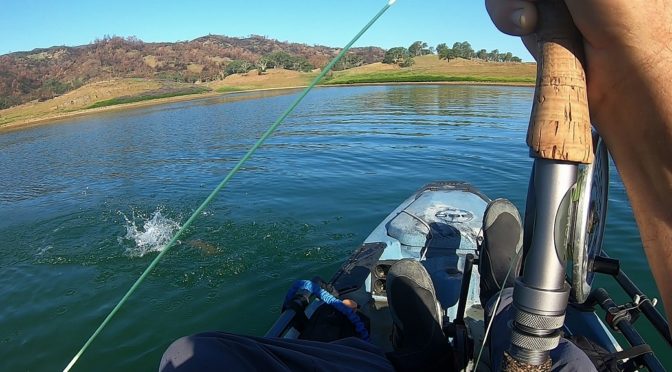
 Fly fishing is a uniquely “hand intensive” fishing style. We require constant contact with the rod and line to cast, mend, gather, and impart motion to the fly. Paddle kayaks require two hands gripping the kayak paddle, pedal kayaks are powered by an angler’s legs, leaving both hands free to cast or strip while the boat is under power.
Personal Opinion ** : My personal opinion is that pedal kayaks are best suited for fly fishermen, as they offer the unique ability to cast and move at the same time. Paddle kayaks are fine for fly fishing, but you have to lay down the rod to move any distance, and you’re constantly swapping rod and paddle, allowing running line to catch on all manner of things in the boat as you paddle to adjust your attitude towards shore or target. You WILL drop things in the water if you fish enough, do you want to risk your rod to the Briny Deep?
Pedal kayaks have two basic styles of motion; pedaling a propellor-equipped or pedaling a fin equipped motor for locomotion. Hobie uses “fins” to move the boat, all of the other manufacturers use the more traditional propellor for locomotion.
Regardless of the style of pedal motion, the core issue is your ability to snag the drive with your fly – or run over your fly line with the boat and get it tangled with the prop, and the motor’s ability to kick up when hitting an underwater object. Hobie fins have a hinge allowing them to fold up when striking an underwater object and restore themselves to the original configuration on the next power stroke. Prop drives have the ability to “kick up” in the same manner, but not all of them can do so, so it’s something to check on the boat, model, and manufacturer you’re contemplating.
You will hit underwater objects especially when you forget to retract the motor when landing the boat, or when you loan the craft to your idjit pal.
I have snagged my rudder, skeg, and fins while fishing, and it is problematic – but not overly so. You will learn to keep your fly line away from the boat as wind and pedaling can move the boat over your fly line and fly quickly. A tangle in the running line – or a few turns of loose line snagged on something inside the boat cockpit, and you risk getting the fly and line under the boat if under power. Recently, I disabled my rudder by snagging a large striper fly in the hinge and had to land the boat to remove the fly and restore rudder function.
With practice you will learn to stop your pedal motion and pause before casting. Kayaks are quite graceful in the water, and the boat will continue to move forward for 20 feet or so when you stop pedaling. Releasing your cast as the boat loses forward momentum means you do not roll over the line and do not have to frantically strip to catch up to the fly.
Instant Reverse: Floating Physics and the unique complications of kayak fly casting
 A traditional “sit on top” fishing kayak has the angler seated about two thirds of the way down the boat towards the stern. The angler is a “sail-like” object, so his profile and its resistance to wind will add motion to the boat in any breeze.
If the wind is behind the angler the boat will drift forward, wind in front, boat will drift backward, etc. Motion of the boat will add drag to the fly, or make it move twice as fast as intended, given how the boat can swing in circles due to its “off center sail”. A fly fisherman will need to constantly adjust his attitude to his fly, as the boat can move in any direction at any time.
This is markedly different from the wading angler, who remains motionless while adjusting the line between him and the fly.
“Instant reverse” describes the ability to change the boat’s direction quickly, and has multiple flavors among the many kayak manufacturers. Because of the vagrancies of wind on the angler, instant reverse will be among the top three issues of your fly fishing experience, as you will be constantly adjusting the boat and its angle to the fly or shoreline.
Hobie kayaks have multiple flavors of reverse on their pedal kayaks, those that use the 180 drive require you to reach down and pull a cable to initiate reverse (the same to resume forward motion), and the newer 360 drive, which allows the motor to thrust at any angle in a 360 degree arc, requires you to turn a handle to pick the angle of thrust. Instant reverse then requires the handle to be spun 180 degrees to go backward, and returned 180 degrees to resume forward motion.
Propellor kayaks only require you to stop pedaling forward and pedal backward to reverse boat motion. Prop driven kayaks are superior to all others in this regard – and in my estimation are the only kayaks that offer true “instant reverse.”
I’ve not owned the propellor flavor, but having spent four seasons on a Hobie 360 – I am quite comfortable turning the handle while the boat is under power (as the rudder handle and motor thrust handle sit atop one another). The 360 Drive offers other mobility features superior to propellor kayaks as the drive thrust allows it to be turned without moving the boat forward, which is a huge advantage in tight quarters (think maneuvering in snags, docks, and chasing largemouth bass).
Personal Opinion**: Propellor based kayaks have true instant reverse, and in my estimation are superior to all others save paddle kayaks, which also have human powered “instant reverse” (typically preceded by the exclamation, “Oh, sh*t” …). The Hobie crank handle is fine, it’s simply not hand’s free like the propellor flavor. You never can have too many hands when managing fly line, boat motion, and sharp things flying in your direction …
Extensibility and all the gadgetry (weight) therein
One of the more important features in kayak selection is what extensions and capabilities can be added via third party. Hobie kayaks use a proprietary “H-Rail” system to attach additional features and connectivity to the boat. Their “H Rail” can be adapted to other standards via Scotty mounts, or RailBlaza Starport mounts. These connections to the boat allow you to add additional features that don’t come with the boat like fish finders, storage, GoPro Camera masts, rod holders, and dozens of other gadgets.
Hobie produces a generic plate mount attachment that allows you to modify, screw, or glue anything you wish to their hexagonal rail attachment, think Boom Box or similar outlandish need. Railblaza makes a similar, rotating platform attachment that is pre-drilled and can be modified, other vendors offer similar functionality.
Whichever kayak you fancy, ensure it has ample extensibility or you will regret the purchase. Not knowing what’s needed in the future or how your angling will change with a job related relocation, the extensibility of your kayak will determine how soon you outgrow it or whether that will happen.
When reviewing watercraft, determine which type of mounts and rails come native to the craft. Many of these can be added to older boats but require drilling holes in the hull, which adds additional issues with sealants, leaks, and the potential to weaken the craft via extensive modification. If you’re not being gifted a kayak or the sudden beneficiary of some similar freebie, I would recommend the purchase of a kayak that contains rails built into the superstructure or hull. The manufacturer choice I’ll leave to you, but get something allowing you to add to the base craft via supported mounts.
As other family members are likely to use your craft and don’t share your passion for fly fishing, the ability to add a drink holder or trolling rod holder may be highly desirable. Kayaks are a pleasant way to enjoy the out-of-doors and you don’t need to be a Purist to enjoy a comfortable seat, warm sun, and a “stroll” around the lake. In fact, the “smart” lad will market the purchase as a “family friendly” non-gas guzzling, Green Initiative – as the price tag for The Beast will have to be negotiated.
There are other ways to add capabilities to your kayak, most are tailored to the specific craft or extensibility it offers; rails versus mounts, etc. I will cover some ways to modify the Hobie when I write about the specific configuration I employ on my 12’ Hobie ProAngler 360.
Leashes and the need to strap everything down
Kayaks are tippy regardless of their size, and like canoes, standing up risks a bath. Kayaks are flat bottomed and lack a keel, so an aggressive lean to see or grab a fish coupled with a broadside wave strike and you could flip your boat instantly. Most angling kayaks are stable, and their stability increases with length, but the threat of an unexpected dunking is quite real, especially if you do something stupid.
Big fish make people stupid.
So does alcohol.
… as does that 24’ ski barge that rounded the point filled with liquored up Millennials … whose wake is about to sink you.
Everything you bring onto the boat must be securely stored via locked hatch or leashed to the superstructure with a lead designed for that purpose. This means once the hull storage is full, each item must be attached individually to the boat if you want to keep it. Paddle, Landing Net, Tackle containers, rod, drinks, food, pedal drive, yourself, anchor, absolutely everything not sealed within the hull must be leashed. If the boat flips, and it will, everything will disappear into the depths or float away while you scramble to get back aboard.
I am leashed to the rail as well. This way the boat cannot move more than six feet from me once I tumble into the water.
My Hobie ProAngler has restraints for extra rods that hold spinning or casting rods tight to the hull. These will not work for fly rods as fly rod pieces are too numerous and slender. I will lose my rod if I tip the boat and relinquish my grip on the handle.
So be it.
Your pedal drive and paddle are the only means of locomotion for the boat. I leash both to the Hobie rail, as the paddle is the backup to the pedal drive and I need at least one to make it back to shore.
My landing net is leashed to the hull in similar fashion and has more than one use in the boat. As it’s likely to be in your other hand when landing a big fish, and that fish could make me forget prudence, it will be lost if I roll the boat with the rod in the other hand. Hence the leash.
I reserve the hull storage for the expensive stuff. Lures and Plugs for largemouth when casting or spin fishing, first aid kit to stop bleeding and bandage the hook punctures, waterproof container with wallet and car keys, and all those tiny packages of split shot, strike indicators, fly boxes, GoPro batteries, leader spools, and hook hones. (I will elaborate on this configuration in future articles tuned to my specific craft.)
Your rod is the only wild card in this mix, as a leash is unwieldy due to the casting motion. I opt not to leash my rod and recognize the potential for its loss.
If you wish to keep it, it must be attached to the boat.
There is no exception.
No FIshing Vests needed
 Sudden immersion is a shock, and while you recover and begin to tread water – are you going to reach for the boat or your rod as it disappears into the water?
If you’re not leashed to the boat and there’s a stiff breeze your kayak will be moving to windward as soon as you hit the water. By the time you resurface it might be eight or ten feet distant, and if you’re in deep water you might be in trouble.
To hell with the rod, you go for the boat as it may be the only thing between you and drowning.
You must wear a Personal Floatation Device (PFD) in your kayak as the risk of flipping climbs with the popularity of the waterway, inclement weather, big tides, and drunken boaters. Choose a vest that is designed for swimming, not one designed for the crowd that frequents big party barges and hang on the cabin wall unused. California boating regulations require all kayakers to wear a PFD equipped with a whistle for alerting other boaters. As the PFD will preclude the use of a fishing vest, you will need to design a new tackle storage solution that allows the same freedom of access as a vest, yet will be leashed to the boat (with all zippers closed) when not in use. (I will describe my system in a future article on Hobie configuration).
Your PFD can have floatation around your shoulders but make sure it doesn’t have any in the lower back area. Any padding near the lower back and waist will interfere with your boat seat and your posture, making the seat less comfortable.
I opted for a Stohlquist Fisherman, as it had a few extra pockets, no padding on the lower back, and is of the “swimming” style. These can be pricey, but being a life saving device is worth every penny.
If you use the boat in salt water many anglers stuff the kayak with pool noodles to allow additional buoyancy. The assumption is that the closed cell foam will ensure the kayak floats if upside down or full of water, giving you something to cling to while you BLEAT frantically on your attached whistle ..
Polypropylene is your friend. Poly won’t absorb water, so clothing that is windproof, rain resistant, and made from Polypropylene will provide additional safety. Big woolen sweaters, Levi jeans, and layered cotton shirts are all barriers for wind and cold, but they will absorb many pounds of extra water when immersed in the lake. If you flip your boat you will have to get back in it unassisted. If you are away from shore you will need to climb in via the nose or stern, or learn to belly up into the cockpit and pivot into the pedal well. If you have an extra fifty pounds of water in that sweater/jean/shirt/jacket combination it will reduce your ability to lift yourself out of the water and back into the boat.
Buy windproof clothing in bright colors (visibility matters) that doesn’t absorb water. Wear wetsuits in the salt (especially on the West Coast) and leave shoes in the car. Wet suit booties offer both floatation and will not absorb water when soaked and are much superior to shoes or sneakers. Most of your launches will be in muddy terrain and wet shoes and socks put a damper on the day no matter how pleasant the weather and fishing.
You’re more mobile than the fellow with the V8, respect the launch and dock protocols
Gas guzzling V8 owners replete with their spiffy Dodge RAM and attendant entourage actually need the dock to launch – you can shove your boat in the water with less fuss. If you are launching your kayak at a traditional lake launch frequented by big boats on trailers, prepare your boat at your truck and avoid using the dock for anything but the launch.
The standard wheeled cart assembly allows you to load your boat with tackle, clothing and food while at your truck. You can string your rod and place it into the kayak at the same time. Only when you are ready to launch should you move into the path of the dock and motorized launch area. Be polite, courteous and fast. If you are carrying your wheel assembly back to the car then keep your boat to the side with the least traffic, and only do so if the distance is short. These launches are designed for the motorized angler and their ritual requires additional maneuver compared to us kayak types.
Anyone learning to back a boat in the water requires considerable space, so give it to them regardless … never insist on imposing your will on a craft whose wake can swamp you.
This advice is doubly important at the end of the day when the crowd at the dock is liquored up and sunburnt. Don’t risk aggression by dawdling at the launch area with your boat, get it out of the water and into the safety of the parking area before wiping it down or storing gear.
Summary:
The move from wading angler to kayak angler requires money and a lot of thought to established fishing practices. Many of the tendencies developed from years of angling need to be retooled and rethought rather than simply ported to the new craft. Everything you bring onto your boat is a liability and subject to loss, so you need to plan your storage and leash system – and you will require several seasons before the configuration you chose will become second nature, so plan for an evolution of your boating behavior. Closing tackle boxes and zipping up your fly box will be cumbersome and inefficient at first, but losing the entire collection to the lake is far worse – and may even end your trip completely.
Expect to evolve your kayak use, don’t assume it will all go swimmingly despite hours of YouTube review and classes attended.
Keep weight and items to a minimum, especially if you’re in a drought area.
Assume a new or strange lake might have a poor launch facility, one that requires portage of boat and equipment to the water. Try to keep it to a single trip from car to water, if you can’t then prioritize your valuables based on the risks.
Anything not tied to the boat will be lost, that includes you.
Dress for success, avoid items that absorb and retain lots of water.
If forced to comingle with power boats, use the dock sparingly and fast. Do not rig tackle or dawdle. Save the fish stories for the parking area, not the boat dock.


 Actually, I’m flattered … First the